How to create videos using an API [Complete guide]


Summarize with





Creating videos using an API means sending instructions and data to a video platform that automatically creates the videos for you.
Yes, that means you can generate 100s or 1000s of video versions without manually opening the same project over and over again only to change a name, image, price, or any other variable. And sure, making one small edit is easy enough. But repeating it a hundred times can really test your patience. Trust us, we know.
Now, automating video production this way requires knowing your way around the code, so it’s best suited to developers and technical marketers, or anyone else who wants to automate video creation through an API, really.
If you happen to be one of those people, you’re in luck, as in this guide, we’ll show you how to set up that video creation process using none other than the industry standard for motion graphics, Adobe After Effects, and our very own Plainly Videos. We’ll walk you through each and every step, starting from preparing your template to rendering, and finally, delivering your high-quality videos.
What is a video creation API?
A video creation API is an application programming interface that lets your software create videos and edit individual video elements through code. Depending on the platform, the API lets you programmatically replace text, swap images and footage, change colors, or add different audio.
There are 4 main types of video creation APIs, and they all work in a different way:
- Template-based video creation APIs
- Programmatic video frameworks
- AI video generation APIs
- AI avatar APIs
A template-based video editing API, like Plainly’s, lets you take one video template and automatically change its text, images, colors, or other elements based on your data.
For our client Tapni, a company that makes digital business cards, that data came from customers’ business card designs. Namely, whenever someone designed a card but left without buying it, Tapni used our API to generate a personalized video showing their design, then sent the video link in a follow-up email to give them a little nudge to complete the purchase. And it worked! The result was a 10% increase in conversions among customers who abandoned their cart.
Types of video creation APIs
As we mentioned above, there are 4 main types of video creation APIs and tools. The best video API for you depends on what you actually want to create. The table below covers their key features to help you find the right API for your project.
Step-by-step guide on how to create videos using an API
Now that you know how these APIs work, let’s get to the practical side of this guide.
In the sections ahead, we’ll walk you through the workflow we use to generate a video programmatically. More specifically, we’ll show you how to upload your own After Effects template to Plainly and use our template-based API to create and render new video versions.
That’s exactly what our client, WPP Production, did. They connected our API to WPP Open Production, a platform they already used to produce images, banners, and HTML5 videos, so their teams could also set up templates and render After Effects videos from the same place.
And to help you do the same, we’ll include code examples along the way, so you have a starting point for your own API integration.
If you don’t have a template of your own just yet, don’t worry, as you can also pick one of the ready-to-use designs from our template library - they work through the API as well.
1. Create your API key
First things first, you’ll need to set up API access for your application. For that, you need to create an API key so Plainly can authenticate the requests you send.
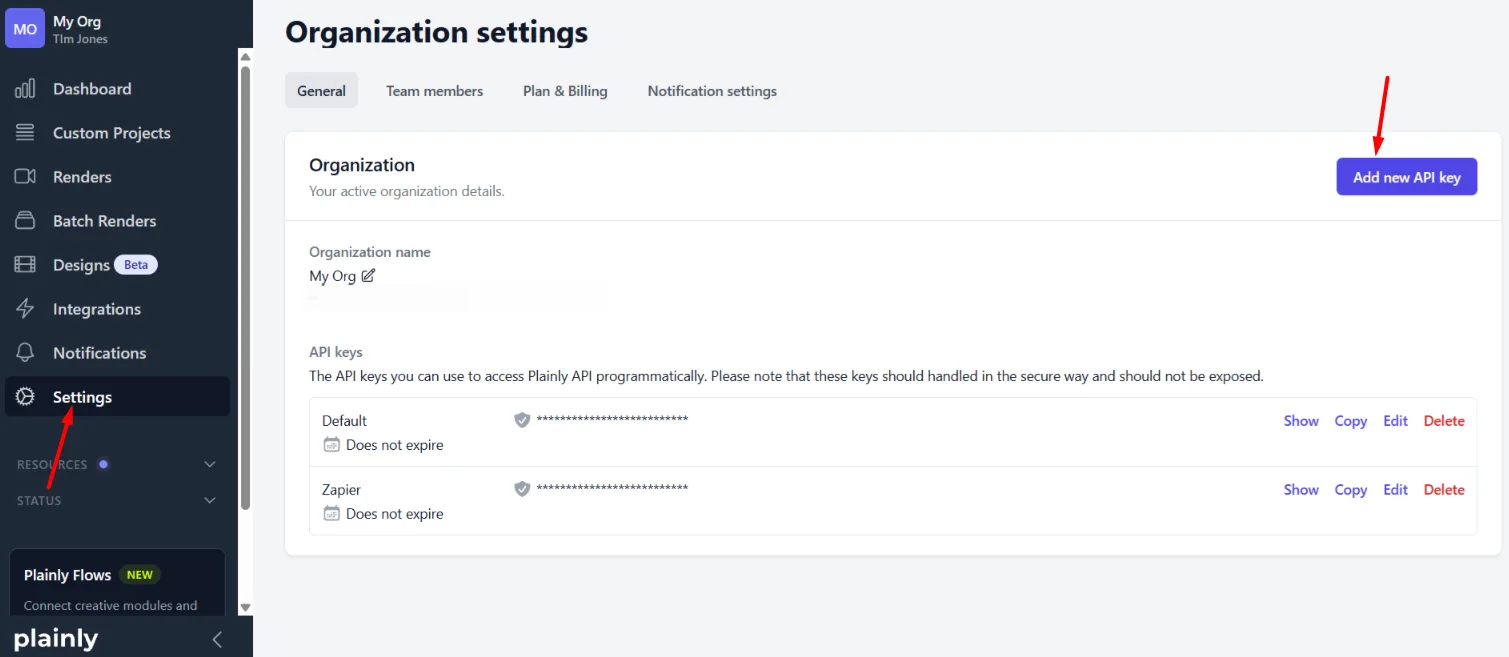
To create one, log in to your Plainly account and navigate to Settings in the left sidebar menu. This opens the Organization settings, where you will find the Add new API key button you need to click.
Once you do, the pop up will appear, where you need to enter a nickname for your key. If you want, you can also choose an expiration date and set storage or rendering minute limits. There is also a Personal access token option if you want the key to belong to your user account rather than the whole organization.
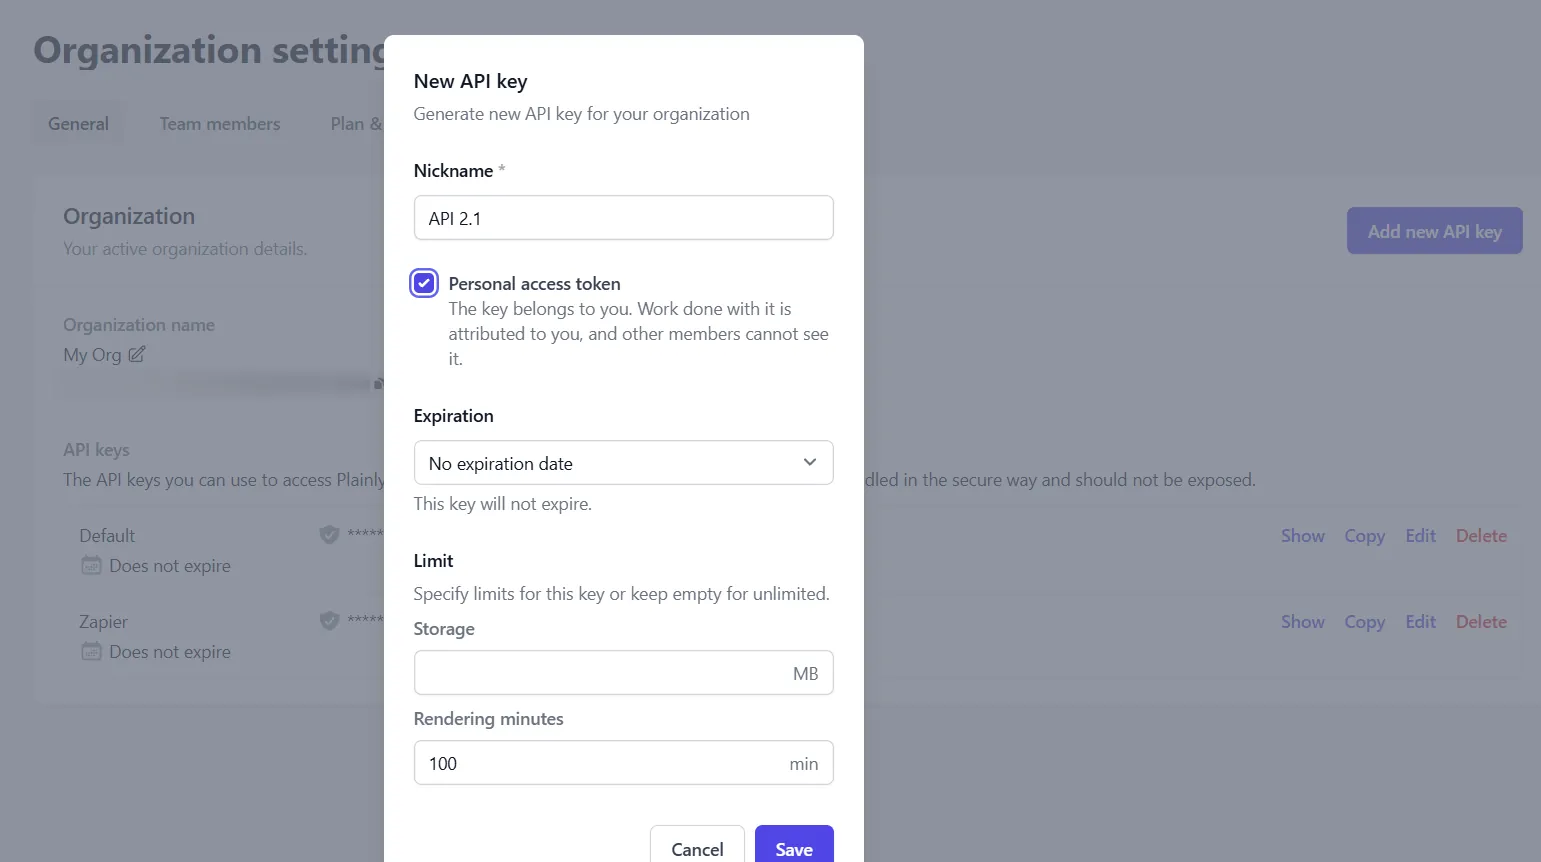
After you’ve filled everything in, click Save. And just like that, you’ll have a brand new key you can copy whenever you need it for your API requests.
It’s important to know that Plainly’s REST API uses HTTP Basic authentication, which means your API key goes in the username field, while the password stays empty. Also, all requests use https://api.plainlyvideos.com as the base URL.
2. Create your master template with dynamic layers
Next, you’ll need to create your master template in After Effects, which will be the base for your After Effects automation. If you need different aspect ratios for different platforms, plan those compositions here, too.
At this stage, you also need to decide which layers you want to make editable and add a common prefix to their names. For example, you can use a prefix "edit".
Say you want to make the text and logo layers editable. In that case, you should rename the layers to:
- editText
- editLogo
This nifty little naming trick will save you time when creating the template in Plainly, as the tool will use that prefix to automatically identify and parametrize the matching layers later on, rather than you doing it manually.
When you are finally happy with the design (and after you’ve renamed the editable layers), package the entire project with all assets into a zip file. Or, if you’d rather skip collecting the files yourself, use our After Effects plugin to do it for you.
3. Upload your project
With your project zipped up and ready, it’s time to upload it to Plainly.
You can do this through the web app or plugin, sure. But since everything you can do in the app, you can also do through the API, we’ll stick with the API for this guide.
To upload the file, you will use the POST Create Project endpoint, which accepts these fields:
- file
- fileUrl (a URL pointing to your zip, which Plainly can download if the file is hosted online)
- name, description, and tags
- folder
- aeVersion
- ignoreMissingFiles
You’ll need to provide file or fileUrl, whereas the other fields are optional.
For the purpose of this guide, let’s say we uploaded a file called my_project.zip, gave it a name My Project, and the description ‘’My video template for API video creation’’.
In that case, here’s what our Bash/cURL request would look like:
curl -u "YOUR_API_KEY:" \
-F file=@my_project.zip \
-F name="My Project" \
-F description="My video template for API video creation" \
<https://api.plainlyvideos.com/api/v2/projects>
For your own video workflows, simply replace YOUR_API_KEY with the key you created earlier and my_project.zip with the actual name of your zip file.
After the upload succeeds, you will get a JSON response containing your project’s details. Grab the project ID and keep it handy, as you’ll need it to reference this project when creating the template and rendering your videos.
Plainly will analyze the project after upload, which may take anywhere from a few seconds to around a minute, depending on its size.
Before moving on, use the GET Single Project endpoint to check its status.
And if you have any issues, you can also check out our analysis troubleshooting guide, which covers the most common ones.
4. Create the template
Now that your project has been uploaded and analyzed, you need to create a template from it using the POST Auto Create Templates endpoint.
This is where the edit prefix we added earlier comes in handy. In fact, Plainly will use it to find the layers you want to make editable, so you won’t have to set up each one manually.
The available fields depend on whether you use prefix or the all type, but we’ll focus on the former here:
- type (prefix)
- prefixes (prefixes used to match composition and layer names)
- stripPrefix (removes the prefix from generated parameter names)
- targetCompositionName
- applyTextAutoScale (automatically scales text to fit the original text dimensions)
- applyMediaAutoScale (automatically scales images/videos to fit the original media area while keeping the aspect ratio intact)
- excludeGuideLayers (skips guide layers used as visual references while designing your template)
- excludeAdjustmentLayers (skips adjustment layers, which apply effects to the layers below them)
- excludeDisabledLayers (skips layers you’ve switched off in After Effects)
- excludeShyLayers (skips layers marked as shy)
- applyExclusionsToCompositions
- parametrizeInAllCompositions (looks for matching layers across all project compositions in prefix mode)
That said, here’s the request for a project whose rendering composition and editable layers use the edit prefix:
curl -X POST https://api.plainlyvideos.com/api/v2/projects/YOUR_PROJECT_ID/templates/auto-generate \
  -u "YOUR_API_KEY:" \
  -H "Content-Type: application/json" \
  -d '{
    "type": "prefix",
    "prefixes": ["edit"],
    "stripPrefix": true,
    "applyTextAutoScale": true,
    "applyMediaAutoScale": true,
    "excludeGuideLayers": true
  }'
Once the request succeeds, find your newly created template in the response and grab its ID. Keep that, as you’ll need it when rendering your video.
You’ll also get the parametrized layers, so keep their parameter names handy, too, as you’ll need them in the next step.
5. Render your video
With the template set up, you can now start generating videos using the POST New Render endpoint.
We’ll create a single video for this example. But if you need multiple versions, you can also batch render through the API.
The fields you can pass are:
- projectId and templateId
- parameters (replacement values for your template’s dynamic elements)
- properties (overrides for supported properties of parametrized layers)
- outputFormat
- options (additional settings, such as captions, thumbnails, watermark, download options, upload options, integration options)
- attributes (your own render metadata)
- webhook (to notify your application when rendering finishes)
For the request below, we’ll use a sports video where the team names and logos change for each match. These parameter names are just examples, though, so use the ones returned for your own template in the previous step.
curl -X POST https://api.plainlyvideos.com/api/v2/renders \
  -u "YOUR_API_KEY:" \
  -H "Content-Type: application/json" \
  -d '{
    "projectId": "YOUR_PROJECT_ID",
    "templateId": "YOUR_TEMPLATE_ID",
    "parameters": {
      "Team1": "Riverside Hawks",
      "Logo1": "https://example.com/logos/hawks.png",
      "Team2": "Northside Wolves",
      "Logo2": "https://example.com/logos/wolves.png"
    },
    "options": {
      "thumbnails": {
        "atSeconds": [2],
        "format": "JPG"
      }
    },
    "webhook": {
      "url": "https://your-app.com/api/webhook",
      "passthrough": "matchup-42",
      "onFailure": true
    }
  }'
As before, replace the API key, project ID, and template ID. You’ll also need actual image URLs that Plainly can access and a working webhook URL for receiving notifications.
6. Download and distribute your videos
Speaking of webhooks, once your videos are rendered, Plainly will send a webhook notification with the download URL.
Now, keep in mind that the tool doesn’t store your videos forever. The storage period depends on your plan, so make sure you check the plan details and the video expiration date on time.
And if you’d like to automate delivery as well, you can use our native integrations to send finished videos straight to Google Drive, Dropbox, Frame.io, or YouTube.
For a custom storage destination, you can also use signed URL uploads, where you provide a pre-authorized upload URL when submitting the render request, and Plainly uploads the finished video there. Just make sure the destination accepts that upload method, and the URL stays valid long enough for rendering and upload to finish.
Create videos using an API with Plainly
And that’s how you go from an After Effects project to a setup that can create and deliver new video versions through an API. You prepare the template, define which layers should change, and set up the requests that handle rendering and delivery.
There’s some prep work involved, sure. But once it’s done, you can reuse the same template with new data without going through extensive editing each time. That could mean changing a customer’s name, updating a product image and price, or anything else really.
So, if you’d like to see how this would work with your own project, book your Plainly demo. We’ll walk you through the setup for your particular use case and help you get started with automated content creation on the right foot.