CSV to video [Step-by-step guide]


Summarize with





CSV to video means taking the data that already lives in your CSV file and using it to create hundreds, or even thousands, of unique videos automatically.
And yes, you can absolutely do that without manually opening the same video project over and over again just to change a name, image, color, product detail, or any other variable.
In this tutorial, we’ll show you the ins and outs of leveraging CSV files for video production. We'll guide you through the very workflow we've been using for years, and it involves none other than the industry standard Adobe After Effects and our very own Plainly Videos.
By the end, you’ll know how to prep your template, format your CSV, batch render your videos, and deliver them without losing your mind in manual edits.
What is CSV to video?
CSV to video is the process of using data from CSV files to create videos automatically.
Now, unless you’ve been pulling a Patrick Star and have been living under a rock, you already know what a CSV file is. Short for comma-separated values, it’s basically a simple spreadsheet format made of rows and columns.
In a CSV-to-video workflow, each row or line in a CSV file represents one video, whereas each column contains the data that should appear in that one video. The data can be anything from names, colors, image URLs, voiceover text, prices, locations, and other variables.
To paint a better picture, let’s say you have a hundred products listed in a CSV and want to use data-driven personalization to create personalized content for a campaign. That same file can be used to create 100 unique videos. Each of these would have the same structure and consistent formatting, but show a different product name, image, price, CTA, background color, or anything else you defined. What's best is that you can use CSV files to create videos regardless of whether you're working with small or large datasets.
Now, it would be impossible to convert a CSV to video using this type of file alone. And sure, CSV converters do exist, but they won’t magically create an MP4 for you. They can only help reformat or move data.
To actually turn CSV data into video content, you need 3 components:
- A CSV file (duh! )
- A template - typically made in After Effects given it’s the industry standard for motion design
- A video automation software such as Plainly to actually connect the CSV with the template and render the videos
How to turn a CSV file to a video step-by-step
Enough theory, let’s talk practice.
In the rest of this blog, we’ll be showing you how to replicate the CSV to video flow that’s been the core of our video production for years.
To follow along, you’ll need:
- A CSV file
- Adobe After Effects
- Plainly
But if you’d rather watch than read, you can also tune into the video below.
Now, let’s get started!
1. Create your video template
First things first, you need to create a video template in After Effects.
This is the base project Plainly will use to generate all your video files, so the idea is not to create hundreds of separate videos. Instead, you create one template and decide which elements should change from one video to another.
These can be:
- Text
- Images
- Videos
- Audio
- Colors
- Product details
- Any other layer controlled by data
Once you know which layers should be dynamic, rename them using the same prefix. In this tutorial, we’ll use the prefix render, so your layers could look something like renderName, renderImage, renderColor, or renderPrice.
Why does this matter?
Because the prefix tells Plainly which layers should later be replaced with data from your CSV file.
Once the template is ready, package the After Effects project file using the Plainly Videos plugin, or zip the full project folder manually, including your .aep file and all linked assets.
2. Upload your template to Plainly
Project zipped up and ready to go? Let's choose a template you just created and upload it to Plainly.
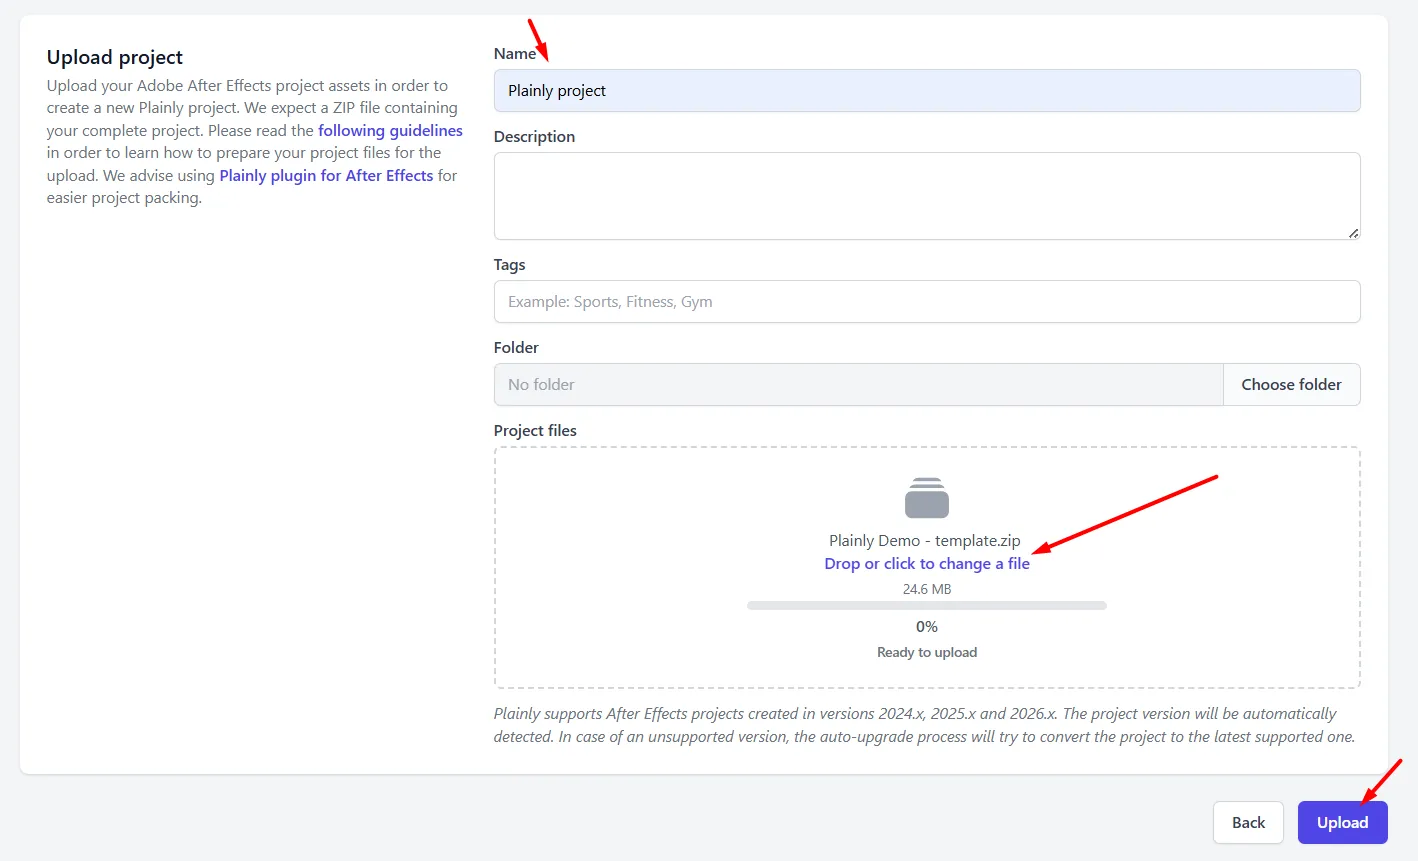
Then, scroll down to the Templates section and click Auto-generate.
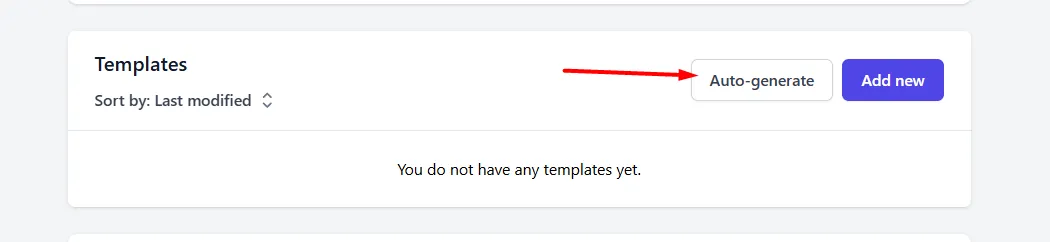
A new pop-up menu will open where you’ll want to select the Prefix option.
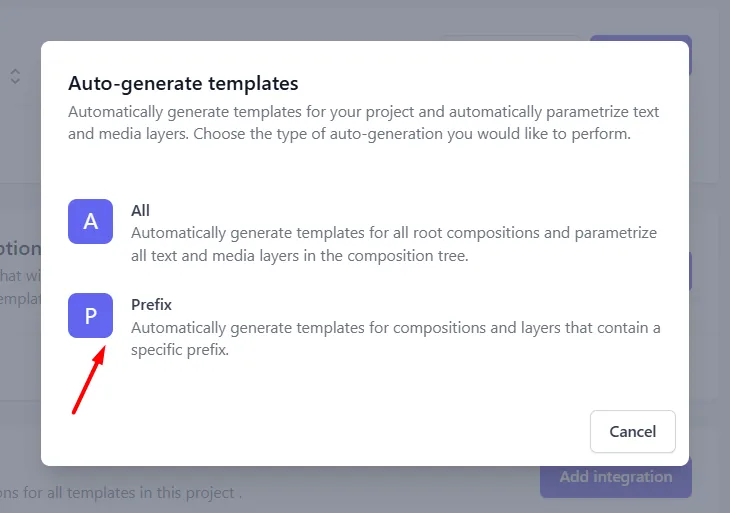
Now, remember the render prefix we added to layers in AE? Plainly uses that prefix to detect all dynamic layers in your template, so make sure you type it in the corresponding field for the After Effects automation in Plainly to do its magic later. Also, you can check/uncheck several other options here, as well.
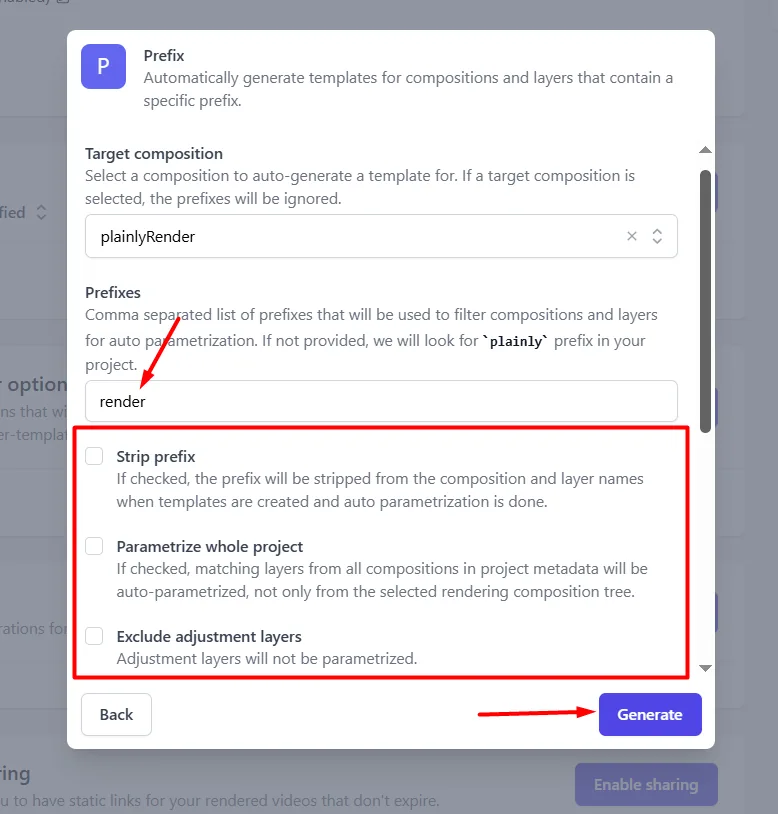
Once you click Generate, your template is set up and ready for CSV-based rendering.
3. Connect your CSV file to the template
To actually convert the data in a spreadsheet to video into unique videos efficiently, you need to connect the file to your template. But first, you need to create such a file.
To do so, choose any tool that enables you to create spreadsheets using tabular data and export them in a CSV format. The most popular options are Google Sheets, Excel and Airtable, though you can use anything else you’re comfortable with as long as it fits the criteria.
It’s the structure of the file that matters the most, a.k.a. data in your rows and columns. In other words, if you want to use CSV for video creation, each row in the file should represent one video version and each column should represent one dynamic element from your template.
Let’s say your AE template has dynamic layers named renderName, renderImage, renderColor, and renderPrice. In that case, your CSV columns should follow the same naming logic. After all, understanding CSV files comes down to clear structure, and that structure helps Plainly connect the right data fields to the right video elements. This ensures each video pulls the right text, image, color, audio, or any other variable during rendering, without you having to check every version manually.
For example, your CSV could look something like this.
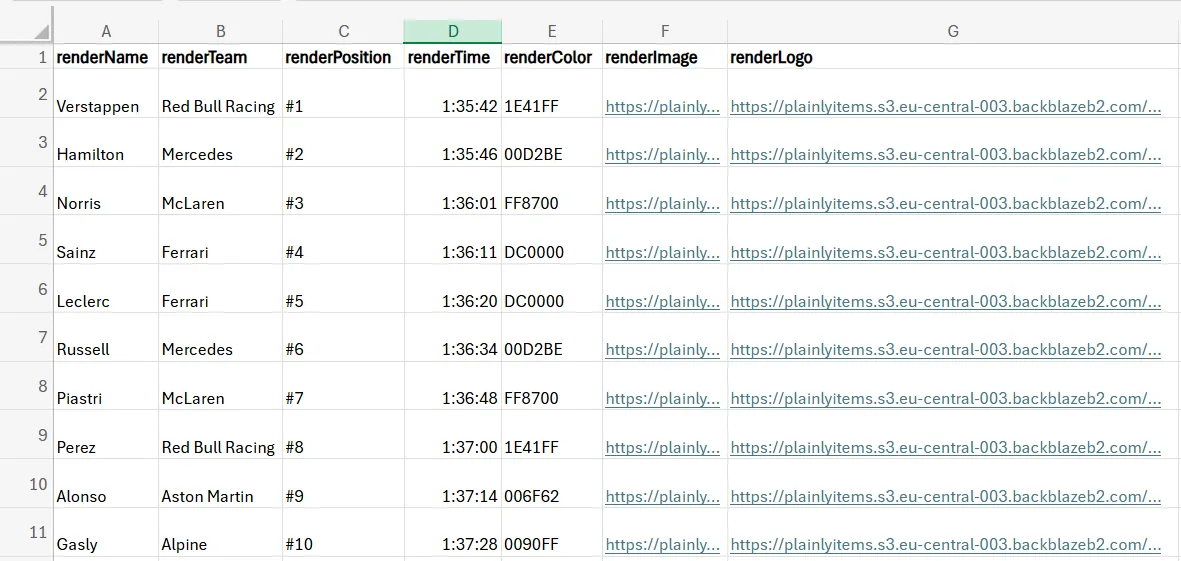
Download the spreadsheet as a CSV file once it’s all filled in and head back to Plainly.
4. Generate videos in bulk
Now that both your template and CSV file are ready, it’s time to generate the actual videos.
First up, we need to import data we compiled in the previous step.
To do that, go to Batch Renders in Plainly and select the right project and template.
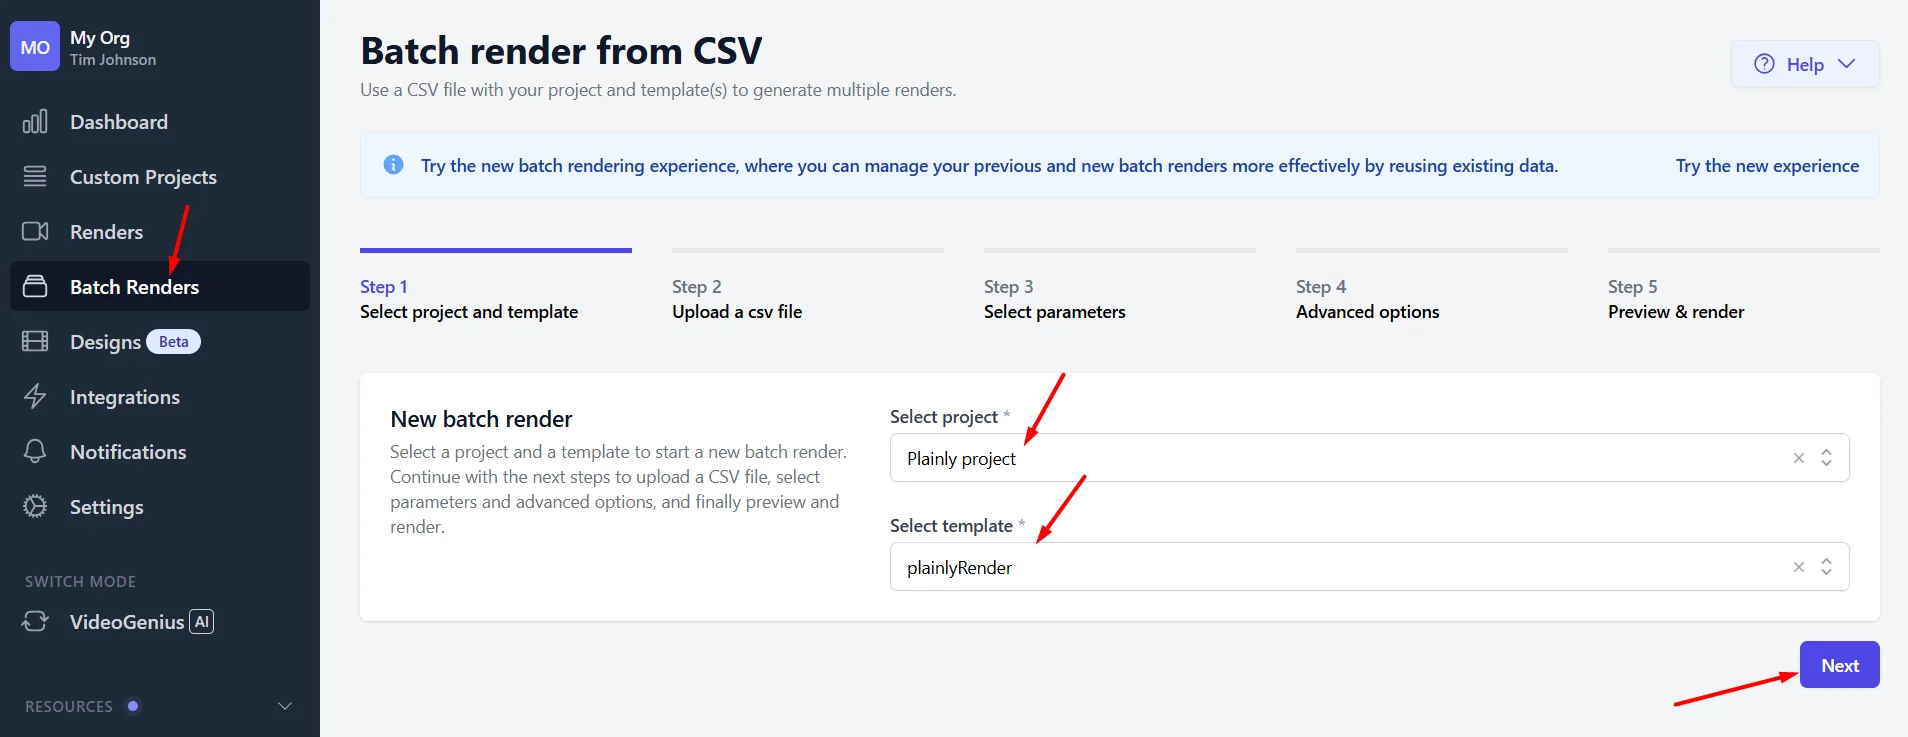
Then, upload CSV you created.
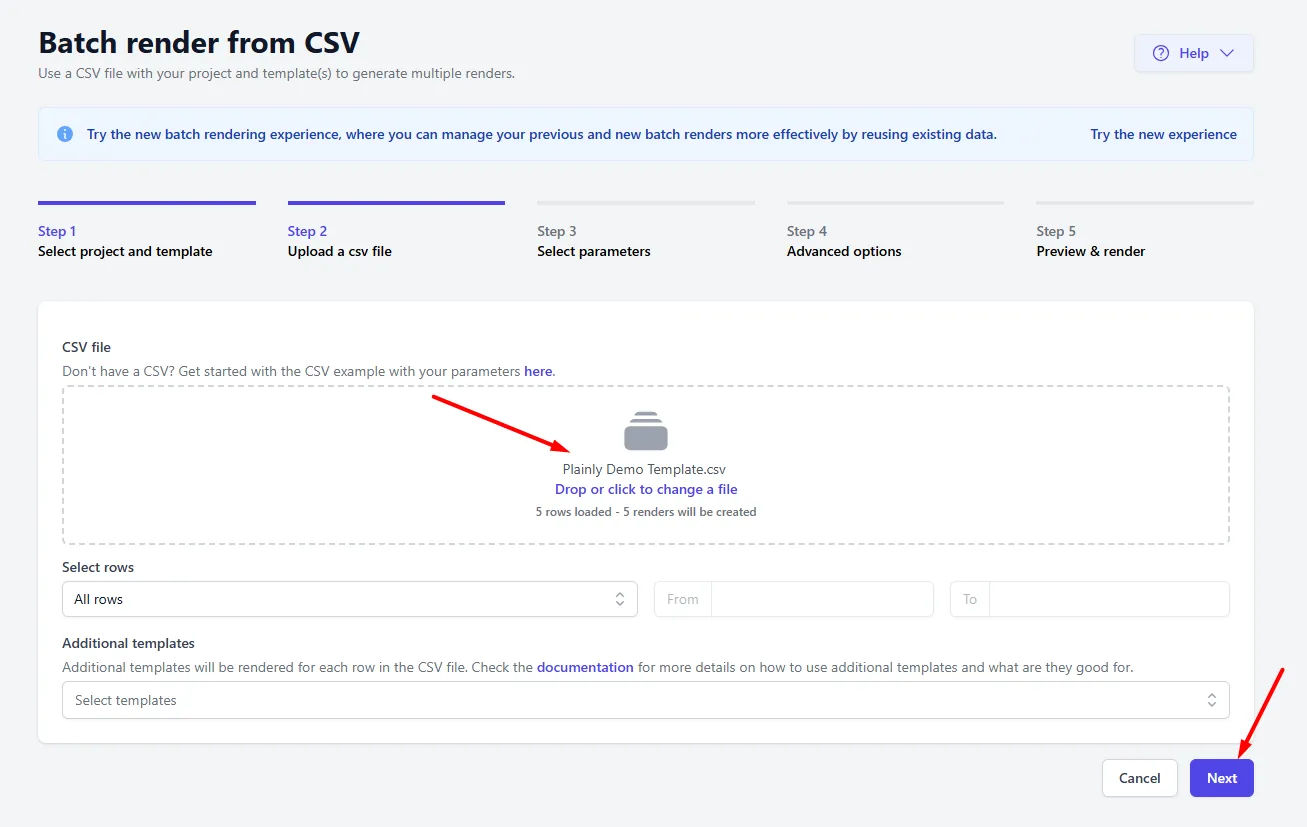
Next, click the Auto-link button, which tells Plainly to automatically match the CSV columns with the dynamic elements in your template.
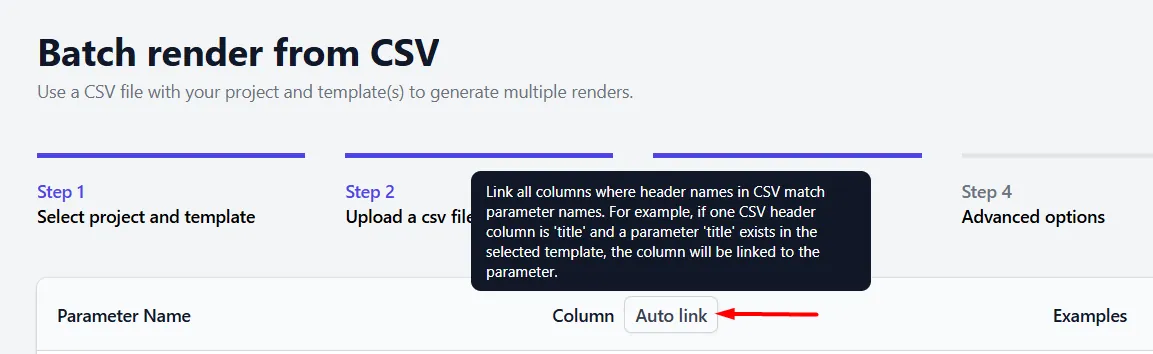
Plainly will then connect data fields to video elements for you, so, for example, renderName fills the name field, renderImage updates the image layer, renderColor changes the color, and so on.
After everything is linked correctly and you’ve defined the rest of the settings, click Next and then Render.
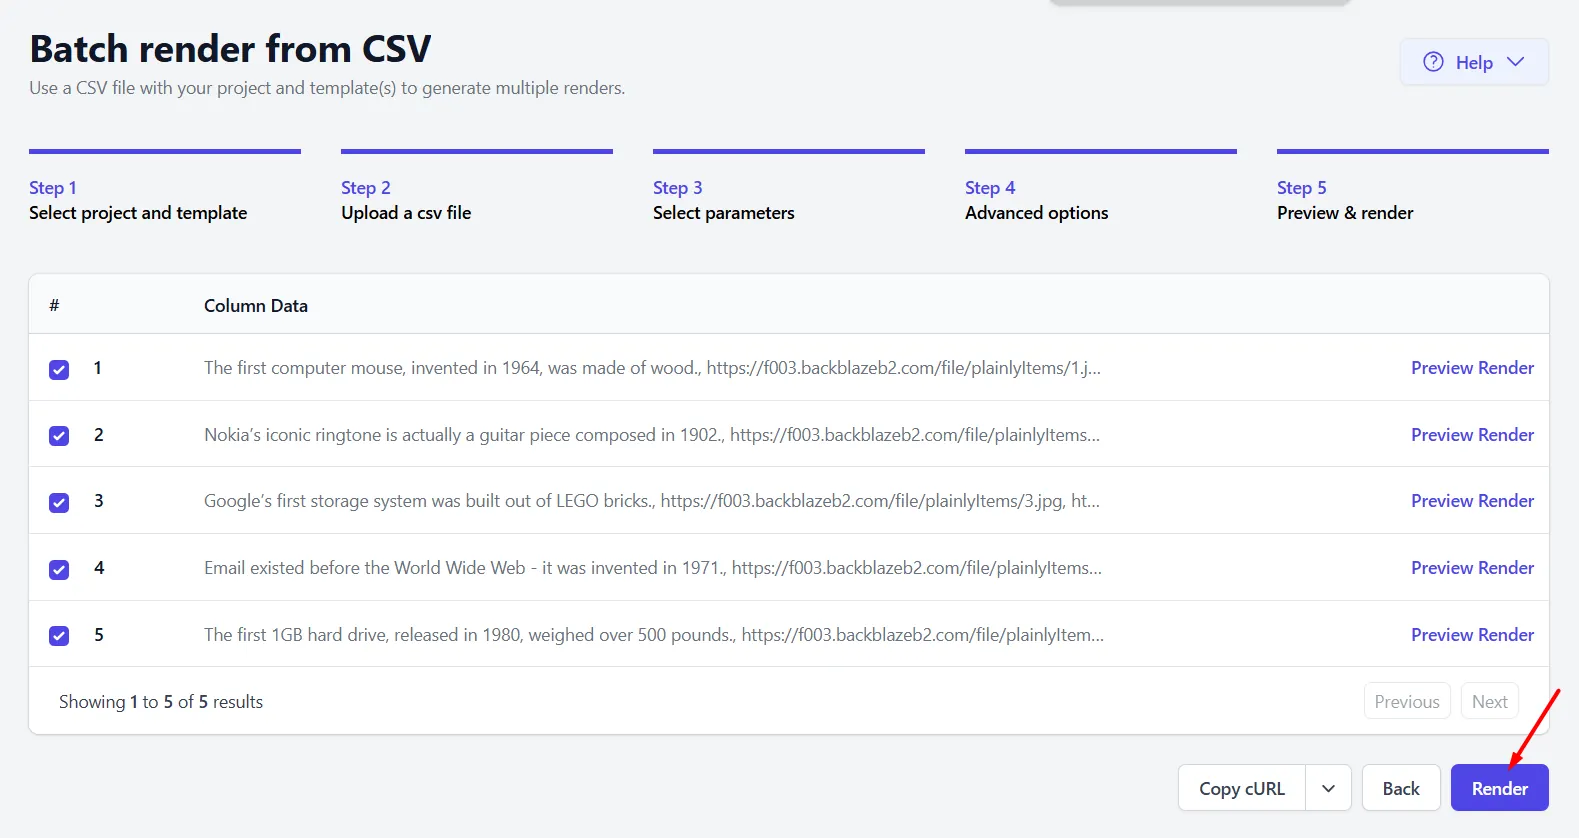
And that’s pretty much it. Plainly will act as a bulk video editor and use your CSV data to render each row as a separate video file, turning one template into as many video versions as you have rows in your file.
5. Download or deliver your videos effortlessly
The flow doesn’t end the moment videos are rendered. After all, you made them with a particular purpose in mind, didn’t you?
So, the next step is to either download them or deliver them to where they’re meant to go.
The simplest option is to download the video files one by one. Does it work? You bet it does. Is it what you want to do with 100s or 1000s of videos? We bet you don’t.
So, what’s the best option here that saves time and resources? Download the entire batch at once as .zip.
Still, if you want to automate the entire video production, in that case, you’re better off using our native integrations to deliver rendered videos straight to Google Drive, Dropbox, Frame.io, and YouTube, among else.
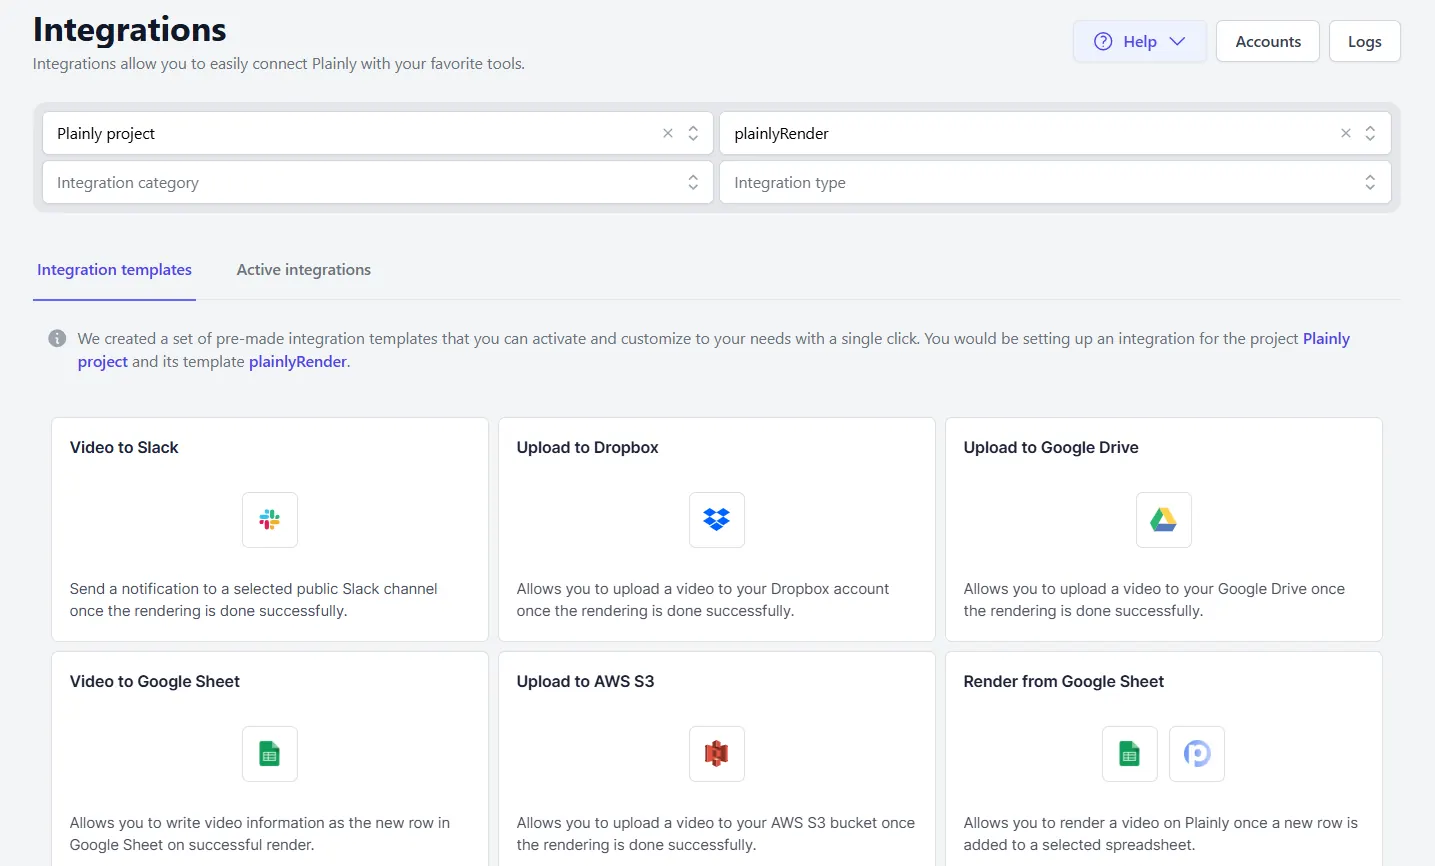
You can also push the rendered video links back to Google Sheets so you can track video status, share final MP4 links, or continue the workflow somewhere else.
As for more advanced use cases, our API lets you build custom workflows where videos are generated, rendered, and delivered automatically - start to finish.
Convert CSV to video to level up your video creation process
And that right there is how you make the bulk video creation efficient and scalable with no manual editing, exporting, and delivering involved whatsoever.
To recap, the whole CSV to video workflow comes down to this:
- You create one After Effects template;
- Mark the layers that should change;
- Prepare your CSV file;
- Connect the right data fields to the right video elements;
- Let Plainly render the content quickly.
The best thing is, once the setup is done, you can reuse the same bulk creation workflow whenever you need to create personalized videos, product videos, localized campaigns for video marketing purposes, event recaps, or any other type of dynamic content at scale.
So, if you’re ready to stop doing repetitive video editing by hand, start your 14-day free trial or book a demo with Plainly to see how you can use the power of CSV files to simplify this process.