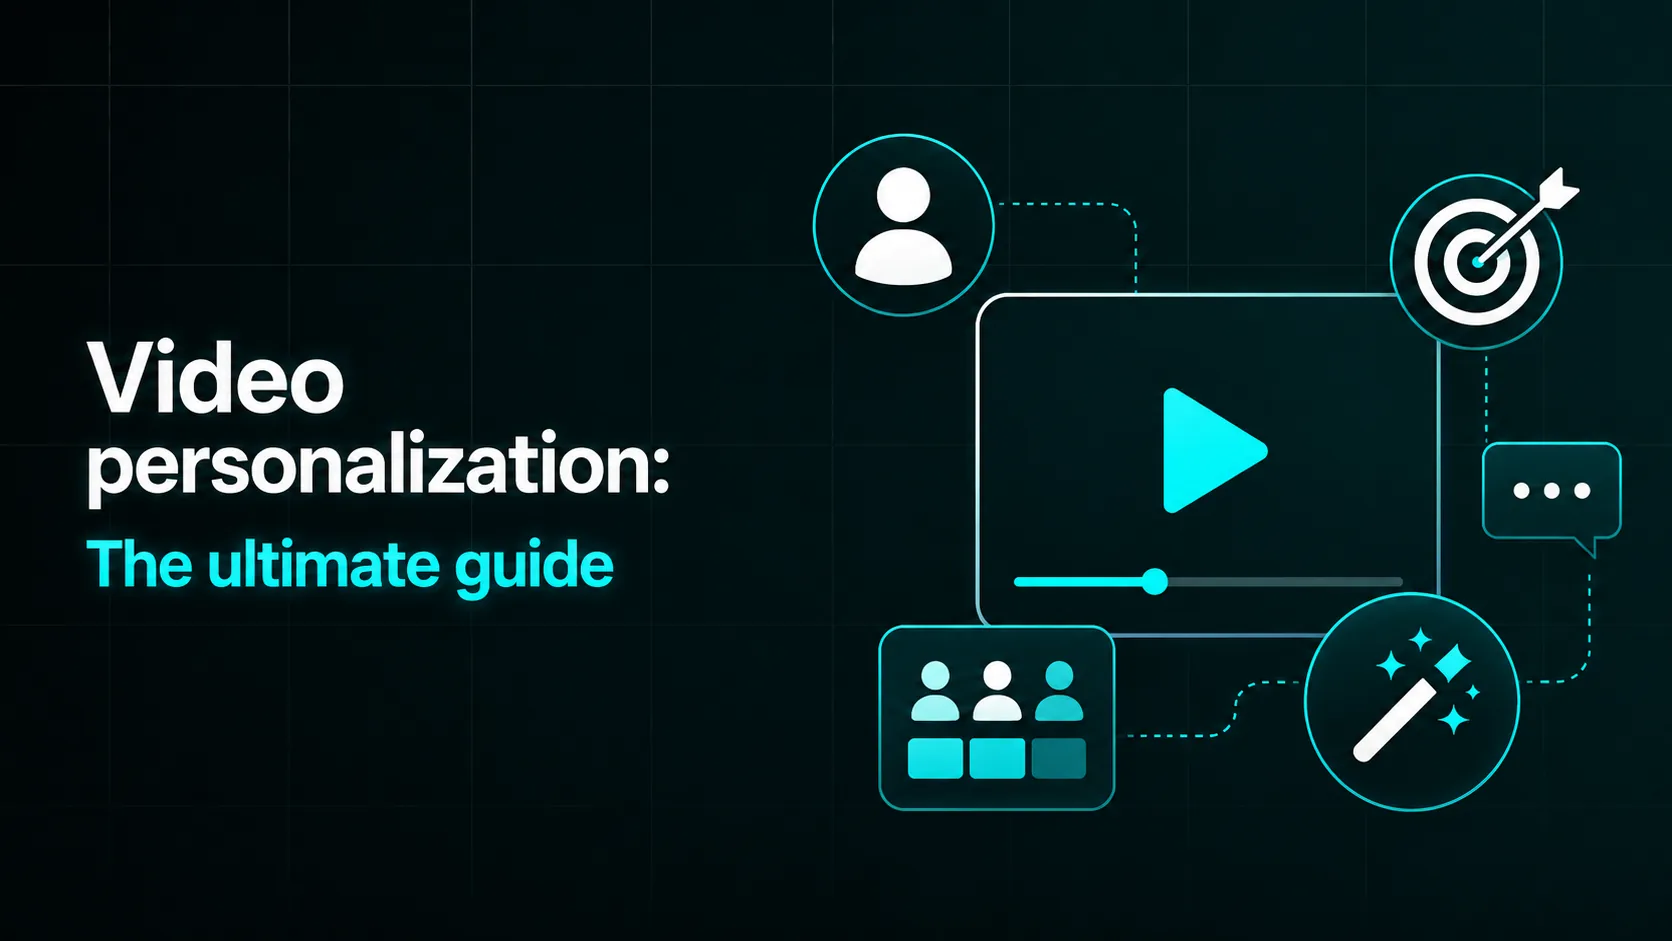
How to do mass video generation from data

.webp)

Summarize with


Mass video generation from data sounds way more complicated than it actually is. In reality, it means taking the data you already have and using it to create multiple video versions at once.
So, instead of editing the same template manually over and over again, you let your data automatically change the text, images, colors, footage, and/or other elements for you.
To show you just how simple it is, we'll be going over a proven workflow we've been using for years, which involves Adobe After Effects and our very own video automation software (yes, it's Plainly Videos ).
Ready? Let's go!
What does mass video generation from data mean?
Mass video generation from data is the process of using structured data to automatically create multiple versions of the same video.
The easiest way to explain it is this: you start with one video template, usually made in Adobe After Effects, and decide which elements should change from video to video. These can be names, locations, stats, prices, images, videos, colors, or any other piece of content you have in your data source.
Then, instead of manually opening the template and changing those elements one by one, you connect the template to your data using video generation platforms for it to be turned into actual videos.
A great example of mass video generation from data comes from our client, Augment Agency, which used Plainly to create personalized run videos for 5,000+ Run Malibu participants.
After the race, Augment exported runner data from their race management platform, including details like start time, average pace, runner position, and final result. That data was then connected to one AE template in Plainly, thus allowing the agency to generate a unique recap video for every runner at once.
So, instead of creating 5,000+ videos manually, they used the data they already had to produce personalized videos at scale - and fast enough to include them in each runner’s post-race email.
Why would you mass generate videos from data?
Truth be told, it makes sense to mass generate videos from data when you need more versions than you and/or your team can realistically create by hand.
I mean, let’s face it. Manually creating 10 versions is doable. Creating 100? Still doable, although a bit annoying. Creating 1,000+? There’s no way that’s happening!
With mass video generation, your data does most of the heavy lifting. You build one template, connect your data source, and watch videos render automatically.
And sure, that’s enough of a perk on its own. But here are some other reasons people use this workflow:
- To save hours of manual editing - Instead of changing videos one by one and handling the repetitive tasks, you update the data and let the bulk video editor generate all the versions for you.
- To personalize videos at scale - You can create videos with unique names, locations, stats, offers, images, product details, and much more without editing anything by hand.
- To keep every video consistent - Since all versions come from the same template, your branding, layout, animations, and structure stay clean across the entire batch, making for on-brand and high-quality output.
- To launch campaigns faster - It doesn’t matter if you’re creating personalized content, event recaps, localized promos, or any other type of campaign for TikTok, YouTube, etc., for that matter. Mass video generation lets you go from data in a spreadsheet to video much faster than with manual content production and, thus, ship videos quickly.
- To connect video creation with your existing workflow - Your data can come from a CSV file, Google Sheet, Excel file, CRM, API, or any other tool you already use.
Common use cases for mass video generation
There are 100s of different scenarios in which you would want to generate videos en masse.
Nevertheless, here are a couple of use cases where automating the production process really makes sense:
- Video personalization - This is probably the most obvious one. You have one video structure, but each person gets their own version with their name, stats, location, message, image, or any other personal detail. Think event recaps, donor thank-you videos, sales outreach, onboarding and explainer videos, customer updates, and similar video content.
- Dynamic video ads - If you’re running paid campaigns, you rarely need just one version of an ad. You need multiple ones for A/B testing purposes, each with different products, prices, offers, visuals, CTAs, sizes, audience angles, etc. With a bulk video creation setup, you can create those variations from your data instead of exporting every single one by hand.
- Video localization - One video can turn into versions for different countries, languages, or markets. Your data can change the text, voiceover, currency, CTA, visuals, and anything else that needs to feel local.
- Sports video creation - Sports content is full of data, which makes it a great fit for automated content creation. Scores, race results, player stats, rankings, match details, participant names… all of that can be turned into highlight reels, announcements, leaderboards, and more.
- Product videos - If you have a product feed, you already have most of what you need. Product names, images, prices, discounts, features, and availability can all be pulled into a template to create videos for different products or categories.
- Real estate videos - Listing videos are another obvious example because the base structure remains the same. What changes are the property photos, address, price, square footage, agent info, and neighbourhood details.
But really, this workflow isn’t tied to one industry. It works anywhere the format stays the same, but the details change from one video to the next.
Step-by-step guide on how to mass generate videos from data
Now that we’ve covered what mass video generation from data is and where it makes sense, let’s get into the actual setup.
For this workflow, we’ll use After Effects to create the video template and Plainly Videos to automate video production. Why After Effects? Well, it's because it gives you the most creative control over your video design, animations, layouts, and dynamic elements. And why Plainly? Because it connects your AE template with your data and handles the rendering for you.
As for a data source? We’ll be using a CSV file. But keep in mind you can also use Google Sheets, Excel, or any other similar tool to replicate the workflow.
1. Create your video template
First things first, you need a template built in After Effects. You can use an existing AE project or build a new one from scratch, it doesn’t matter. As long as it’s ready for dynamic updates.
What does that mean?
It means you need to decide which elements should change from one video to another. This can be:
- Text
- Images
- Videos
- Audio
- Colors
- Any other visual element controlled by data
After choosing the dynamic layers, rename them using the same prefix. We’ll use the prefix ‘’edit’’ for the sake of this tutorial, so a title layer could be named editTitle, an image layer editImage, and a color layer editColor. Of course, you can use any other prefix you like as long as it’s consistently used across layers.
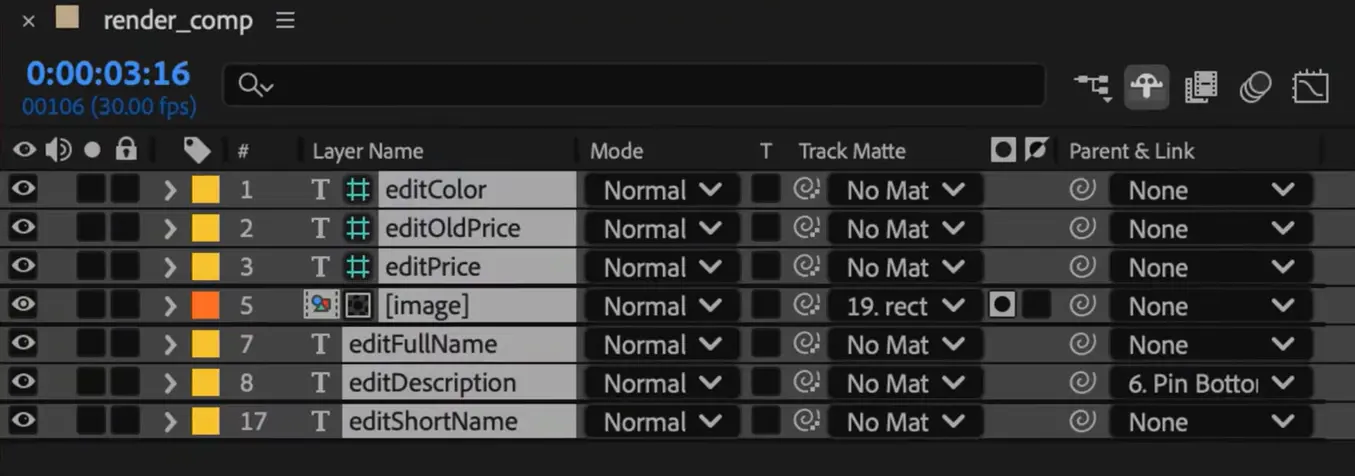
Now, what does a prefix do, exactly? Well, it tells Plainly which layers should later be updated using the data from your CSV file.
Before moving on, make sure your template is clean, organized, and responsive. Then, once everything is ready, package the project file using the Plainly plugin.
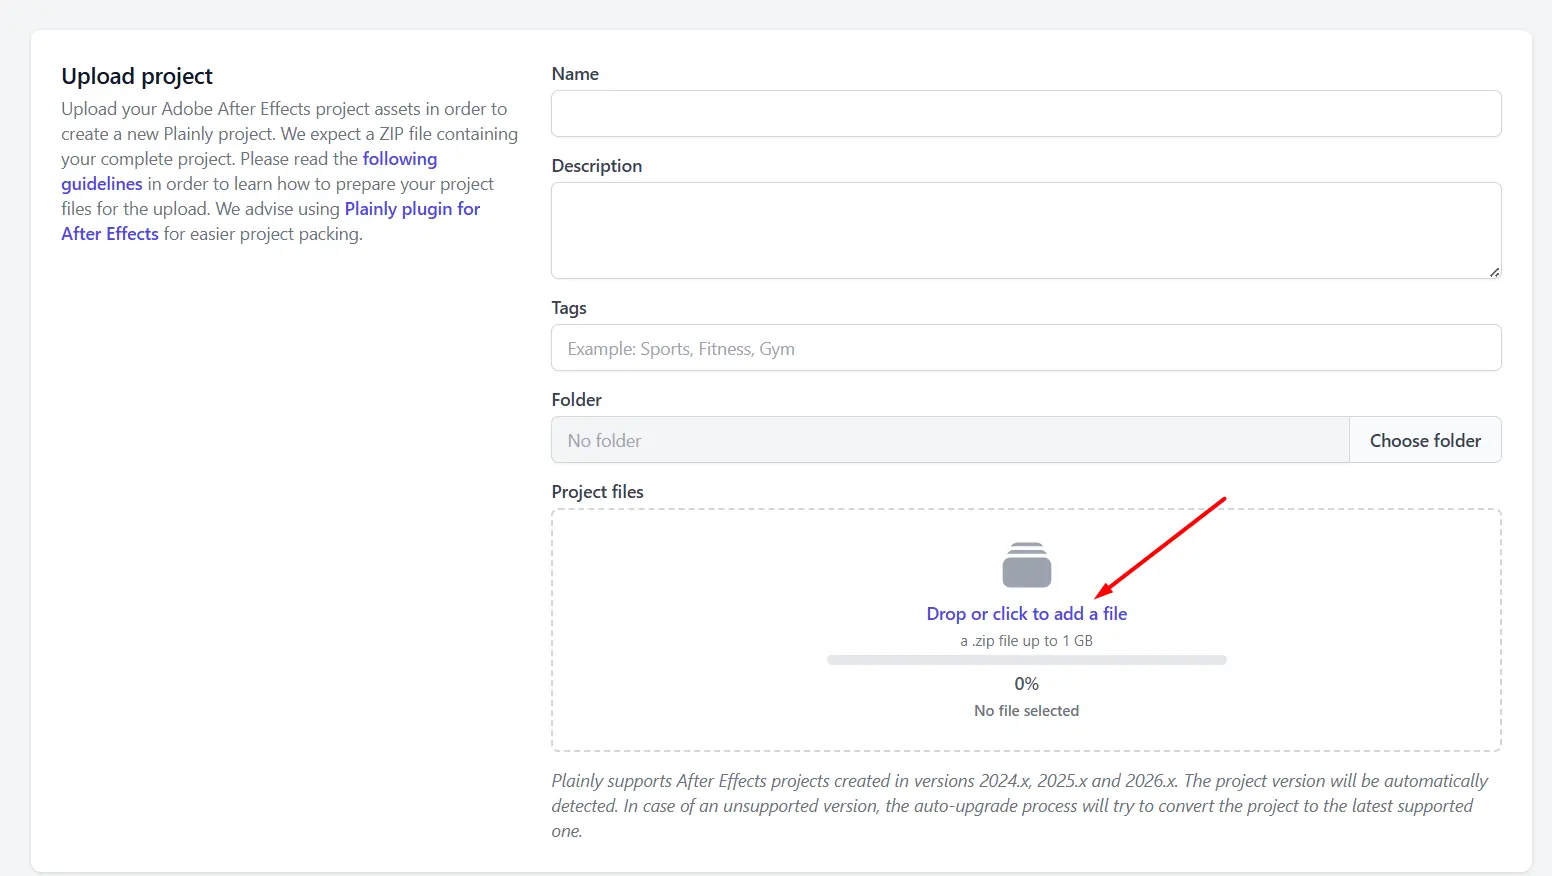
2. Upload your template to Plainly
With your template all set, it’s time to upload it to Plainly.
To do this, go to your Plainly dashboard and upload the packaged project file.
After the upload is done, use the Auto-generate feature to detect the dynamic layers automatically.
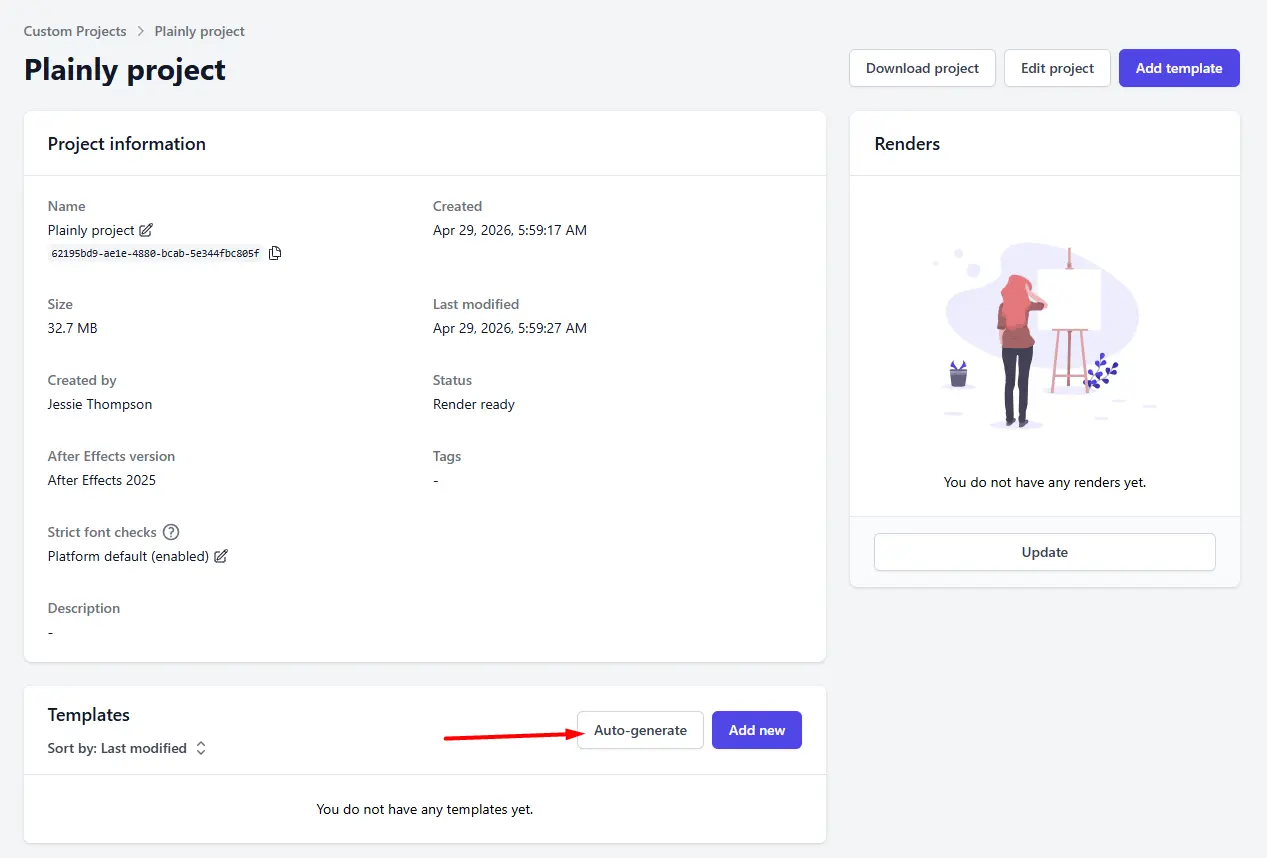
Since we named our dynamic layers with the edit prefix in the previous step, choose the Prefix option.
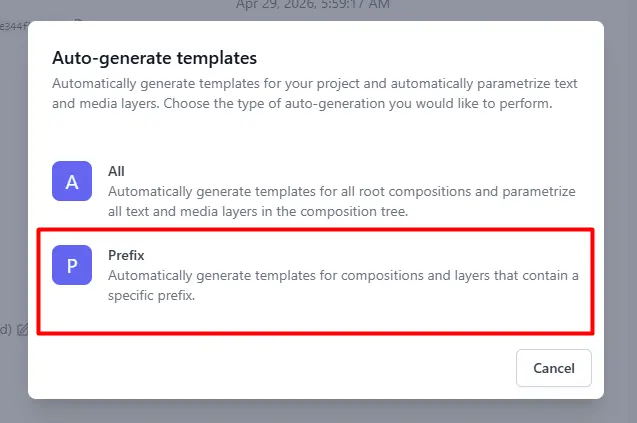
Then, type in ‘’edit’’ and select any additional settings if you want before clicking ‘’Generate’’.
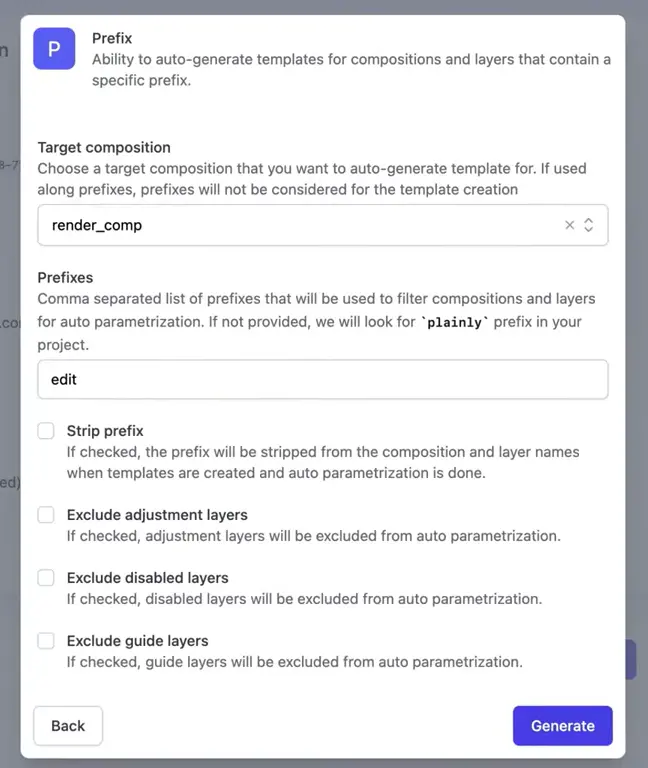
Plainly will then scan the project and find all layers that use that prefix, whether they’re text, image, video, audio, or color control layers.
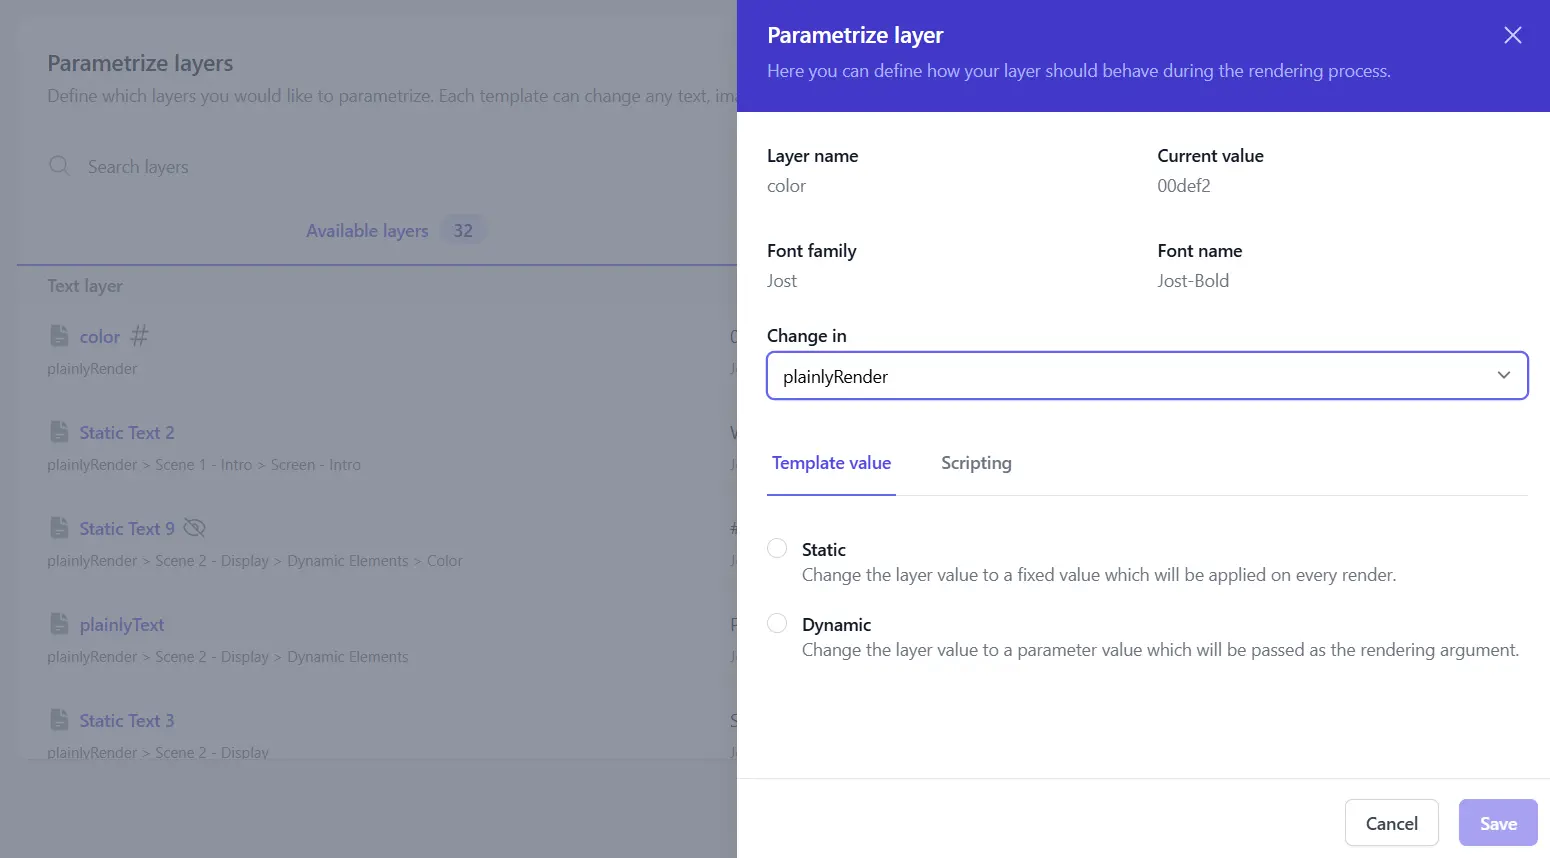
Once the dynamic elements are detected, your template is ready to be connected to data. You can still adjust the parameters manually if needed, but in most cases, the prefix setup does the job just fine.
3. Create your data source a.k.a. a CSV file
Now that you have a template, it’s time to prepare a CSV file that will feed data to your data-driven videos.
Each row in this file corresponds to one video version, whereas each column matches the dynamic layer in your template. So, if your template has dynamic layers named editTitle, editImage, and editColor, your CSV should have columns with those same names.
All that’s left is to fill in the rows with different data, and download the CSV.

4. Mass render videos from your data
All good?
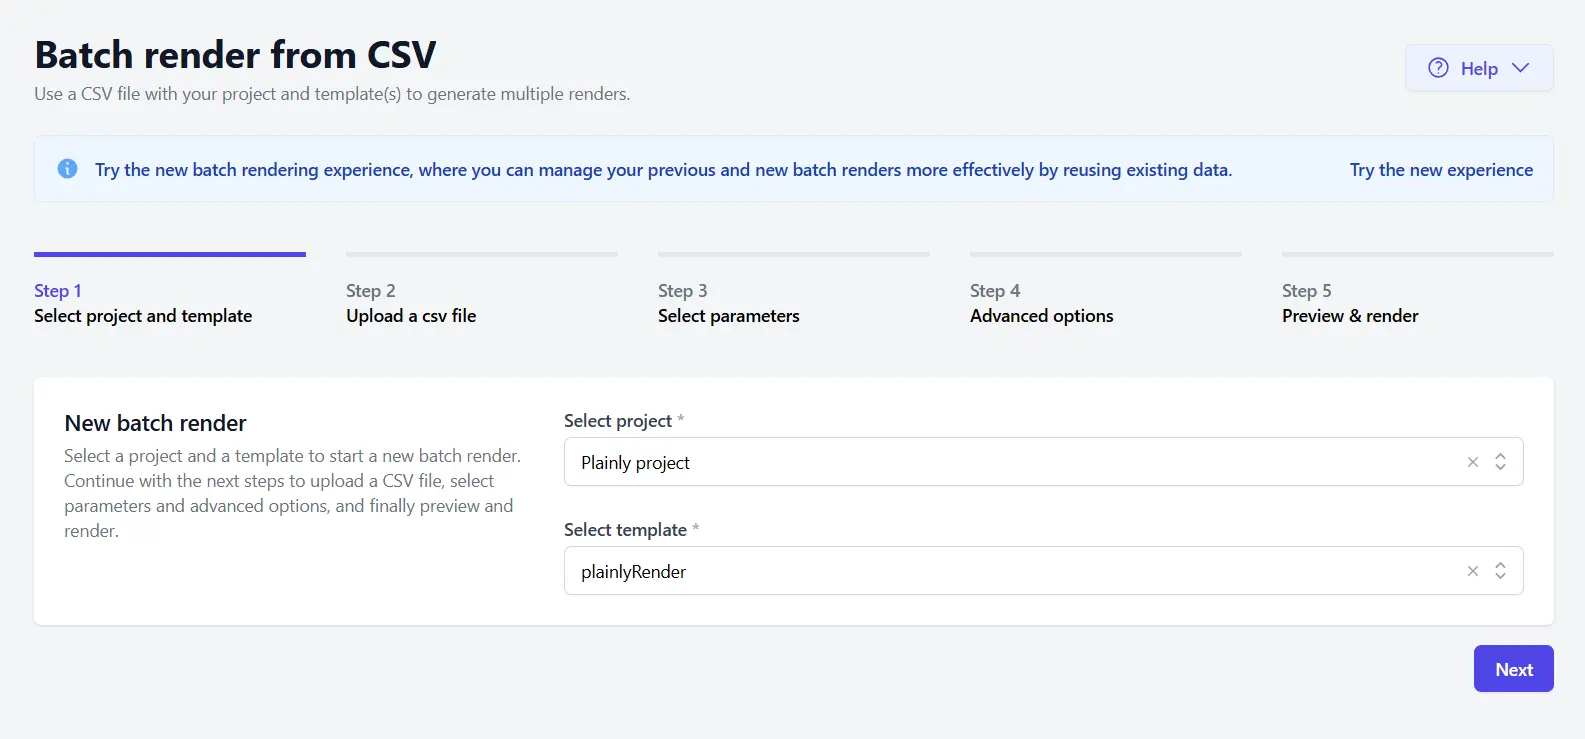
If so, go back to Plainly, click ‘’Batch Render’’, then ‘’New batch from CSV’’.
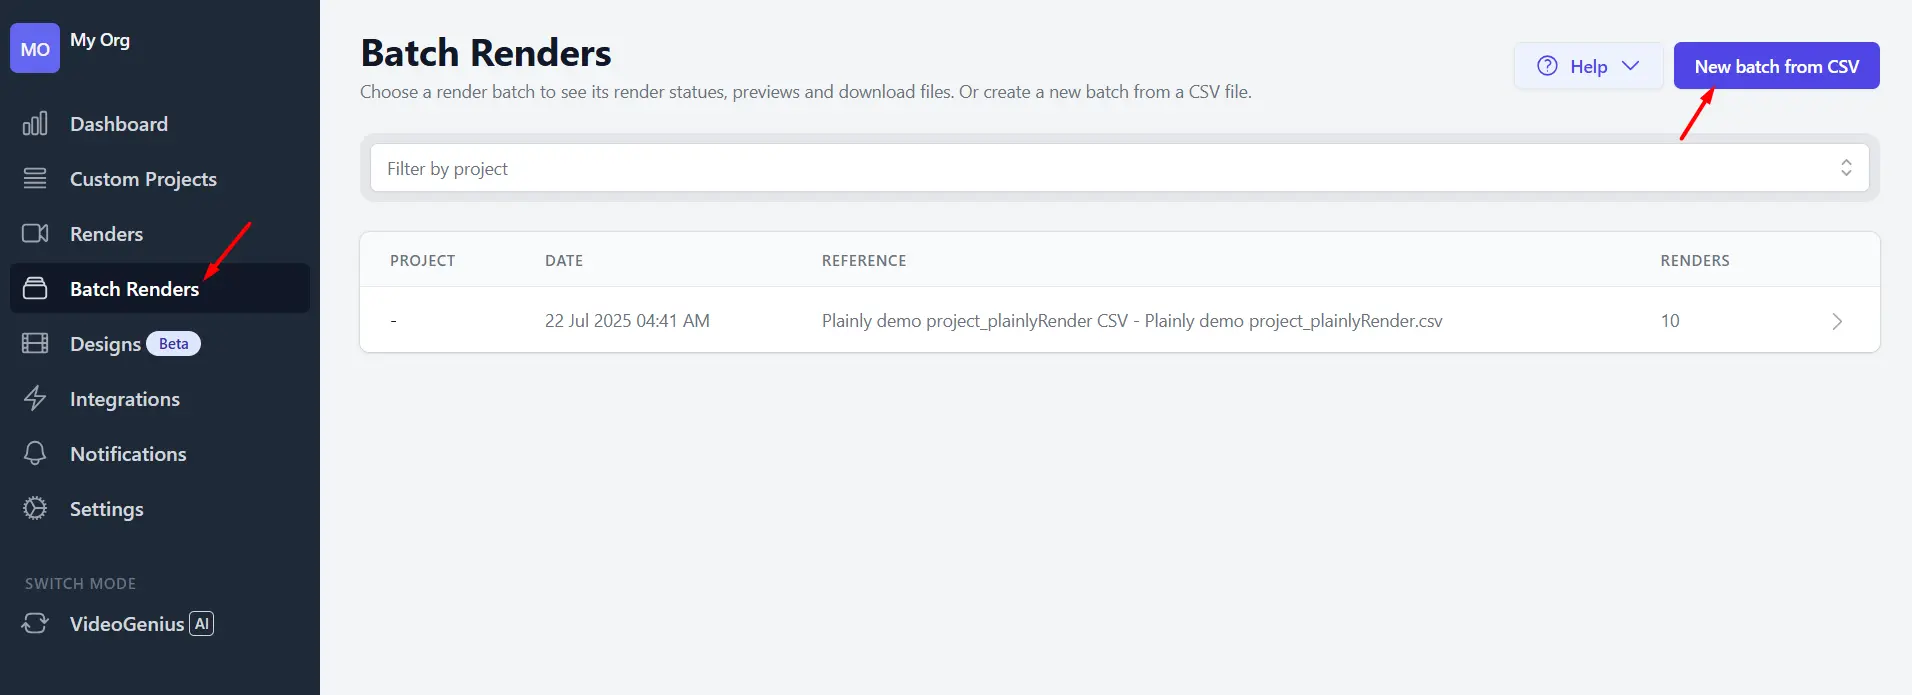
Select the project and template.
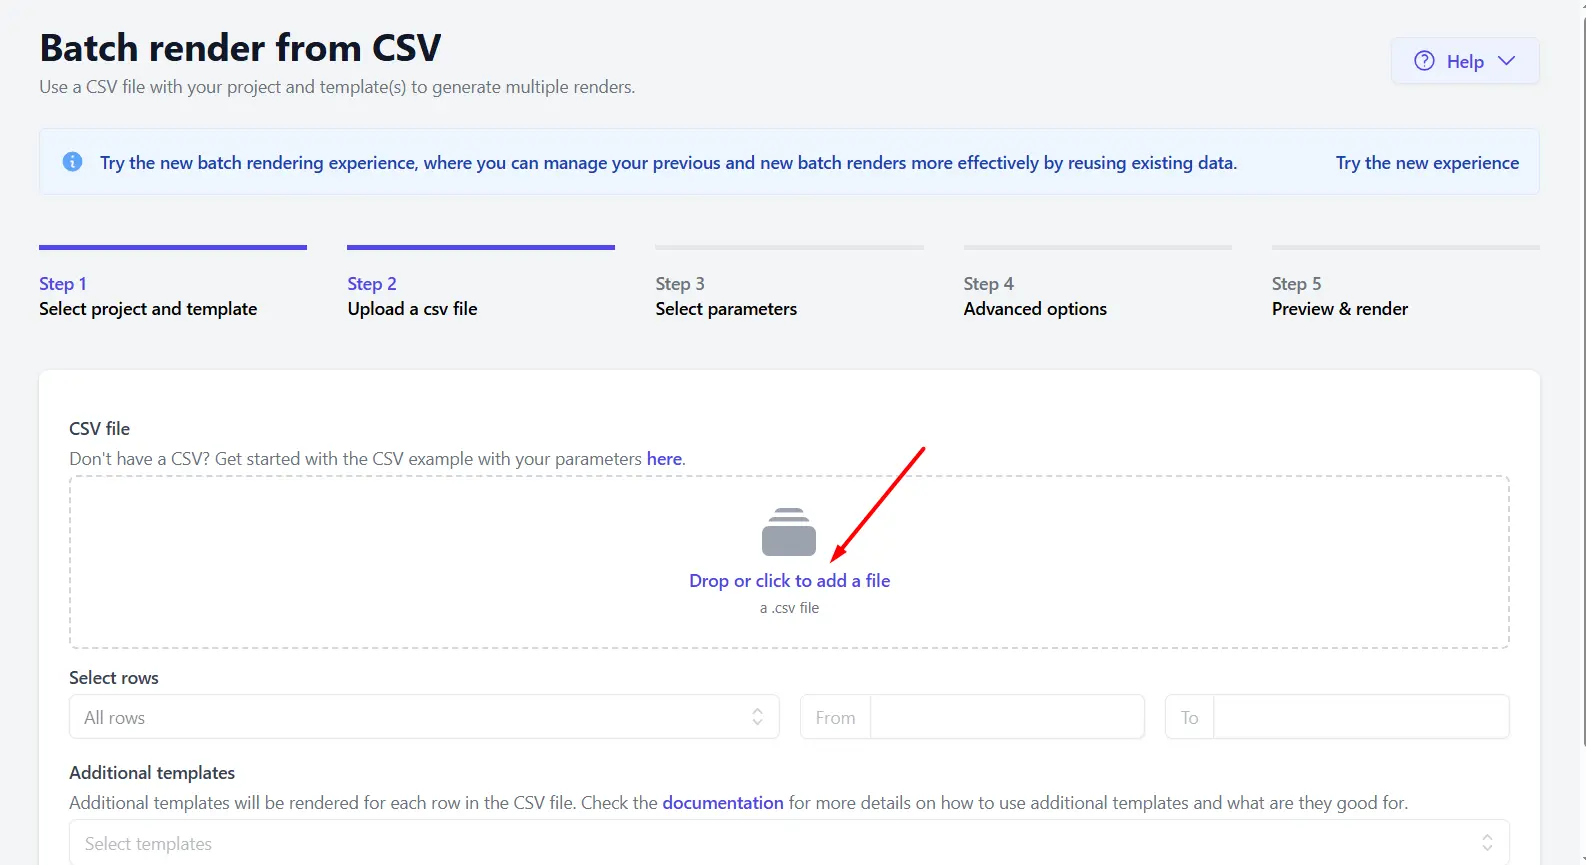
Then upload the CSV we created in the previous step.
After the file uploads, click Auto-link so that this video generator matches the columns from your CSV with the dynamic layers from your AE template.

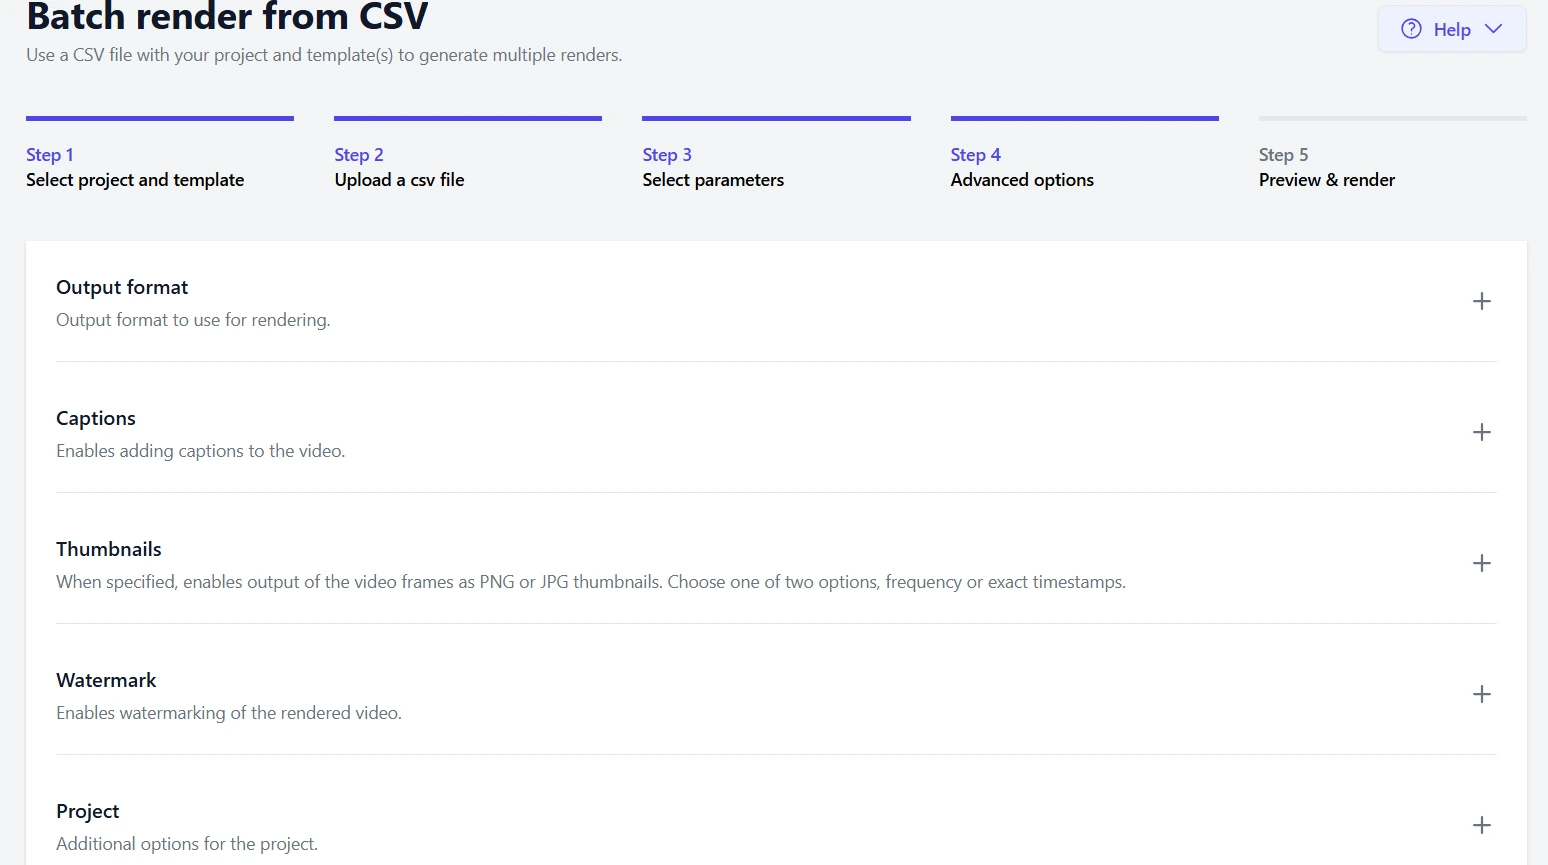
Quickly check if everything looks good, click Next, and then define advanced options, if you want.
Finally, preview everything once again and, if everything looks good, click ‘’Render’’.
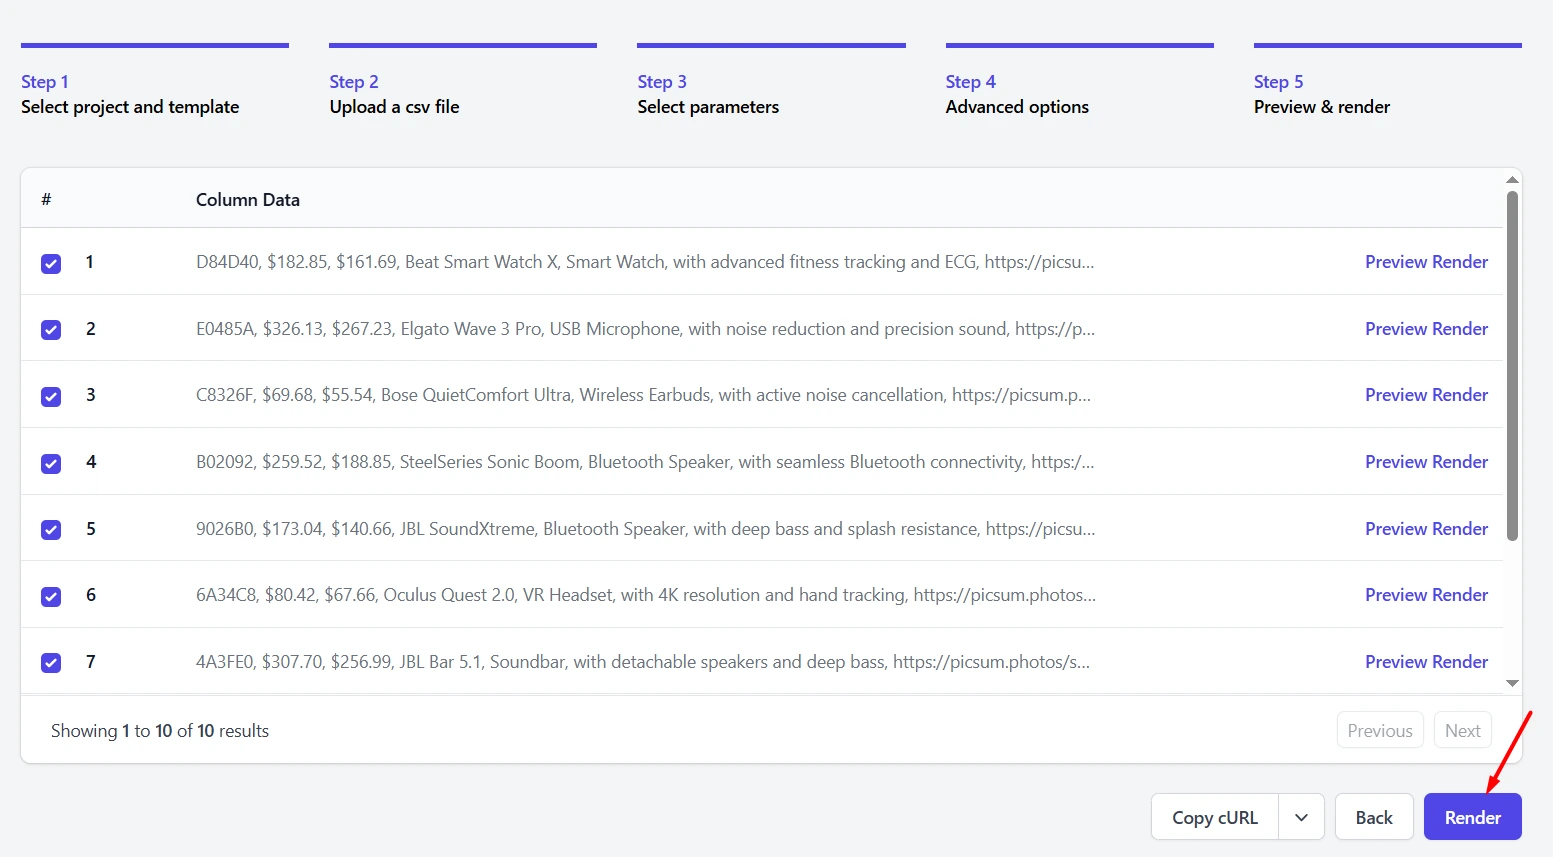
And that’s it! Each row from your CSV now becomes its own video.
So, if you uploaded 50 rows, Plainly will create 50 high-quality videos automatically. If you uploaded 1,000 rows, it will create 1,000 videos, and so on. The whole rendering process takes only a few minutes, which is amazing considering the alternative is to batch render in After Effects directly...but only a handful of videos at the same time.
5. Download and/or distribute your videos
Videos are all rendered, but you still need to decide what to do with them.
You’ve got a couple of options here.
First, you can download videos one by one… but let’s face it, who’s got the time for that.
You can also download the entire batch as a ZIP file, which is a much better option.
If you’d like to save time and cut the manual work to a minimum, you can also use one of our 20+ native integrations and deliver finished videos directly to Google Drive, Dropbox, Frame.io, YouTube, etc.
And if you want to fully automate video creation, you can connect Plainly to no-code tools like Zapier to build different workflows. Alternatively, you can even set up an entire custom workflow using Plainly’s API.
Start generating engaging videos from data
And that’s how you go from a simple data sheet to hundreds - or even thousands of videos!
You create one After Effects template, decide which parts should change, connect those elements to your CSV file in Plainly, and let the platform render the videos for you.
No opening the same project over and over again. No manually replacing text, images, colors, prices, stats, or whatever else needs to change. And definitely no exporting videos one by one until your laptop starts begging for mercy.
Want to hop on a mass video generation wagon yourself? Start your 14-day free trial with Plainly or book a demo, and we’ll show you how to set up your first scalable automated video workflow.