How to make personalized travel offer videos [Complete Guide]


Summarize with


Generic travel offers disappear into crowded inboxes, scrolled past by prospects who've seen the same beach sunset and "limited time deal" a dozen times. But personalized video offers-ones that greet travelers by name, showcase their dream destinations, and reflect their actual budget and travel dates-achieve 3-7x higher engagement rates.
The reason personalization works so well in travel marketing comes down to emotional connection. When someone sees their name paired with images of Santorini at sunset (the exact destination they browsed last week) alongside dates that match their vacation window and a package within their stated budget, the video creates a direct emotional connection. It shows them their trip as a tangible, bookable reality rather than another generic promotion.
This complete guide shows how to make personalized travel offer videos at scale without manual editing using an automatic video editor workflow..
You'll learn the exact process:
- Designing your video template in After Effects
- Uploading it to an automation platform
- Connecting your customer data
- Rendering hundreds of unique videos in bulk
By the end, you'll know how to turn a single template into a personalized video library that converts browsers into buyers.
What are personalized travel offer videos?
Personalized travel offer videos transform generic promotional content into custom proposals that speak directly to individual travelers. Instead of showing the same beach sunset to everyone, these videos become data-driven videos that dynamically insert customer-specific information like their name, their preferred destinations, their actual travel dates, and their budget into each frame.
The difference is that generic promo videos broadcast one destination or package to all viewers. Personalized videos adapt based on the person, pulling from customer data to create dynamic videos for each traveler. When Sarah opens her email, she sees "Sarah, here's your 7-day Rome itinerary for €2,400." When Mike opens his, he sees his Alaska cruise with dates and pricing tailored to him.
Common personalization elements include customer name overlays, preferred destination imagery, specific travel dates, customized pricing based on loyalty tier, and references to past trips. Tour operators use these videos to present custom package proposals. Travel agents send personalized itinerary walkthroughs. Hotels promote targeted room upgrades. Airlines showcase destination-specific offers based on frequent flyer history.
What you need to create personalized travel videos
Creating personalized travel videos requires three core components working together:
- Structured customer data
- Visual assets
- An automation platform that connects them
Data of your customers and offers
You need a structured data file (typically a spreadsheet or CSV) with columns for each personalization element. Essential fields include:
- First name and destination name
- Travel dates and package price
- Number of travelers and trip duration
- Accommodation type and special requests
Optional data points enhance personalization: past destinations visited, loyalty program tier, preferred travel style (adventure, luxury, family), booking history, and seasonal preferences. Source this data from your CRM systems, booking platforms, email lists, customer surveys, or website form submissions.
Video assets
You'll need destination-specific visual elements: photos and video footage of locations, accommodation images, activity shots, transportation visuals, brand logos, and background music.
Stock footage libraries like Pexels and Unsplash work well for starting out. You can also source assets from destination marketing boards, tour operator photo collections, or past customer content (with permission).
Personalization and automation tool
The two-tool approach works best: After Effects for professional template design, and Plainly for automated bulk video editing.
After Effects provides unlimited creative control for template design, since it's the industry standard for motion graphics and lets you build exactly what you envision.
Plainly is the cloud-based automation platform that connects customer data to After Effects templates and renders hundreds of personalized videos without manual editing. It handles the repetitive work, letting you focus on creative decisions rather than rendering individual videos one by one.
Step-by-step guide on how to make personalized travel offer videos
The entire process breaks into five phases: template design, uploading the template, data connection, batch rendering, and distribution.
Create your video template
Start by designing your travel offer video in After Effects. We've found that 15-30 seconds works best for travel offers-long enough to showcase destinations meaningfully, short enough to maintain attention across email and social channels.
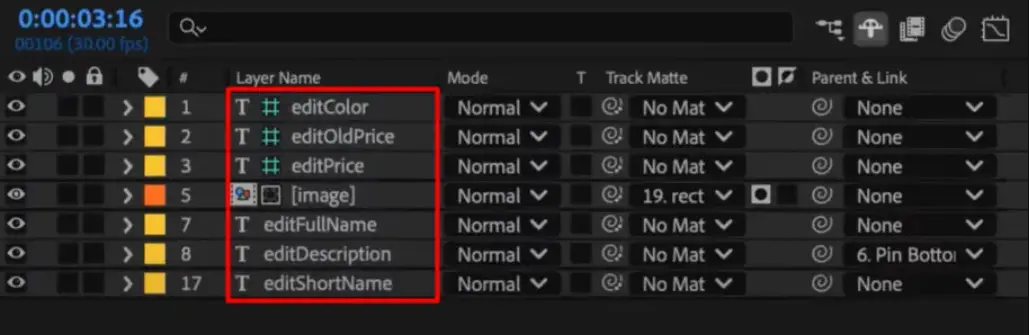
Now identify which elements should be dynamic-the parts that change for each client. These typically include text layers for customer names and destinations, image or video layers for destination footage, text layers for travel dates and pricing, and logo placements.
Here's where naming conventions matter significantly. Add consistent prefixes to every layer you want to make dynamic. Use something like "editCustomerName", "editDestination", "editPrice"-the prefix signals to Plainly which layers accept dynamic data during rendering.
Before moving to the next step, ensure all custom fonts are packaged with your project file. After Effects can render correctly only when it has access to every font you've used. Missing fonts cause analysis failures that delay your entire workflow.
Once your template is polished, package everything into a single, organized folder that gathers your project file, footage, and fonts. Compress this folder into a ZIP file, and that's what you'll upload to Plainly.
Upload your video template to Plainly Videos
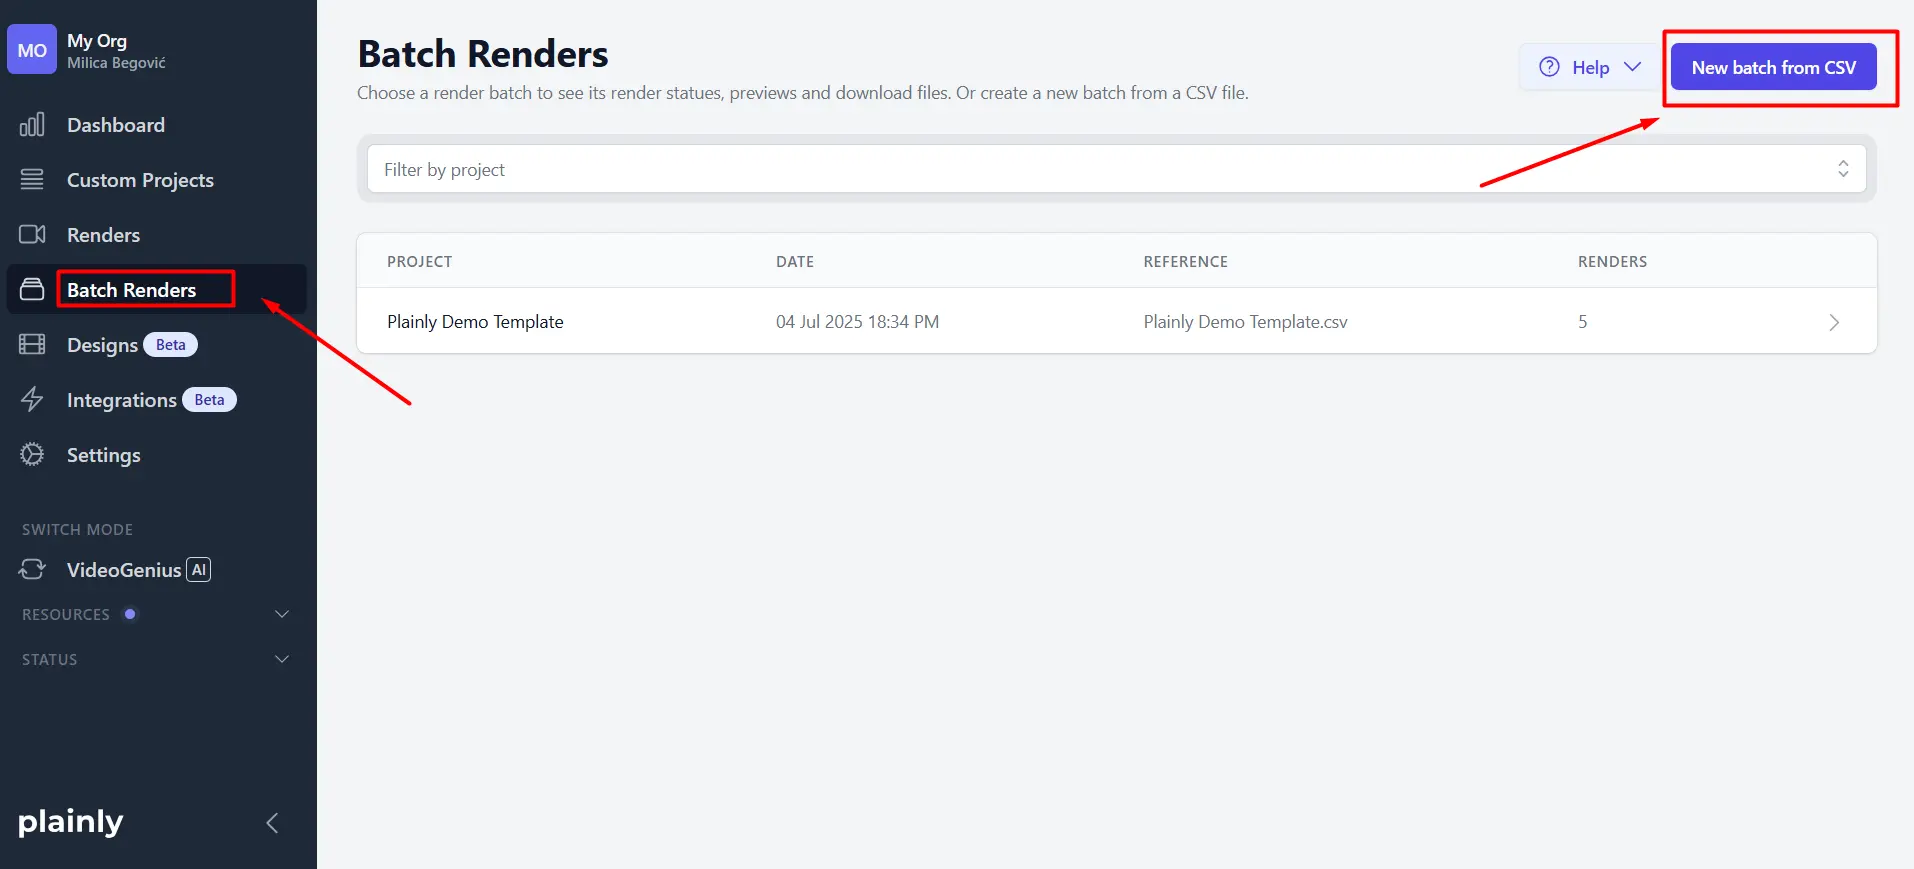
Navigate to the Custom Projects page in your Plainly dashboard and click the "Upload new" button.
You'll be prompted to upload your packaged ZIP file, provide a project name and description, and then wait while Plainly analyzes your After Effects file.

This analysis step validates your project structure, checks for missing assets or fonts, and maps out the composition hierarchy. Most projects analyze in 1-2 minutes, though complex templates with heavy assets can take longer.
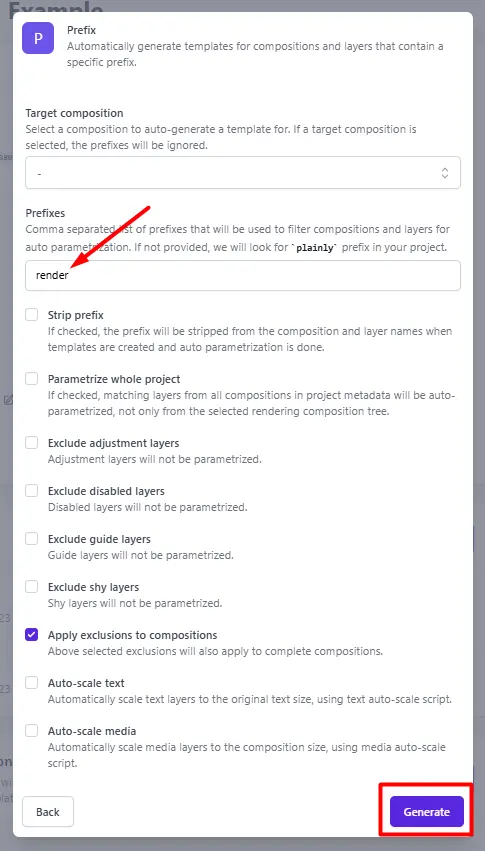
Once the analysis finishes, go to the Templates section of your project and click Auto-generate and select Prefix. This option will only work if you've already defined a prefix in the previous steps for each layer you want to make dynamic.

Next, enter the prefix you assigned to your layers in your project (e.g. "edit") and click generate. Plainly will scan your entire project and automatically identify every layer that matches that prefix, marking them as dynamic and ready to be connected to data. You can also fine-tune the results using additional options such as stripe prefix, auto-scale text or media, and more.
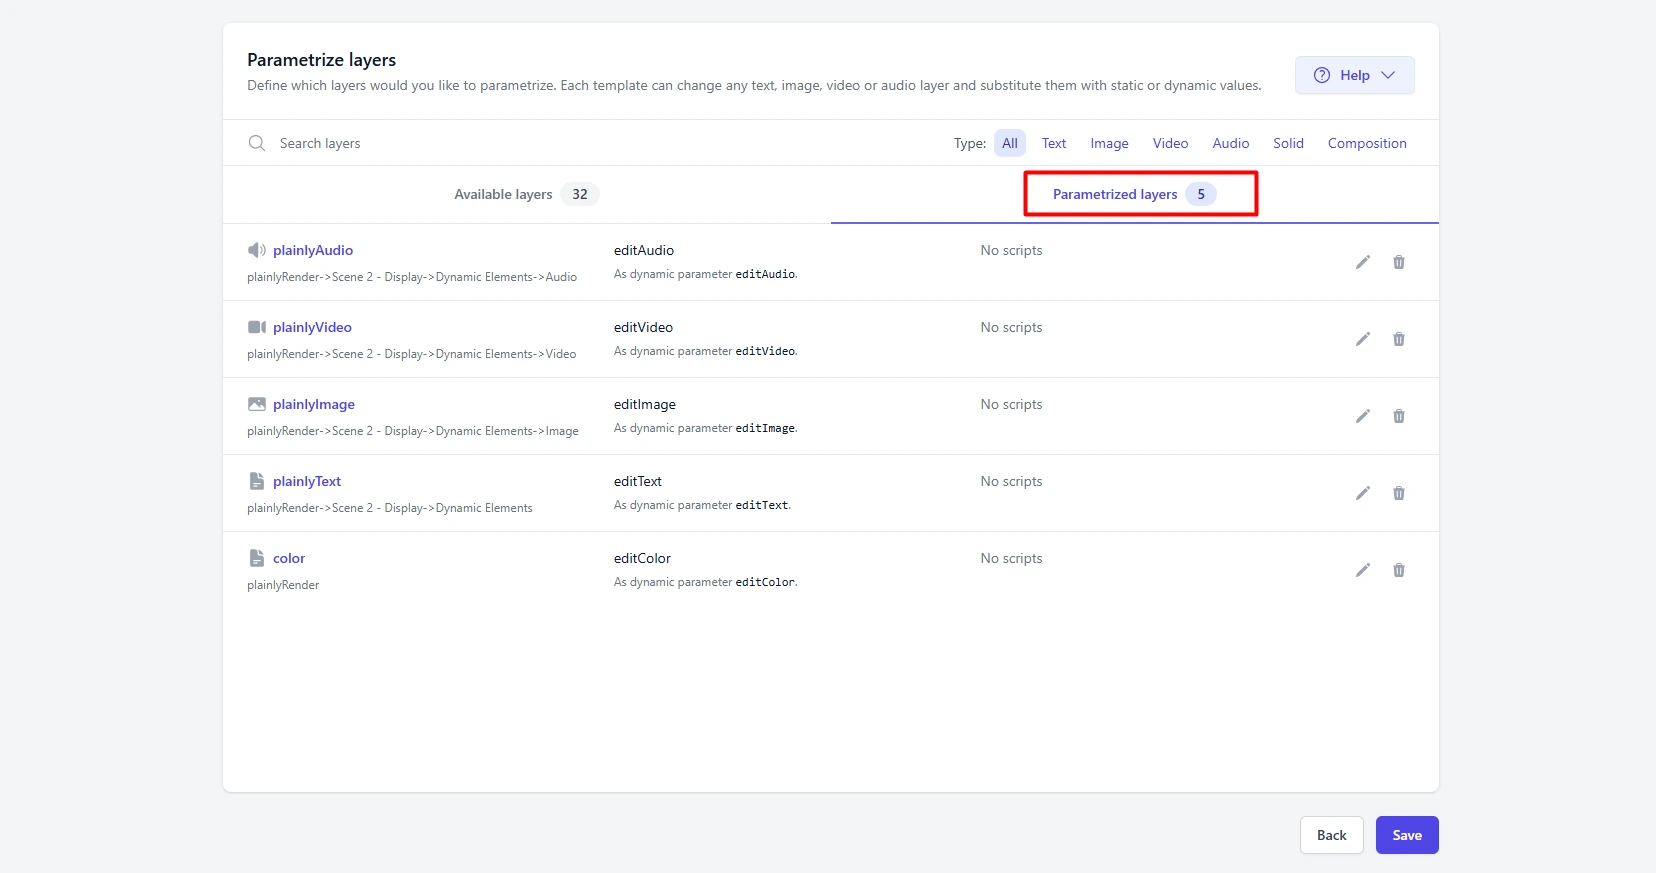
You can move on to the next step or open Parametrize Layers to see every element Plainly pulled from your project. Filter by layer type (text, images, video, audio, colors, or control effects) and edit or add which ones should update dynamically during rendering.
If you need more control, you can add advanced rules through Layer scripting. This is entirely optional, but it's useful when you want to automate things like cropping, extending, or shifting elements based on your data. Layer scripting automatically adjusts how each layer responds during rendering.
.webp)
Connect your data
Create a spreadsheet with one row per video you want to generate. Each column maps to one template parameter: CustomerName, Destination, TravelDates, Price, and similar fields. Case sensitivity is important. Using these exact names will speed up the next step when connecting your data to the template.
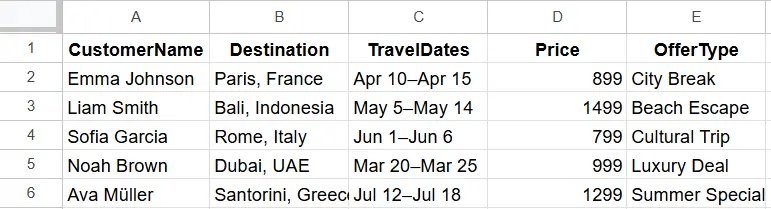
Format your data consistently to avoid rendering issues. Use the same date format throughout, include currency symbols in price columns if your template expects them, and carefully check for typos in customer names because nothing kills personalization faster than a misspelled name.
For image and video parameters, include publicly accessible URLs pointing to your destination footage. These URLs must be reachable by Plainly's servers, so either use signed URLs from your cloud storage or host assets on a CDN without authentication requirements.
Save your spreadsheet as a CSV (comma-separated values) file. While this guide uses CSV for simplicity, Plainly also supports Google Sheets, Airtable, and direct API connections for more sophisticated workflows where data updates frequently or lives in existing databases.
Start rendering your videos in bulk
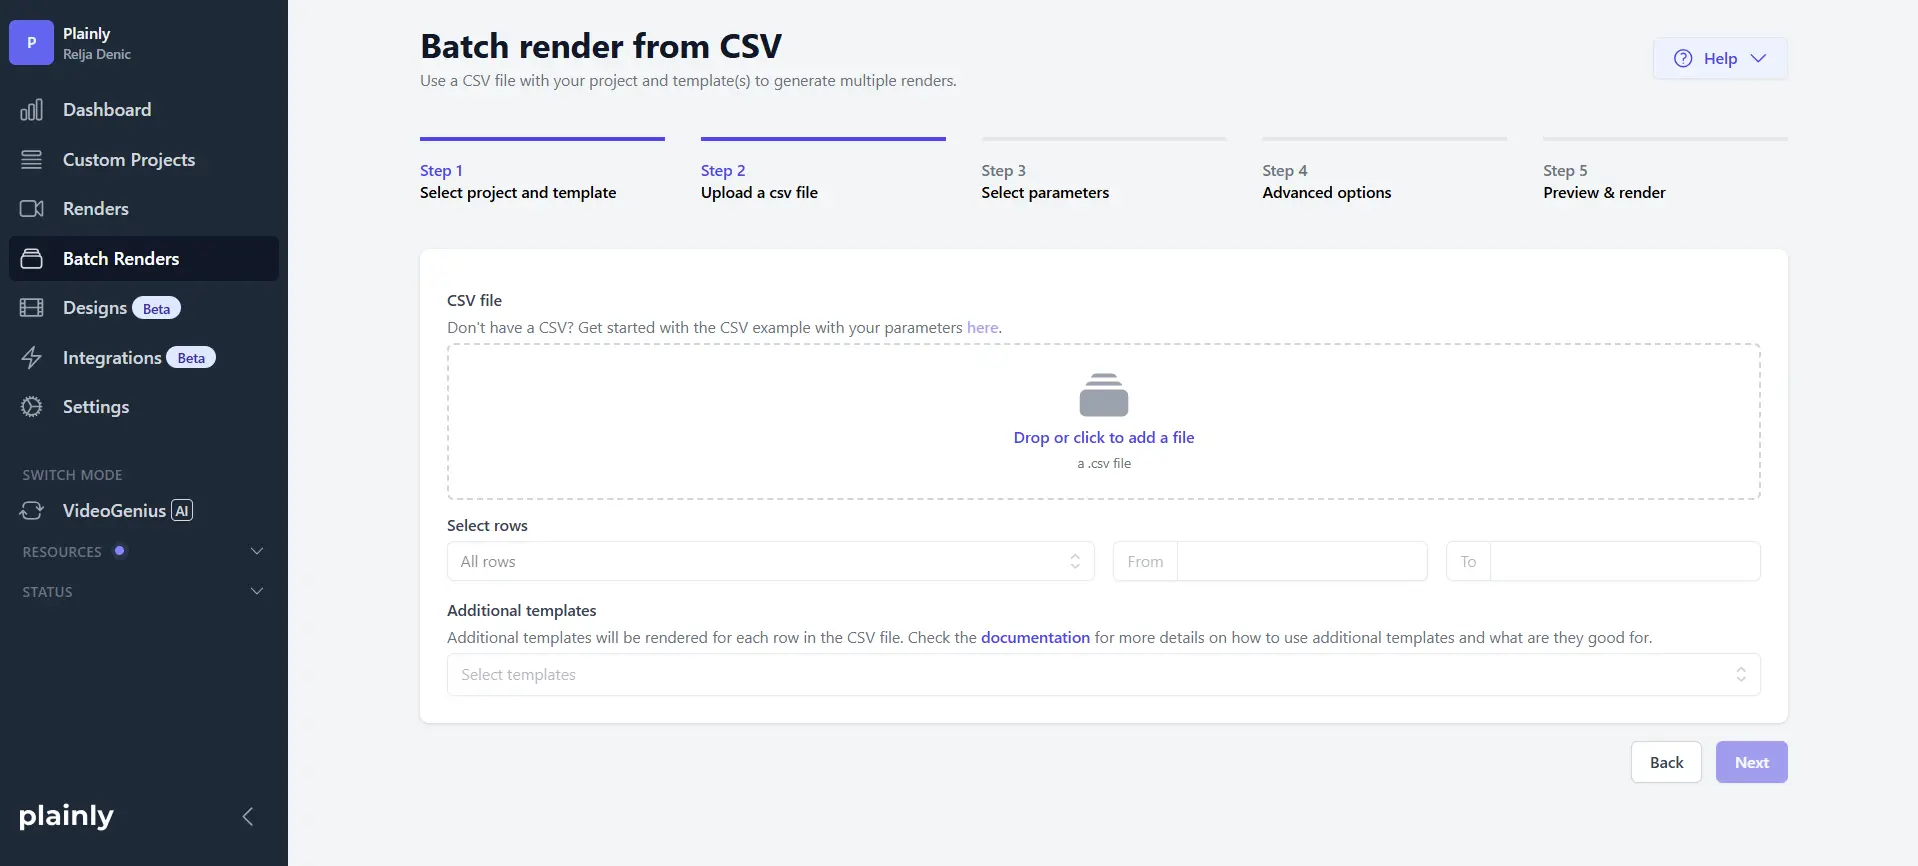
Navigate to the Batch Render page in Plainly, select your project and template.
After that, upload the CSV that you just created.
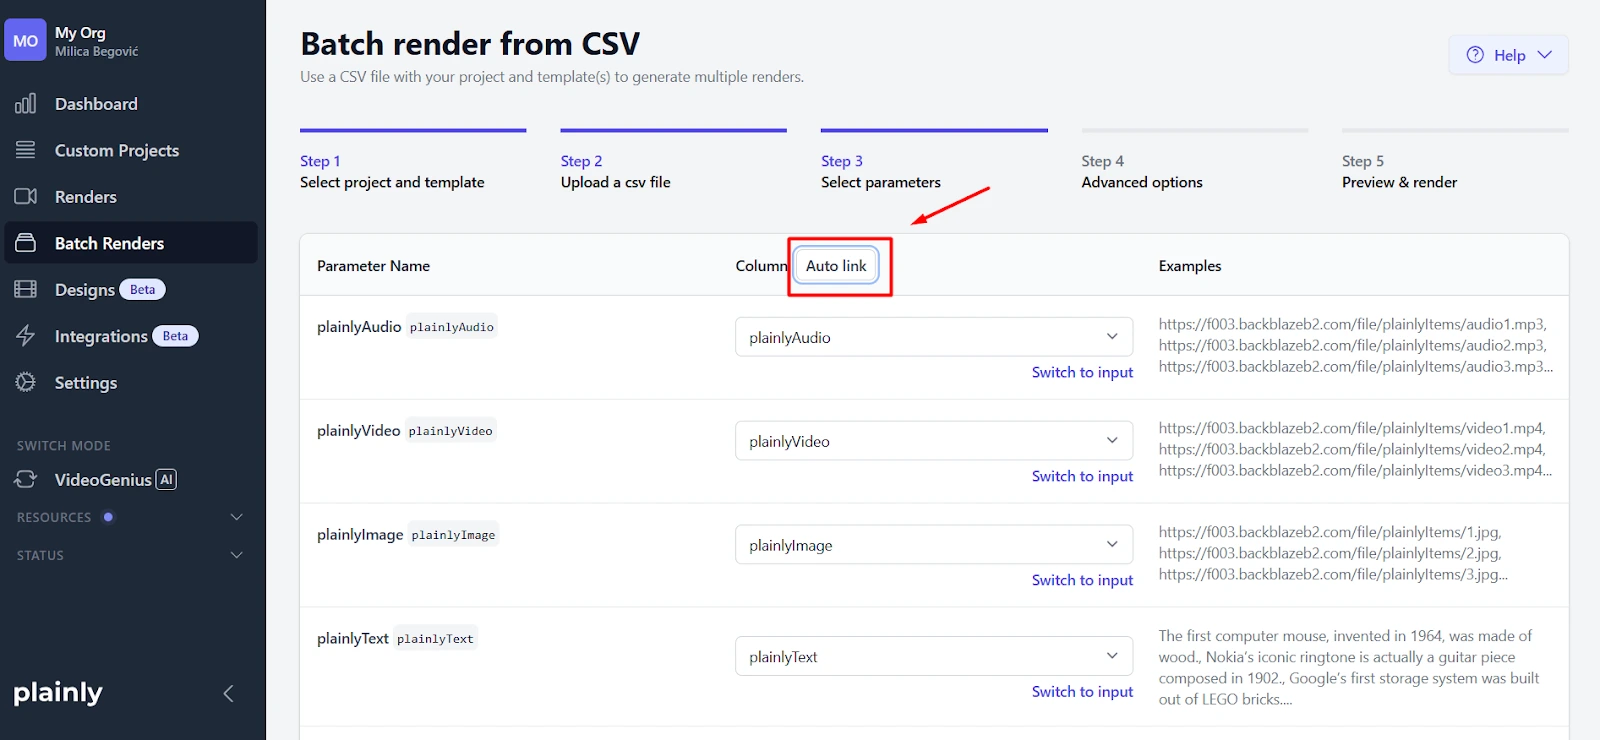
Plainly displays your CSV columns alongside your template parameters, letting you connect each column to the corresponding parameter. If you named your CSV columns to match your parameter names exactly, use the Auto link feature. It automatically maps columns to parameters, saving significant time.
Before submitting, configure advanced options like output format (MP4, MOV, or others), webhook URLs for completion notifications, captions if you're including subtitles, and thumbnail generation if you need preview images. These options apply to every video in the batch, so set them how you wish.

Click Render to queue all videos. Plainly processes renders in the cloud using the After Effects engine, so rendering happens in parallel rather than sequentially.
Download and distribute your videos
Once renders complete, you have several distribution options depending on your workflow needs.
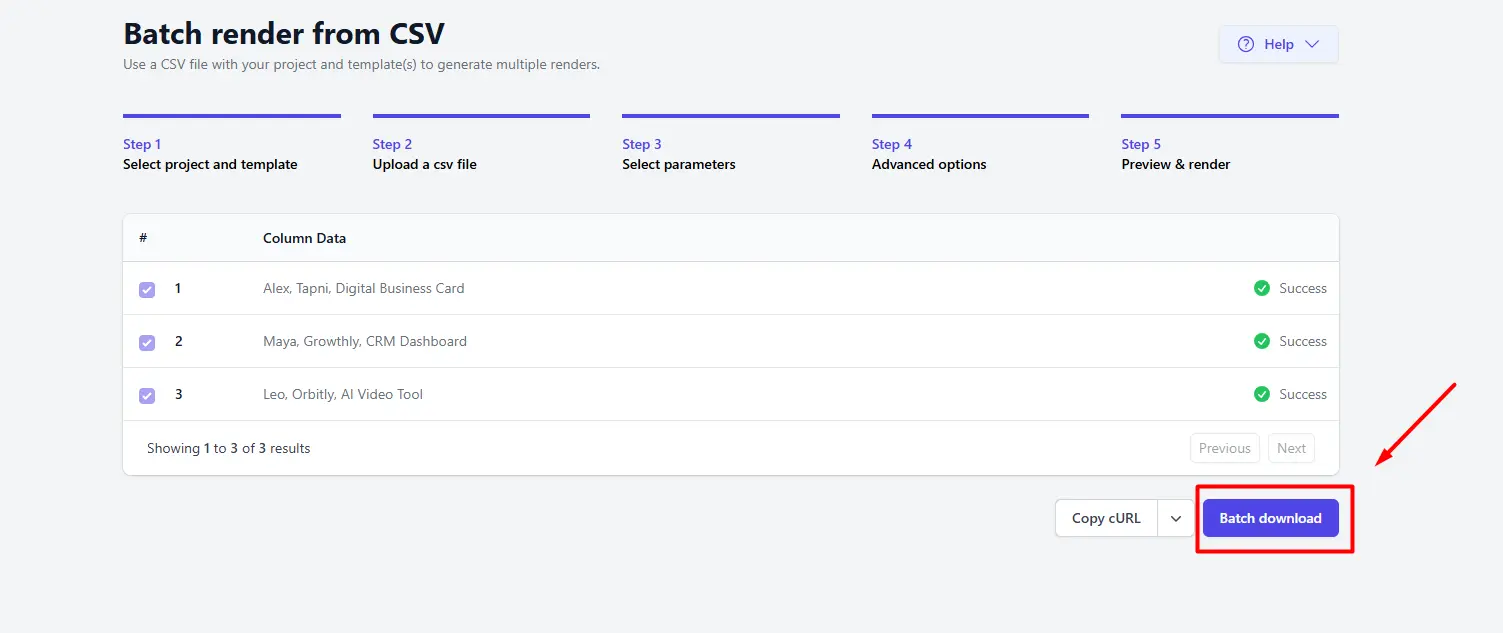
For manual distribution, download all videos as a ZIP file from Plainly's Batch Download page. Extract the files-they're organized by customer data, making it easy to match videos to recipients.
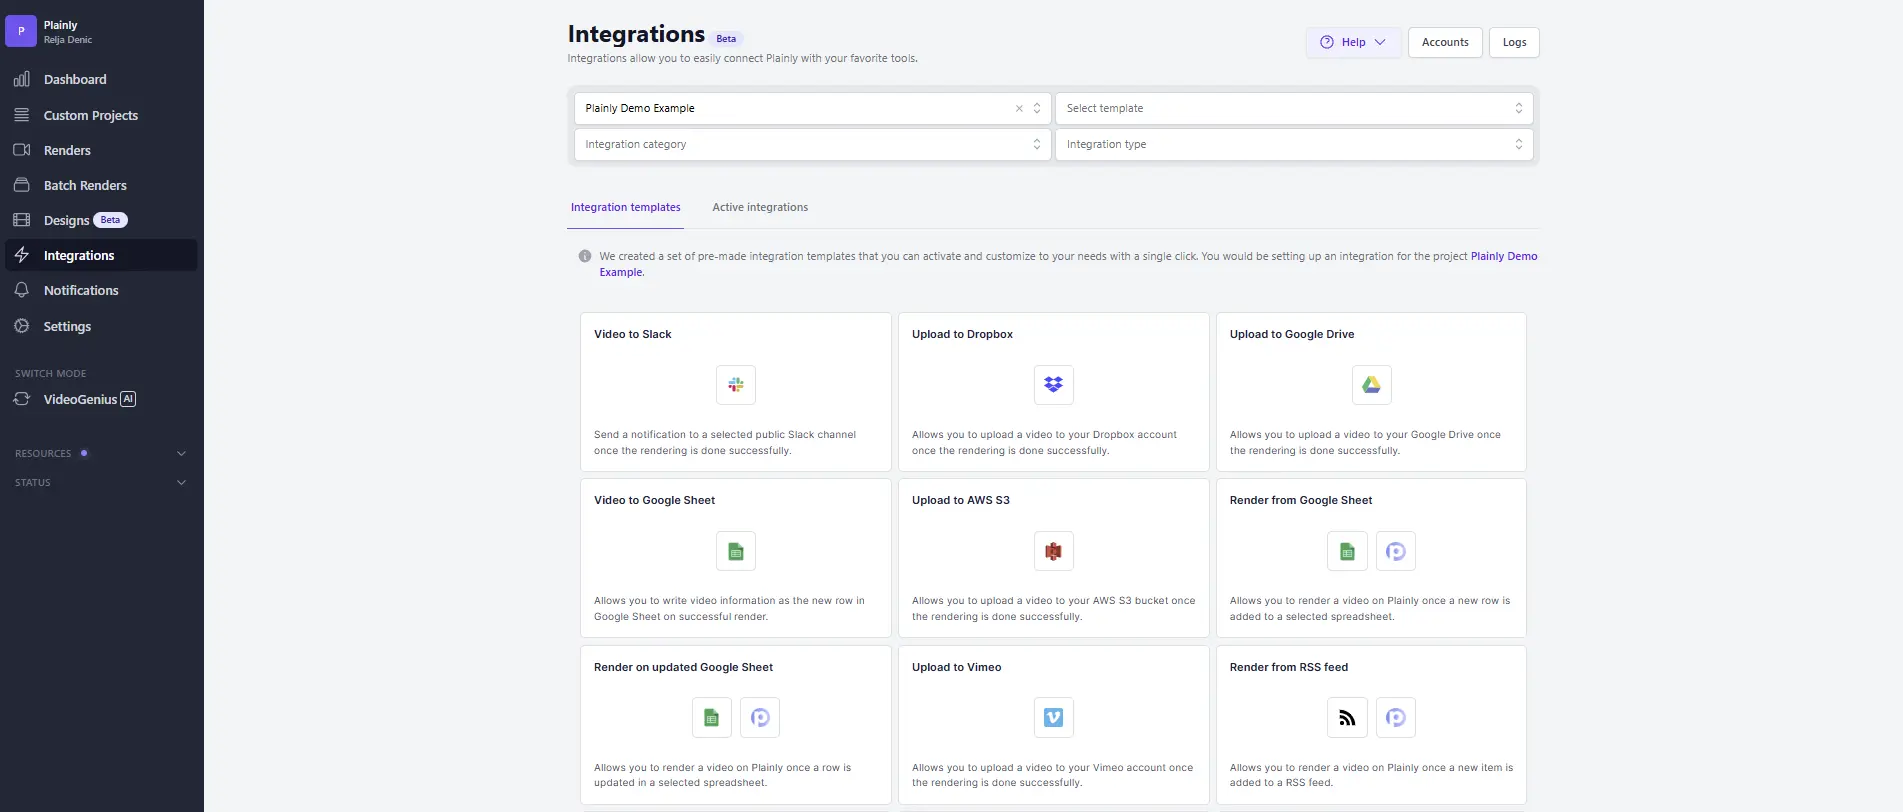
For automated distribution, configure integrations to upload finished videos directly to cloud storage. Send videos to specific Google Drive folders, push them to Frame.io for client review, or sync to Dropbox for team access. These integrations run automatically after each render completes, eliminating manual file management.
For advanced workflows, use Plainly's API to programmatically retrieve video URLs and integrate with CRM systems, marketing automation platforms, your app, or with anything where you want to get rid of the manual process.
Plainly supports multiple delivery methods simultaneously, so you can download a backup copy while also pushing videos to cloud storage and triggering webhook notifications to your CRM. Choose the combination that fits your existing tools and processes.
Start personalizing your travel offer videos
You've just transformed what used to take hours of manual editing per video into minutes of automated rendering. Send personalized offers or even dynamic video ads to hundreds of customers simultaneously, each greeting travelers by name with their specific destinations and dates.
The competitive advantage shows up immediately in your metrics. Personalized videos drive higher booking rates and customer satisfaction, because prospects actually watch content that speaks directly to their trip with their specific destination and travel dates.
Sign up to Plainly and get a 14-day free trial. Upload your After Effects template, and you're ready to render personalized travel videos.