How to automate lower thirds in After Effects [2026]


Summarize with


You've got a spreadsheet with 80 client names and titles, a finished testimonial video, and a lower third design that's ready to go. Everything's ready except the part where you open After Effects and spend the next four hours copying names from a spreadsheet, pasting them into 80 separate compositions, adjusting text that doesn't quite fit, and praying you don't typo a VP's name on entry 73.
The slowdown is never the creative part. It's the data entry.
Automating lower thirds in After Effects cuts that four-hour work down to about 15 minutes. One template, one data file, a rendering pipeline that runs without tying up your machine. No custom scripts to maintain, no folder structures that only make sense to you, no expressions that fall apart the moment someone else opens the project.
This article walks through a concrete, step-by-step workflow for building that automation. You'll design your lower third exactly as you normally would in After Effects, connect it to a data source, and batch-render every version without touching a single text layer more than once. If you've ever duplicated a comp 50 times and felt your soul leave your body somewhere around comp 34, this one's for you.
TLDR
- One template, unlimited output. Design your lower third once in After Effects, connect a CSV or spreadsheet, and render as many versions as you have rows of data.
- No coding required. The entire automated lower-thirds workflow in After Effects relies on a CSV file and a cloud rendering tool, not scripts or expressions.
- Cloud rendering keeps your machine free. Renders happen on remote infrastructure, so you can keep working in After Effects while your lower thirds process in parallel.
- Typos and formatting drift disappear. When text comes from a single, reviewed data source rather than manual entry across dozens of comps, human error drops to zero.
- Delivery is flexible. Download finished files as a zip, push them automatically to Google Drive or Frame.io, or deliver them into a custom system through an API.
What are automated lower thirds?
A lower third becomes automated when its text fields pull from a data source rather than getting typed in manually for each comp, though other elements like colors, images, and media can change too. The design, animation, and timing stay the same across every version.
One template gets designed once in After Effects. A data file (typically a CSV) drives what's different between versions. Each row in that file produces one finished lower third. Whether you're producing 10 lower thirds or 400, the work on your end is the same. Build the template once, and you're done.
Picture a documentary crew wrapping production with 40 interview subjects. Traditionally, someone on the post team would duplicate the lower third composition 40 times, manually type each person's name and title, double-check spelling against a call sheet, and render each one. With automation, a single CSV containing 40 rows of names and titles renders all 40 files without anyone opening a text layer after the initial design.
This approach is common in broadcast content production at scale:
- news tickers
- sports graphics
- corporate event sessions
- conference speaker intros
Anywhere the volume of name-and-title graphics goes beyond a handful, automation removes the bottleneck.
Common problems with manually editing lower thirds in After Effects
Before walking through the solution, it's worth spelling out exactly why manual lower third production breaks down at scale. If you've only ever made five or six, the pain might feel manageable. Once you cross into double digits, specific problems start compounding.
Step-by-step guide to automate your lower thirds in After Effects
This walkthrough uses Plainly Videos as the automation tool. Plainly is video automation software built on After Effects infrastructure, which means your AE templates render natively without conversion or compromise. The designer works in After Effects as usual.
- Connects your data to the template
- Renders everything in the cloud
- Delivers finished video files
The workflow has five stages, and the first one is the only part that requires After Effects on your machine. Everything else is handled in the cloud.
Create your lower third design
Build the lower third in After Effects exactly the way you normally would. Set up the layout, animate the elements, dial in your timing and easing, and apply your brand colors. Nothing about the design process changes.
Once the design is finished, identify which elements need to change between versions. For a standard lower third, that's typically two text layers: the person's name and their title or role. Some designs also include a dynamic headshot, logo, or accent color, and all of those can be automated too, but the name and title are the most common starting point.
The trick is giving every dynamic layer a consistent prefix in After Effects. The prefix can be any word you choose - render, edit, dynamic, whatever makes sense to your team. So, for example, instead of a layer named "headline", add your prefix "renderHeadline". Just keep it consistent across all layers that should change between versions.
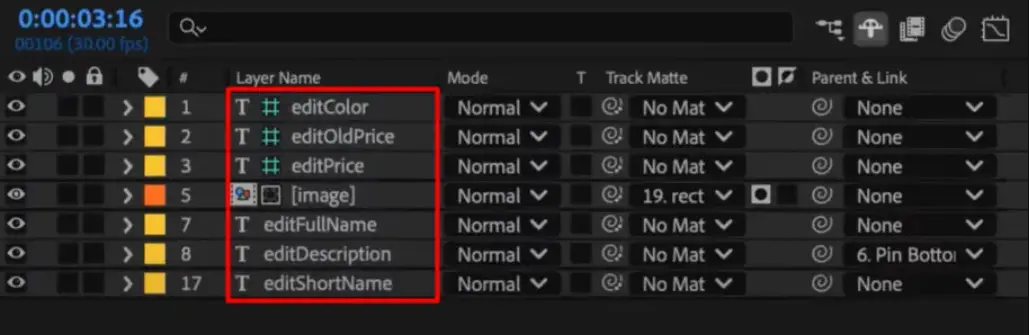
This prefix is the signal that the automation tool uses to detect which layers are dynamic. Everything without the prefix stays fixed across all rendered versions.
When the template is ready, zip the entire After Effects project folder. That means the .aep file and all linked assets, fonts, images, textures, everything the project references. This zip file is what you'll upload next.
Upload your project to a video automation tool
Open the Plainly dashboard and click Upload. Give the project a name, upload the zip file, and wait for the upload to finish.

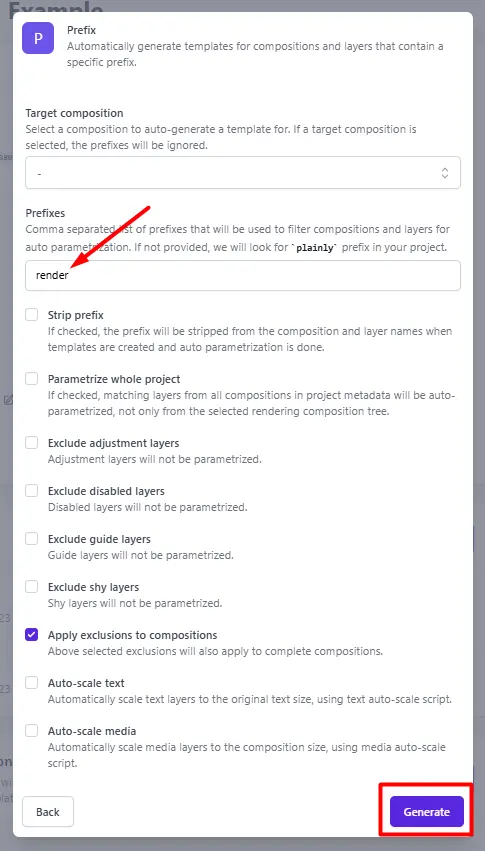
Once uploaded, create a template from the project. Click Auto-generate and select the Prefix option.

A new window will open, and now write the exact prefix you used in After Effects (e.g., render). Plainly scans the project file, finds every layer whose name starts with that prefix, and automatically tags it as a dynamic layer. This is why the naming convention matters. Without the prefix, you'd be manually selecting dynamic layers one by one.
After auto-generation, you can open Parametrize Layers to review everything Plainly detected. This panel shows all dynamic elements sorted by type:
- Text
- Image
- Video
- Audio
- Solid
- Composition
Add, remove, or adjust layers if needed.

For more complex templates, you also have Layer Scripting that lets you set advanced rules on individual layers, like cropping, extending, or shifting elements based on data and timeline logic.
.webp)
Also, If your team needs the same lower third in multiple formats (horizontal for broadcast, square for social, vertical for stories), you can set up multiple templates from the same uploaded project and render all of them from a single data file in one go.
Connect your data
Plainly supports multiple data sources, including Google Sheets, Microsoft Excel, Airtable, CSV files, and more. For this walkthrough, we'll use CSV because it's the simplest and most universal starting point. A spreadsheet-to-video workflow starts here, regardless of which tool you prefer.
The CSV structure is simple. Row 1 contains column headers that match your dynamic layer names exactly. If your layers are called renderName and renderTitle, your CSV headers are renderName and renderTitle. Each row after that represents one lower third.
.webp)
A faster way to build your CSV is to go inside Plainly, click Generate example CSV from within your template. It creates a pre-formatted file with all the correct column headers already in place, pulled directly from your dynamic layers. Just fill in the data, and you're done.

One workflow worth mentioning for teams that want hands-off automation is that some production teams use Airtable as a form interface where a producer or coordinator enters lower-third data directly. When someone submits the form, Airtable pushes the new row to Plainly through the Integrations tab, and rendering starts automatically. No one has to touch Plainly at all. The lower third just appears, rendered and ready. That kind of live integration works with Google Sheets and Excel, too.
Start rendering your lower thirds in the cloud
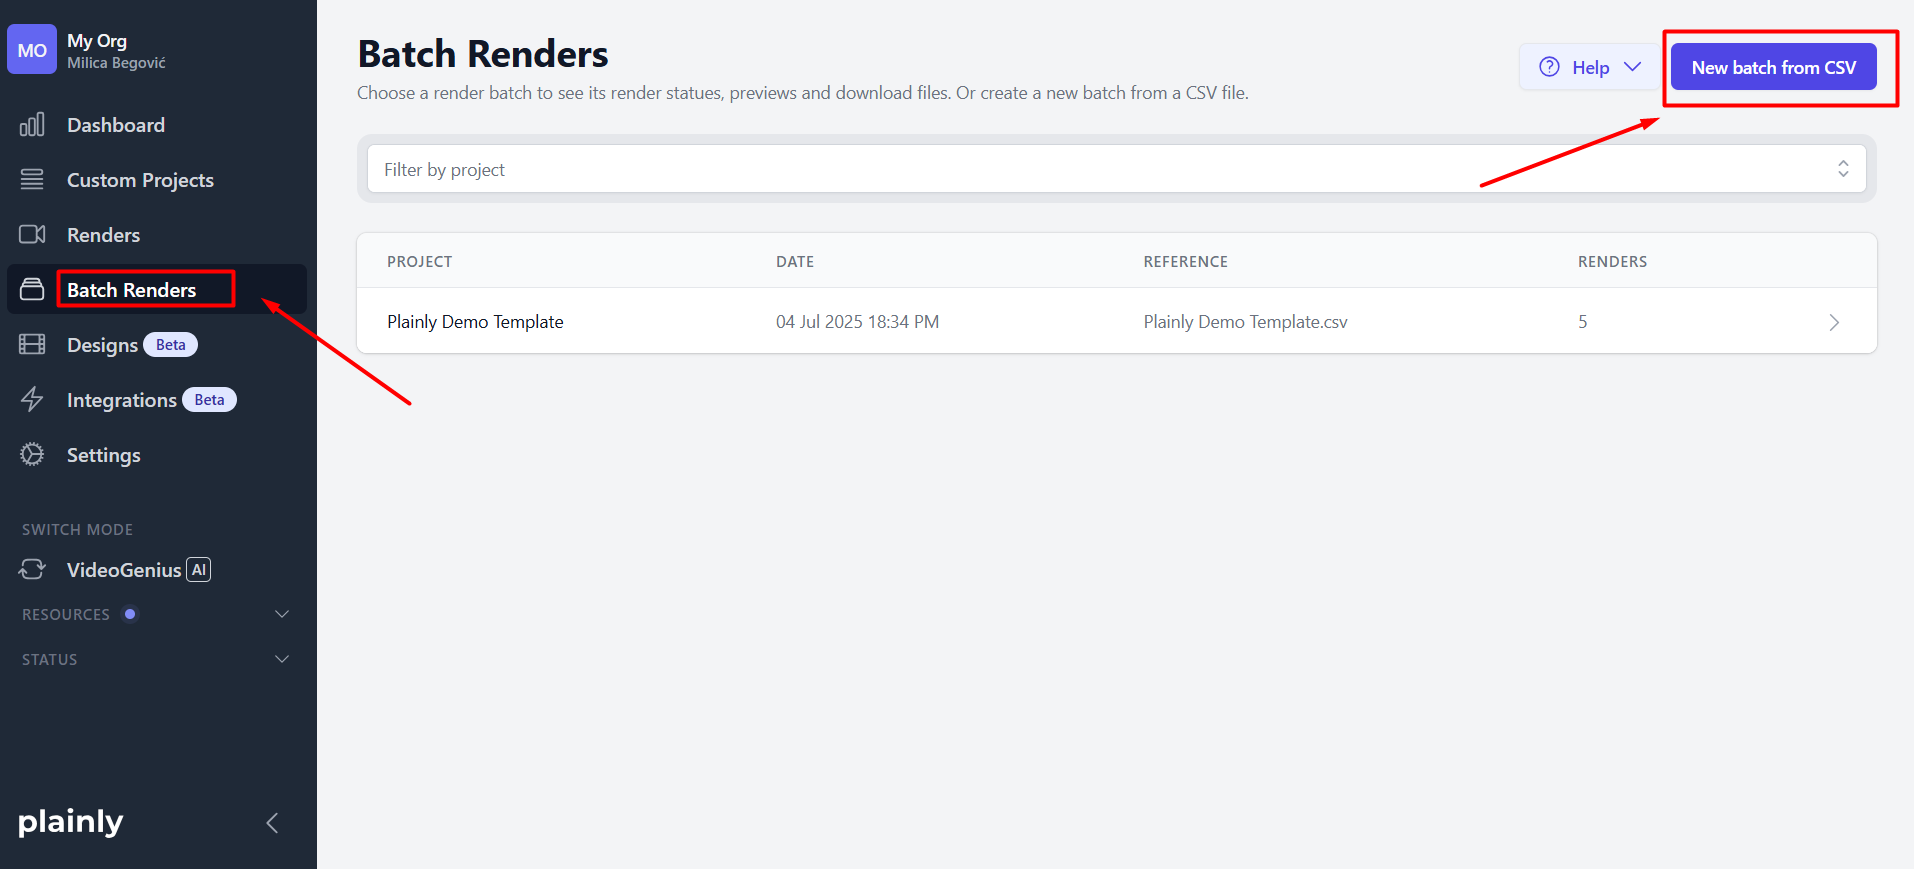
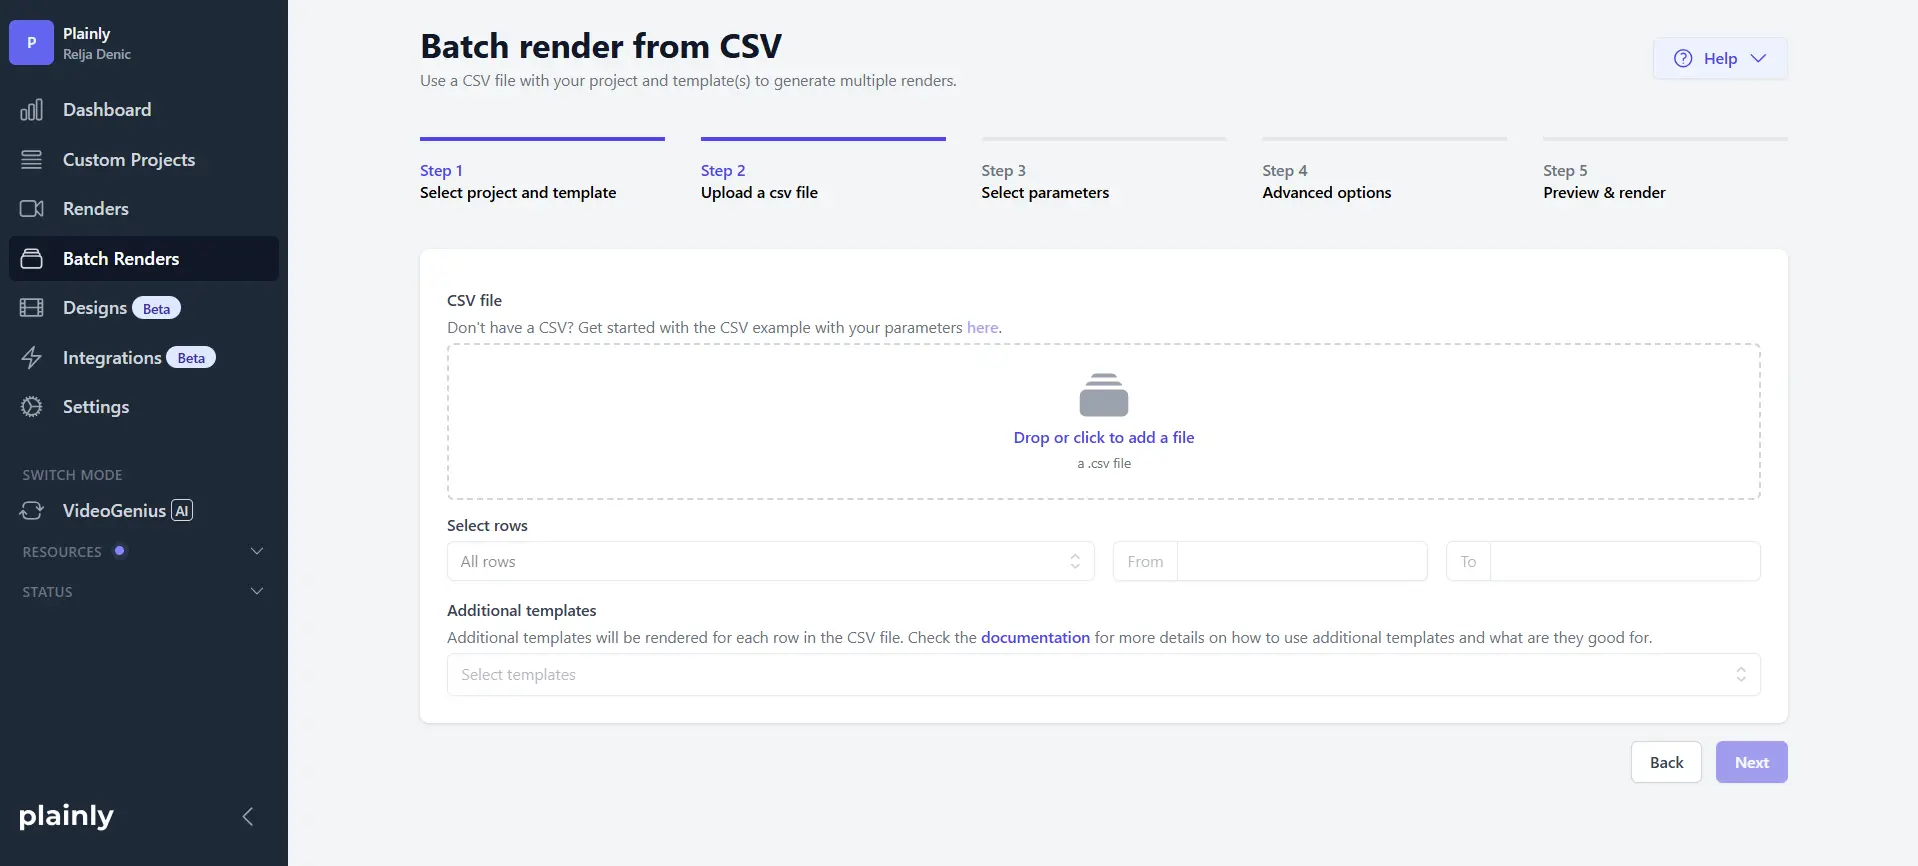
Go to Batch Renders in Plainly and click New Batch from CSV.
Upload your CSV file and select any additional templates you created for other formats.
The next screen asks you to map CSV columns to template layers. If you followed the naming convention (column headers match layer names), click the Auto-link button. Plainly maps everything automatically. If names don't match perfectly, you can map them manually with dropdown menus.
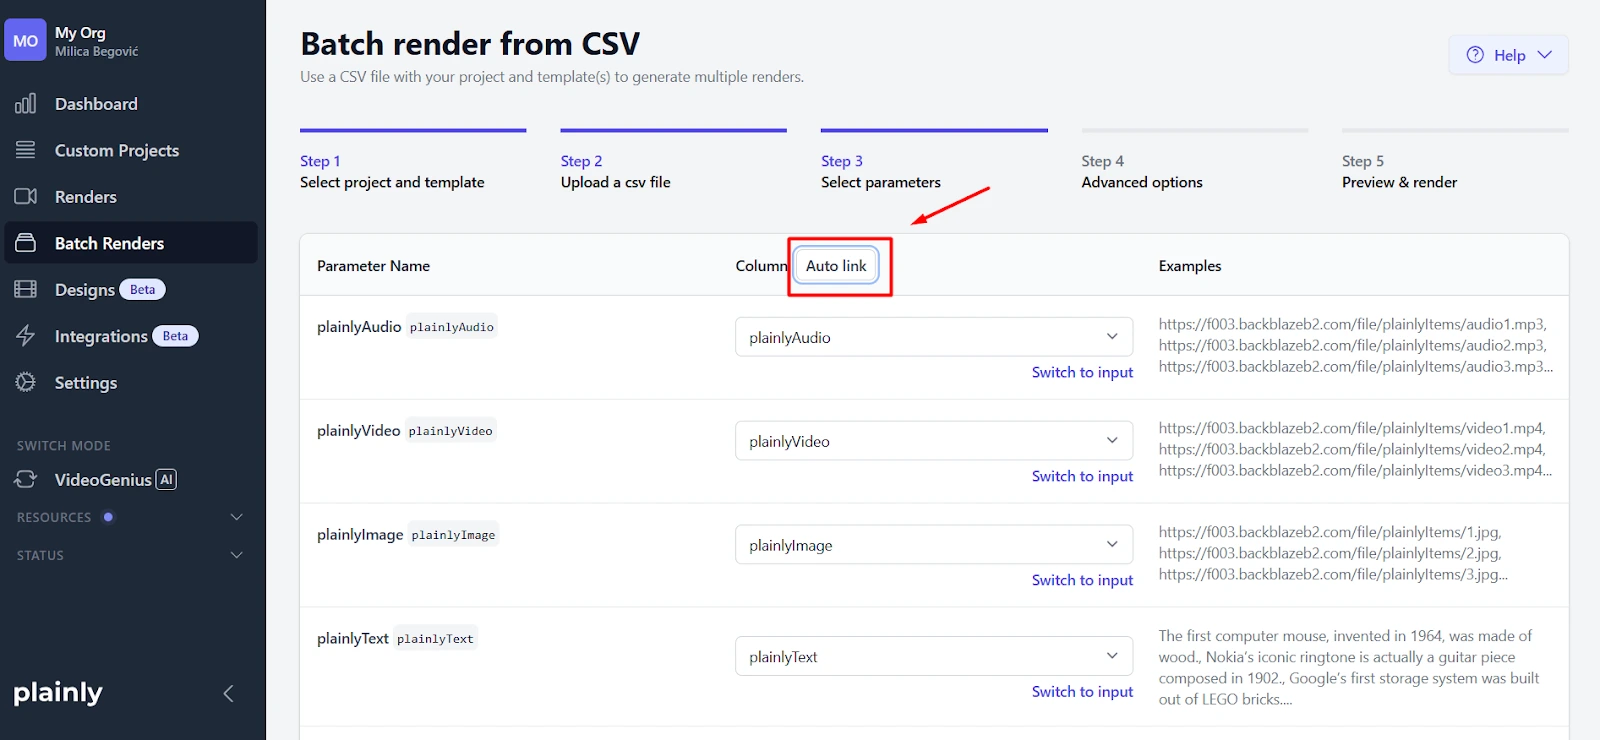
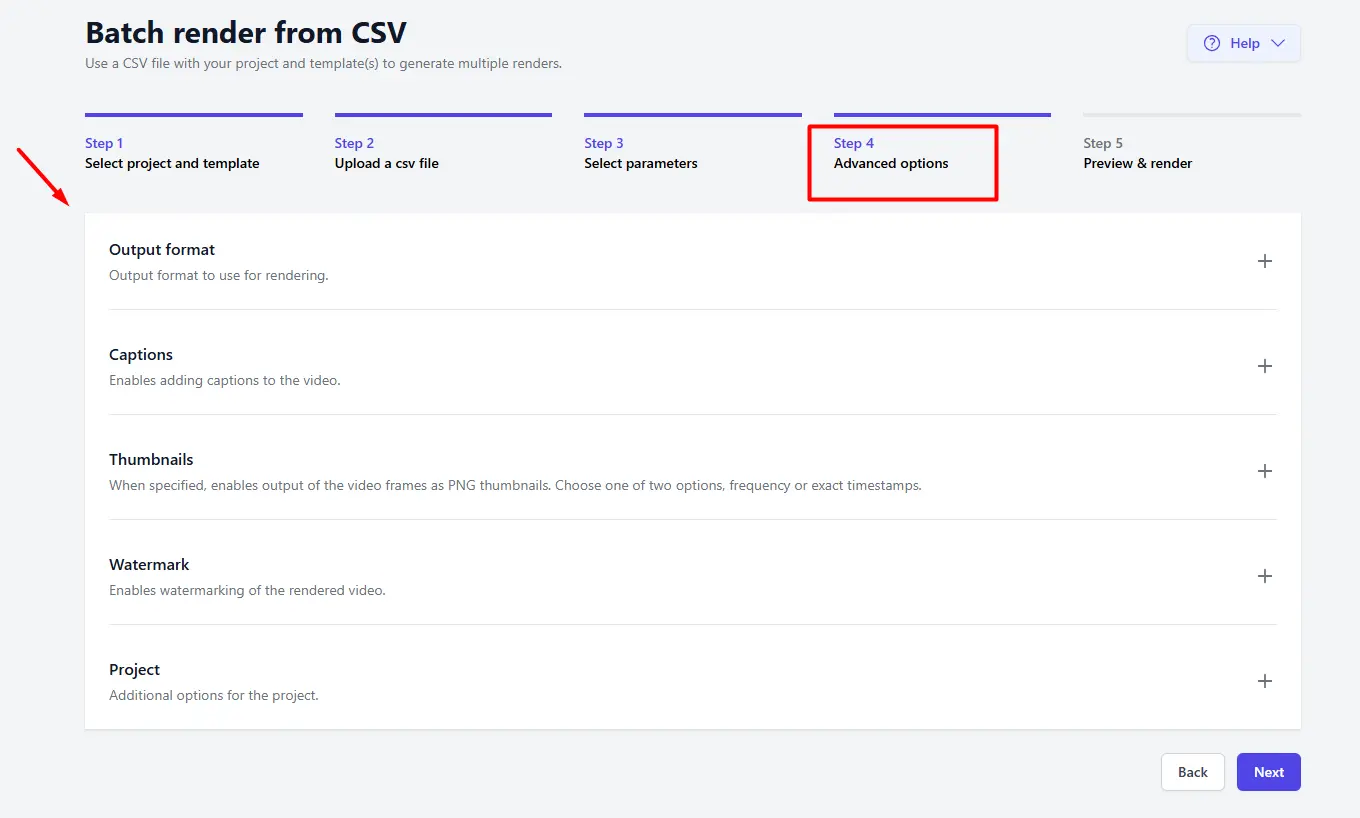
You can configure any optional settings you need, like output format, captions, thumbnails, and watermarks, or leave it to the default settings. When you are don click next, and then Render.
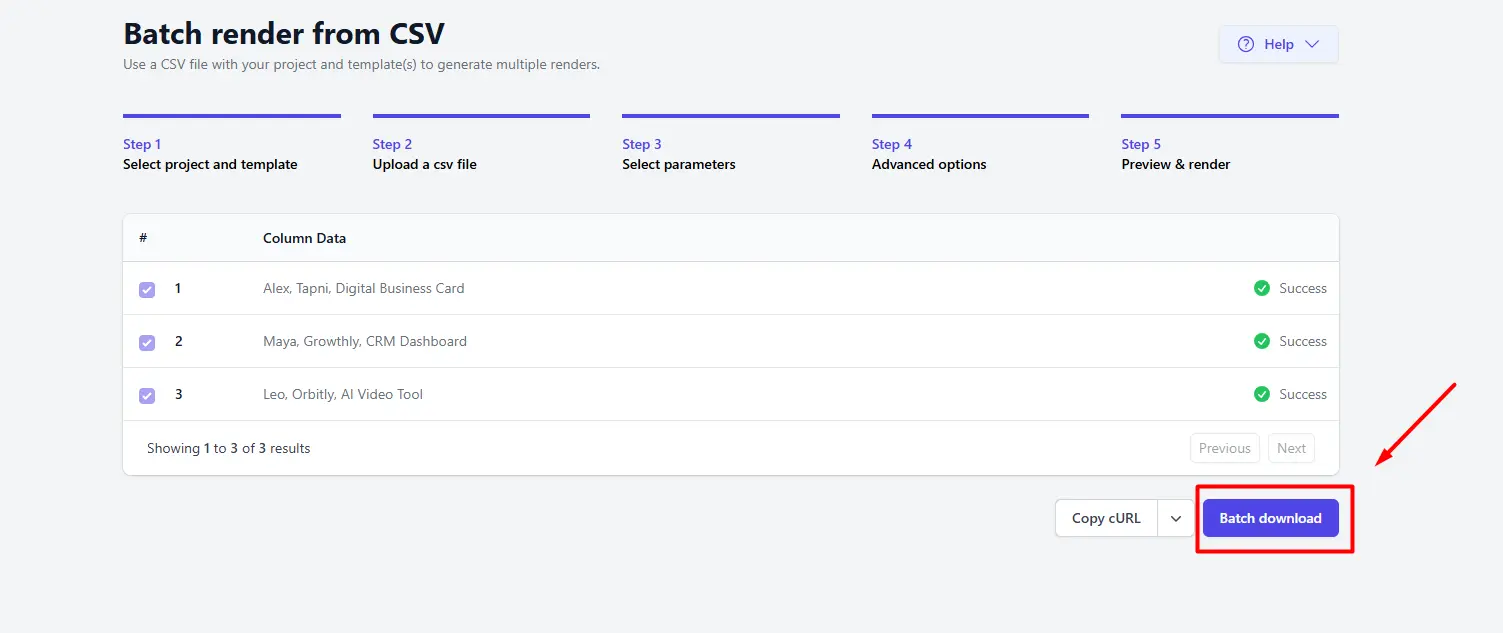
Rendering happens on Plainly's cloud infrastructure. Your local machine stays completely free, which means you can keep working in After Effects on the next project while your lower thirds render in parallel. The exact number of concurrent renders depends on your plan, but the key point is that you're not sitting idle watching a progress bar.
That's where After Effects automation pays for itself. Renders that used to tie up your machine for hours just run on someone else's hardware while you get on with other work.
Download your lower thirds
Once rendering finishes, you've got options depending on how your team handles delivery.
- Small batches or manual review. Download files individually or grab everything as a single zip from the Plainly dashboard.
- Shared team folders. Connect Google Drive or Dropbox for automatic file delivery. Rendered lower thirds land in the folder you specify without any manual downloading.
- Review and approval pipelines. Connect to Frame.io so stakeholders can review, comment, and approve lower thirds inside their existing workflow.
- Fully programmatic delivery. Use the Plainly API to push finished lower thirds directly into a CMS, a broadcast playout system, or any downstream workflow that accepts video files. This is how teams build fully automated pipelines where lower thirds go from data entry to delivery without a human in the loop.
When automated lower thirds in After Effects make sense
Once the number of lower thirds on a project gets past 10 or 15, manual entry stops being tedious and starts being a time sink. The setup time for building an automated template is roughly the same whether you're making five lower thirds or five hundred. What changes is everything that comes after that initial build.
The workflow is worth revisiting in plain terms: design one template in After Effects, mark your dynamic layers with a prefix, upload to Plainly, connect a CSV, and hit render. Your machine stays free, your text stays consistent, and revisions mean updating a spreadsheet cell instead of reopening a project file. That's the core of an automated lower-thirds workflow in After Effects, and it doesn't require scripting, expressions, or any technical knowledge beyond basic spreadsheet skills. Every version of your dynamic video output inherits the same design quality as your original template.
If you want to see how this works in practice, start your 14-day free trial of Plainly Videos and run your first automated lower thirds batch before the end of the day.


.webp)