Make your own Spotify Wrapped using video automation


Summarize with


You must be wondering how to make your own Spotify Wrapped experience for your users so they can get that same “wow, this is so me” feeling they already know from Spotify, but with your product? If the answer is yes, you’re in the right place.
In this article, we’ll show you how to get creative and design a Spotify Wrapped-style template in Adobe After Effects and connect it to Plainly Videos, so your product data can automatically turn into thousands of personalized recap videos with no manual editing. Just a little setup and some powerful tools.
You’ll learn what Spotify Wrapped really is, how to translate that idea into your own year-in-review presentation concept, and how to plug Plainly into your stack so this becomes a repeatable campaign, not a one-time thing. This workflow can run every year (or even every month) with almost no extra work from your side.
We’re leaving a video tutorial here, too, for you visual types:
But we will also provide everything in writing, so you can go back to each step, any time you need to set up your personal bulk video editor. Let’s dive in and begin the setup right away!
What is Spotify Wrapped?
Spotify Wrapped is Spotify’s annual year-in-review experience that turns each listener’s streaming data into an online personalized story. Every December, Spotify packages your top artists, songs, genres, and minutes listened into bold, hilarious, story-style slides and short videos you can swipe through and share with your audience. It works as both a fun recap for users and a viral growth engine for Spotify, because every share of your listening habits and millions of others puts Spotify’s brand and your listening stats in front of new people.
Brands use similar Wrapped-style Spotify template videos as retention campaigns, win-back touchpoints, and social content that reminds users why the product matters. You can reuse this format for year-in-review moments, product anniversaries, or milestone campaigns like “your first 100 days with us.”
One of our clients, UNICEF, did just that. They used personalized videos to thank over 20,000 donors and strengthen their relationships by showcasing their efforts in a unique way. They switched from personalized emails to personalized videos for this campaign, and the results? Well, let’s just say there was an 8 percent increase in their generous donations.
How to create a year-in-review video experience like Spotify Wrapped
So, to create a custom year-in-review dynamic video experience like Spotify Wrapped, you combine a custom design in Adobe After Effects with automated rendering in Plainly Videos. After Effects is the industry-standard, most powerful tool for motion design, so you can make your own Spotify Wrapped-style visuals that actually feel polished and on-brand. Plainly then connects that template to your user data and automatically generates personalized recap videos at scale, without anyone reopening After Effects again.
In the next steps, we’ll walk you through the process of setting the system end-to-end, from the first template to a fully automated Wrapped-style experience for your users.
Create your Spotify Wrapped template
First things first! We need our main template, the core of our creative, which can be reused for every single user. It’s simple: this template is your “master file”: you design the layout once, animate, add music, and later, Plainly will swap in different names, stats, and images for each viewer. In fact, any element you’d want to change.
The only thing you need to do is mark those dynamic layers in the template before you hit render. A simple Edit prefix is enough for Plainly to know which elements of the main video will be swapped for each user, based on additional data. Of course, any word can be used as an alternative for the prefix; just make sure to match it in the template and later on, in Plainly.

Now, let’s look at some After Effects automation magic, sponsored by Plainly!
Upload your template to Plainly
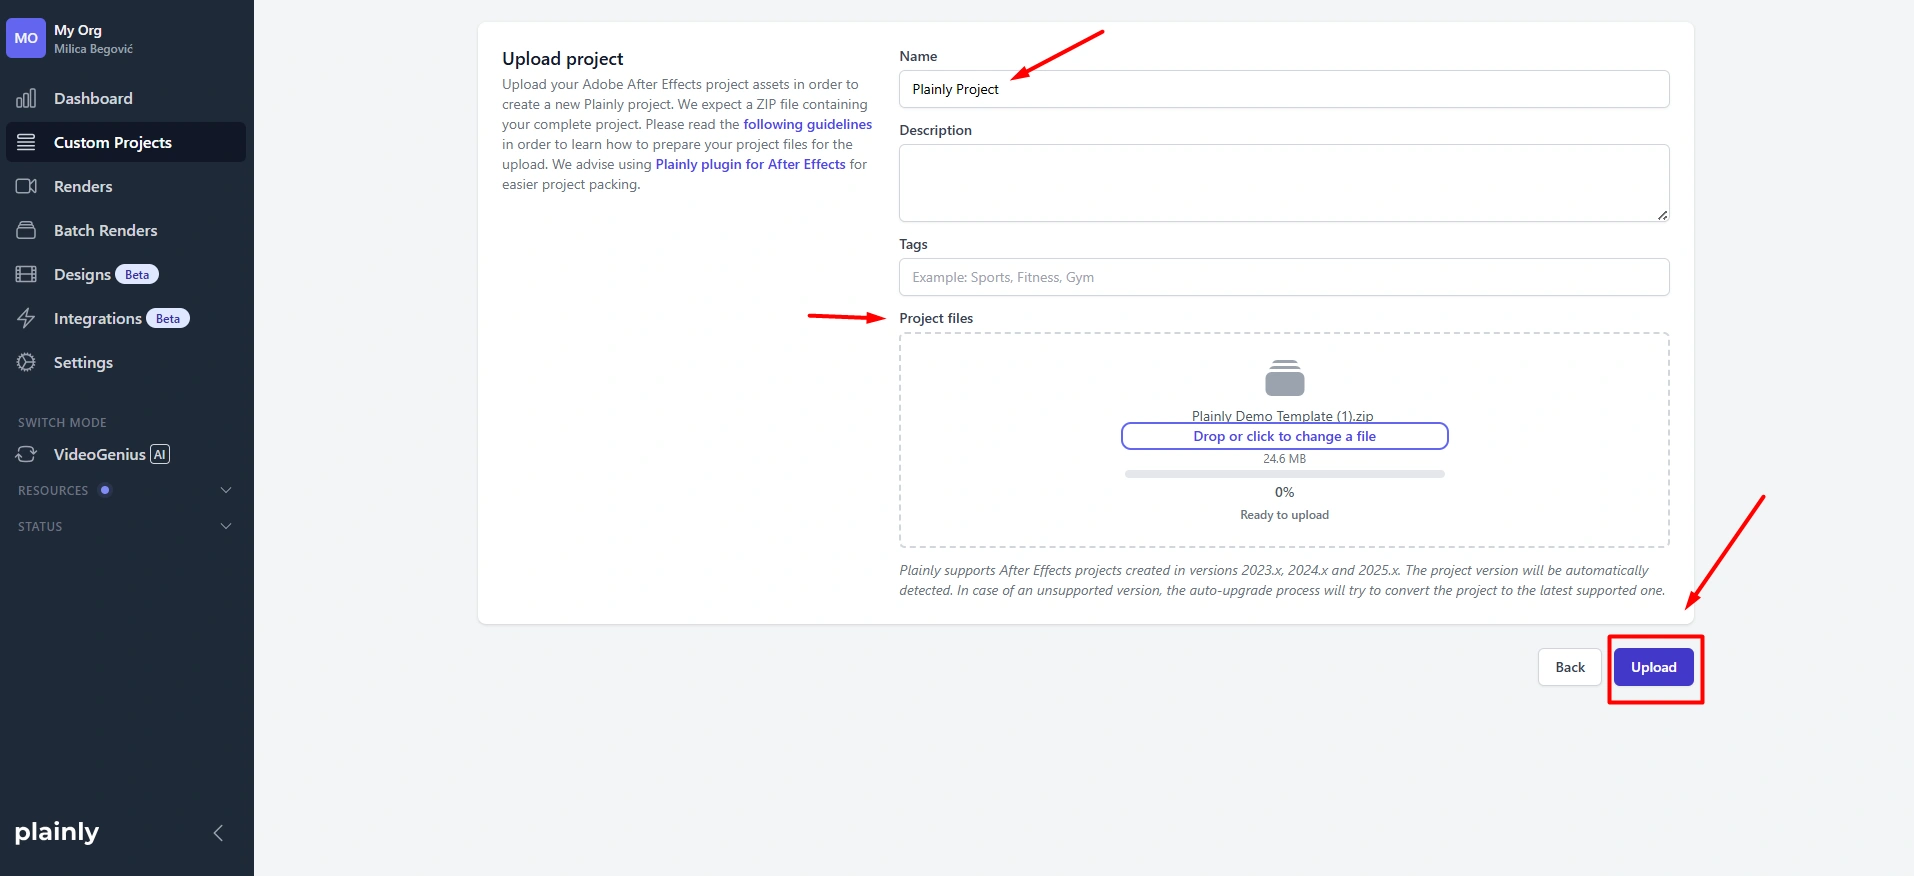
Step number two is very simple. You open Plainly and upload a .zip version of your main creative - your template.
- Go to the main Dashboard and hit Upload project. Then add the project along with all the details that you need, like name, tags, etc. Then just hit Upload.
- After your project loads, hit the magic button - Auto-generate.
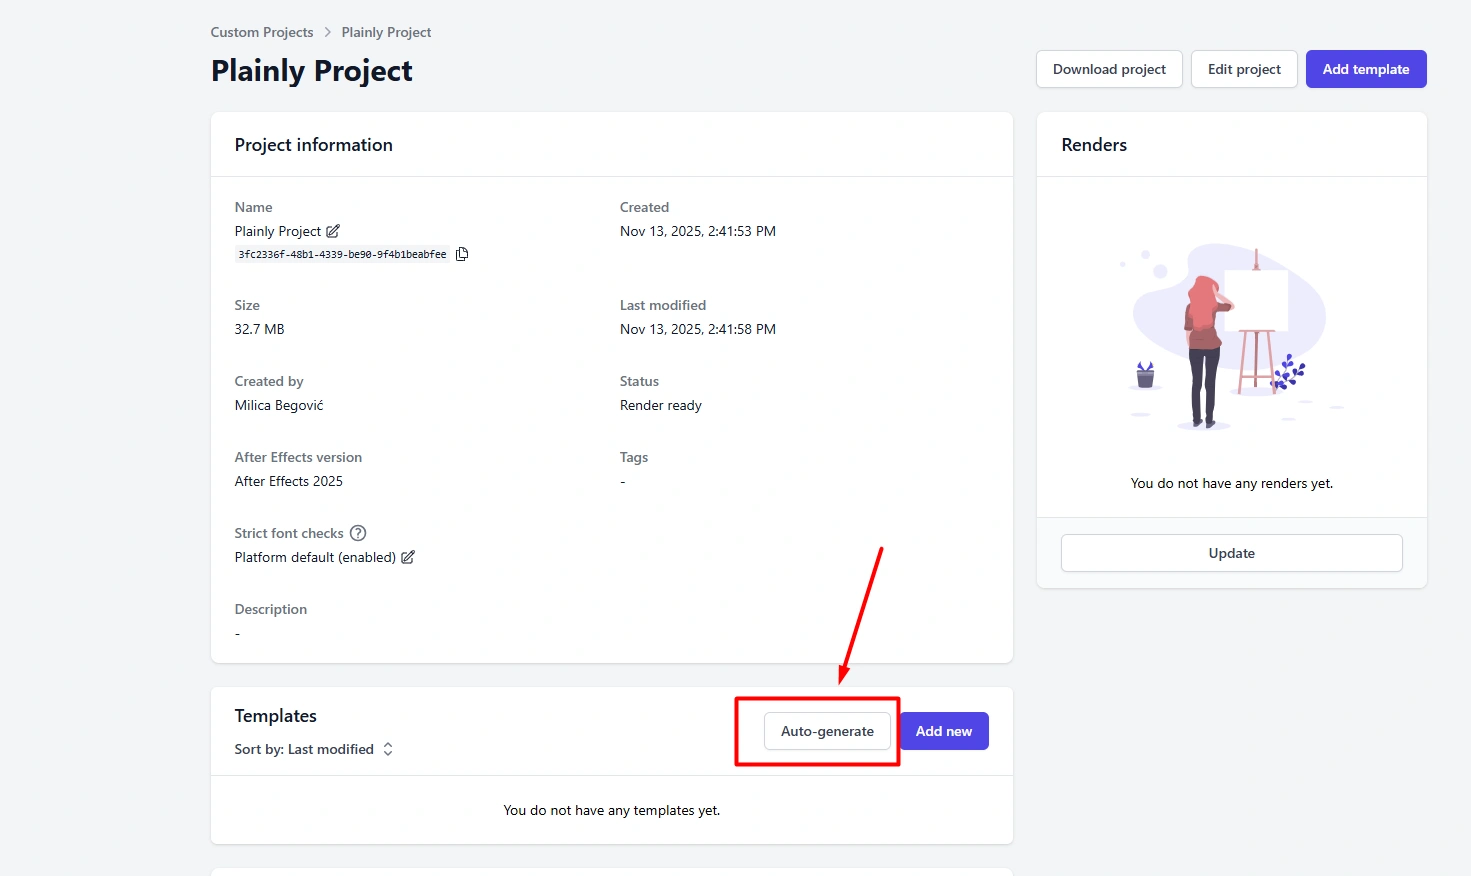
Then select the Prefix option and enter the same prefix you used earlier in After Effects (in our case, it was Edit). This tells Plainly exactly which layers should be dynamic and automatically generates your template by mapping all editable layers that will change across all Spotify Wrapped-style versions.

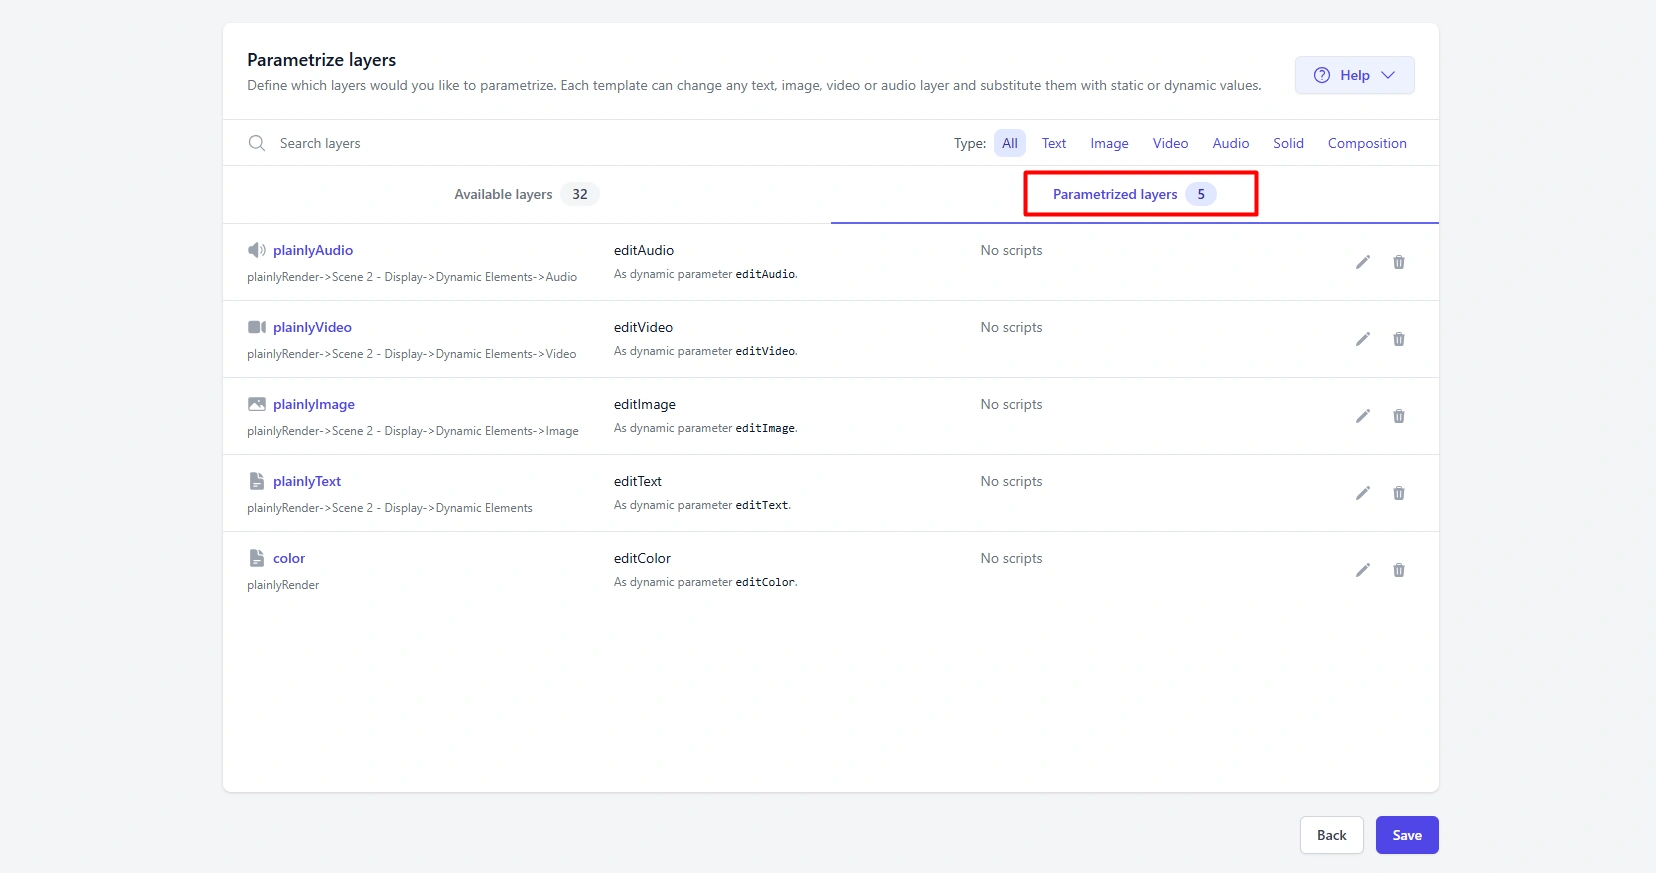
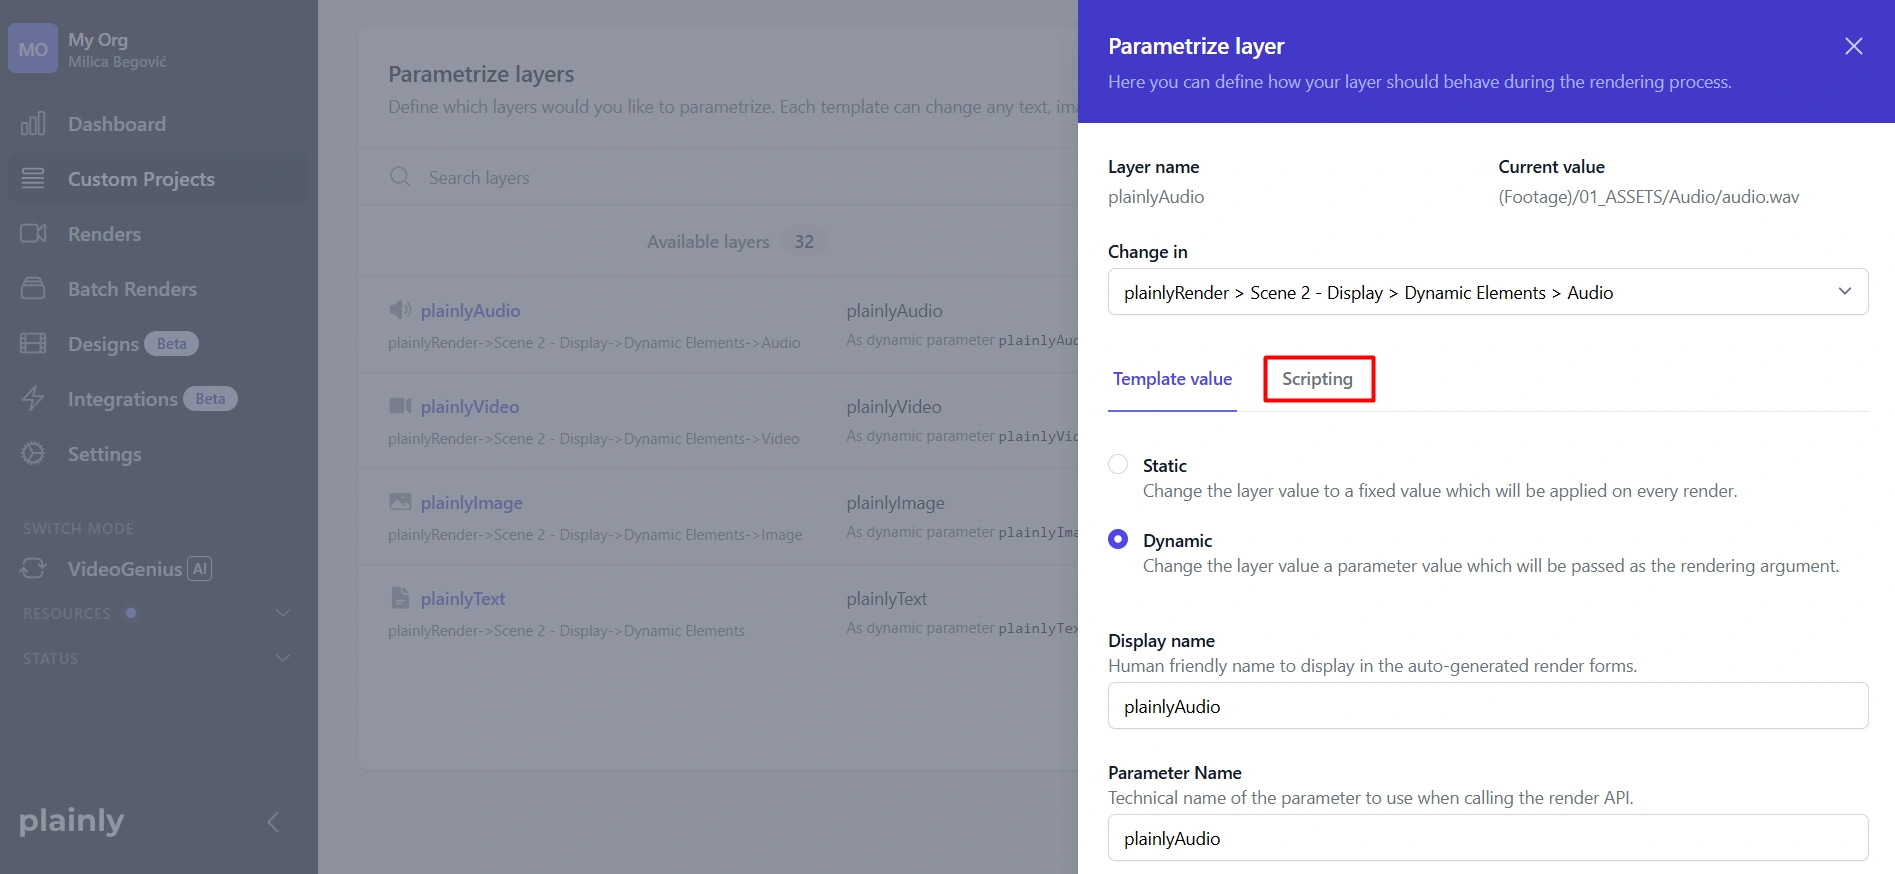
- After the template is generated, you can move on to the next step or choose to open Parametrize Layers to see every element Plainly pulled from your uploaded project. Here, you can filter by layer type: text, images, video, audio, colors, or control effects, and also choose exactly which ones should update dynamically during rendering.
- Finally, if you want even more control, you can add advanced rules. This part is completely optional, but whenever you need to automate things like cropping, extending, or shifting elements, you can use Layer scripting for that. This is where you can fine-tune how each layer reacts to your data when Plainly generates personalized videos.
Create your CSV file
The next step in our data driven video creation is to connect your video template with real audience data. In this guide, we’ll use a simple CSV file to walk you through the process, but you can also hook Plainly directly to your CRM, Google Sheets, or any other tool using our many available integrations or even generate videos in real time via the After Effects API workflow that connects directly to your database.
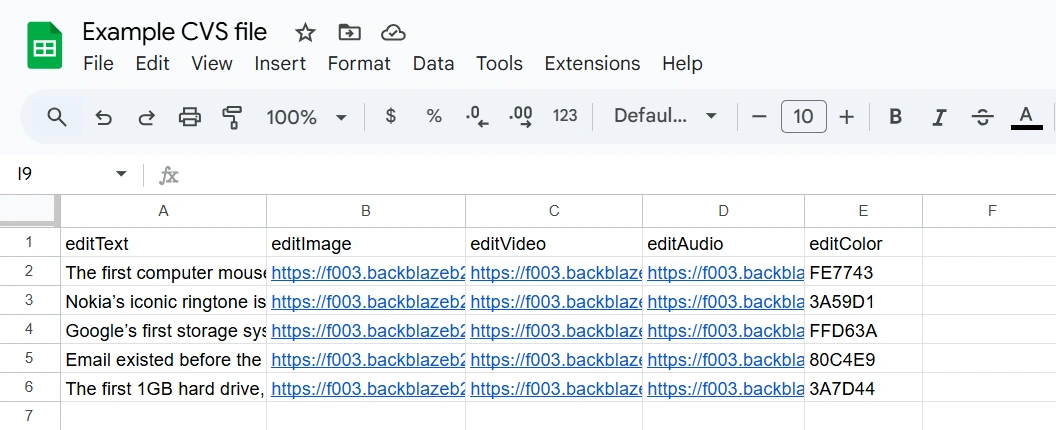
In all cases, each row represents one video, while each column maps to a variable in your template. So, make sure to name your columns the same as your dynamic layers, like in the example below.
Upload your data and render videos
Now that all of our preparations are done, it’s time to batch render from a CSV file. We start by going to Plainly and uploading our data - the data Plainly will use to feed the system and create personalized Spotify Wrapped-style videos. Here’s a short step-by-step of how to render your videos.
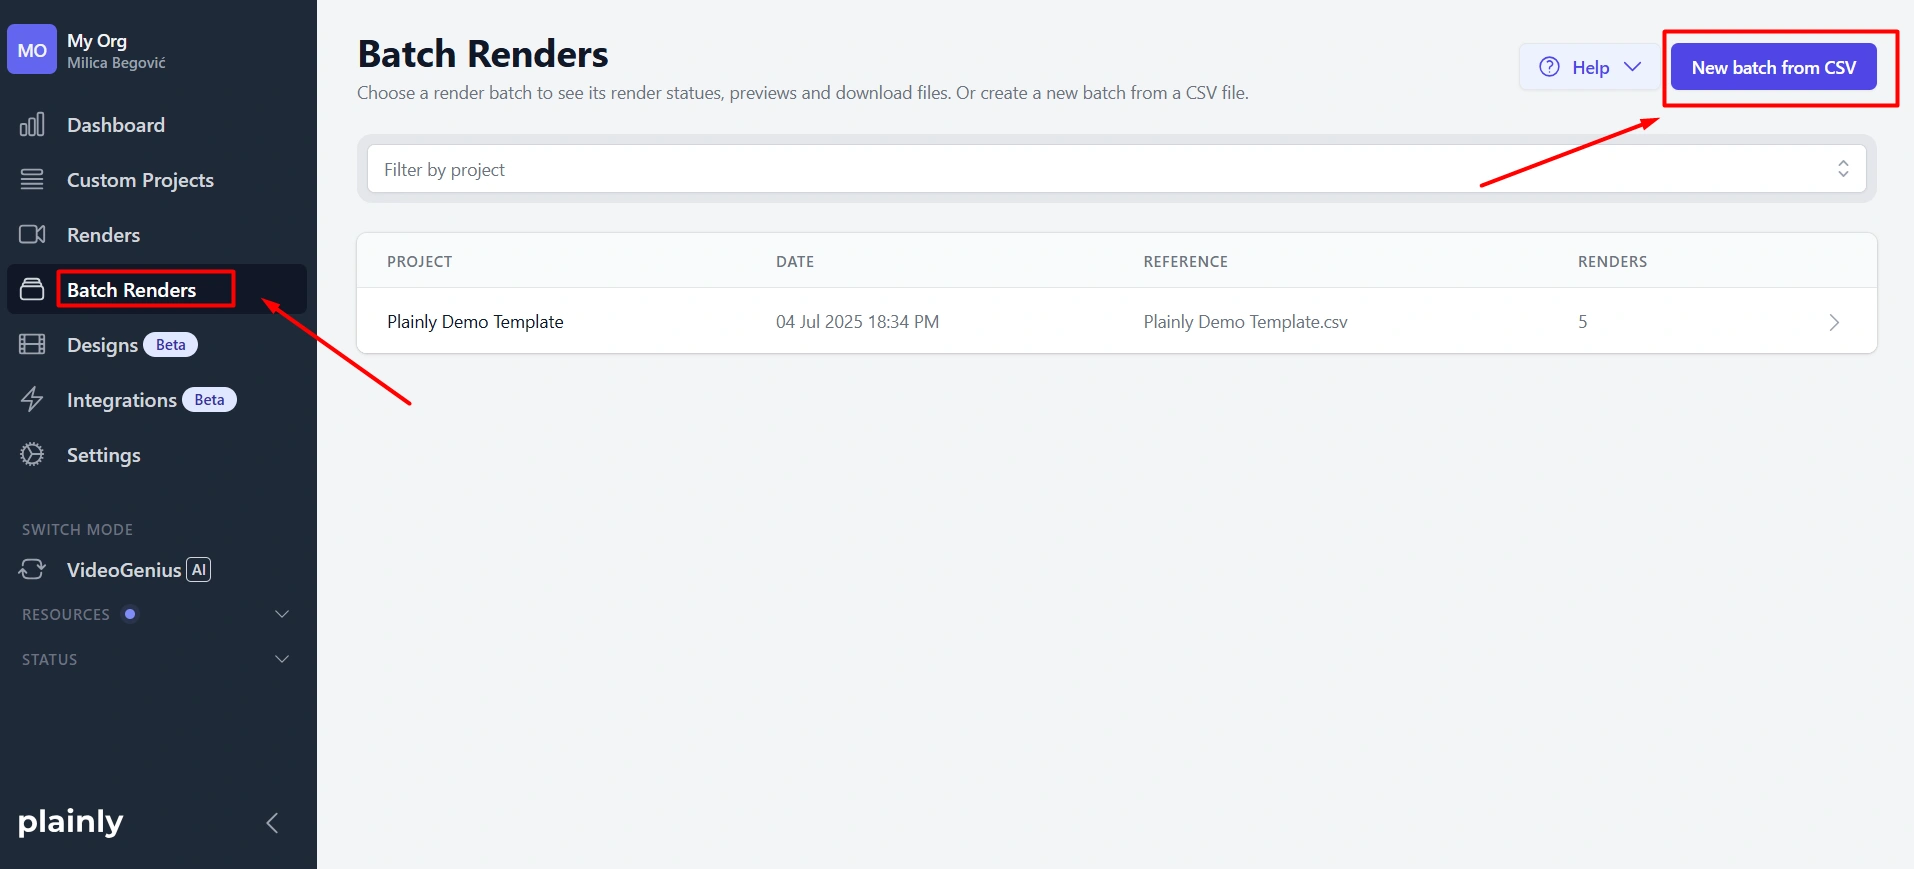
- First, go to Plainly’s Batch renders and hit New batch from CSV.
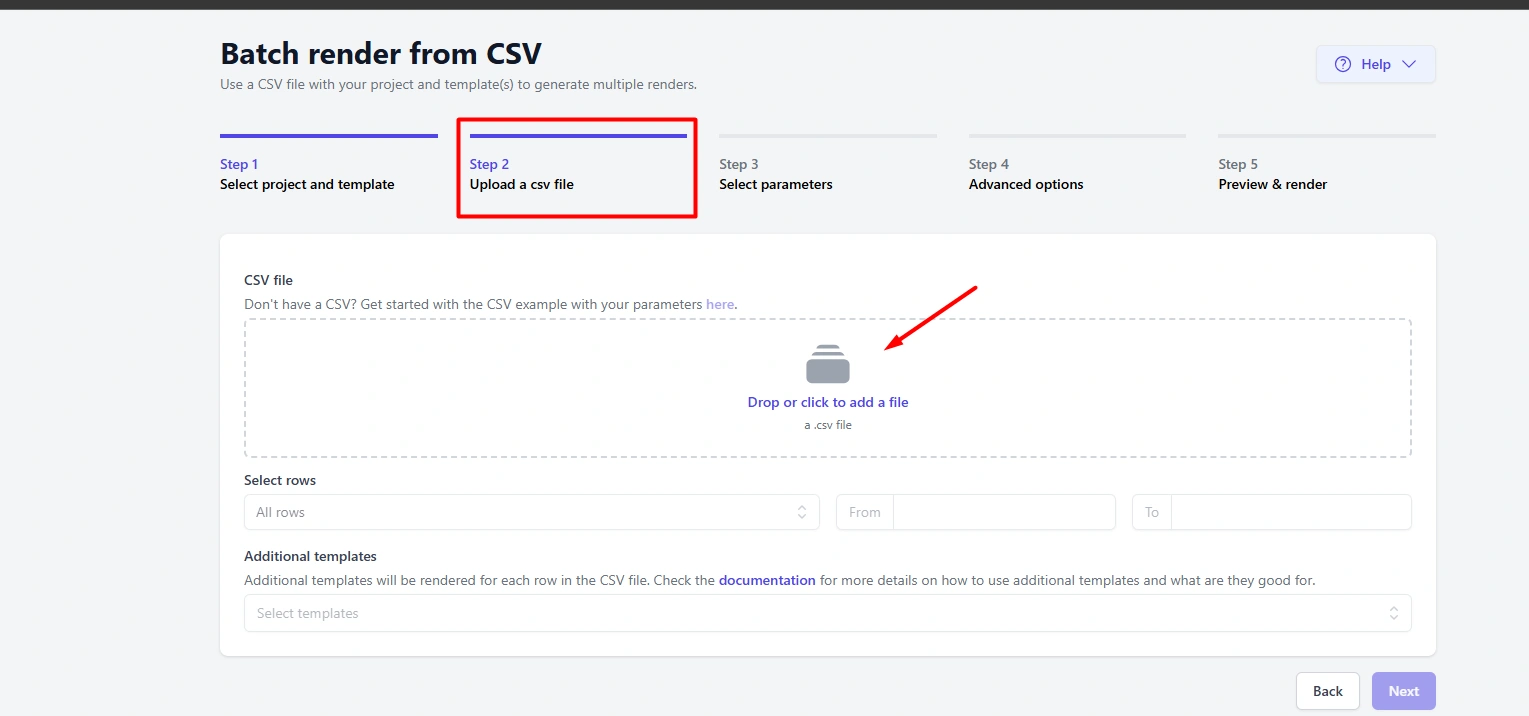
- Second, upload the CSV to the required field.
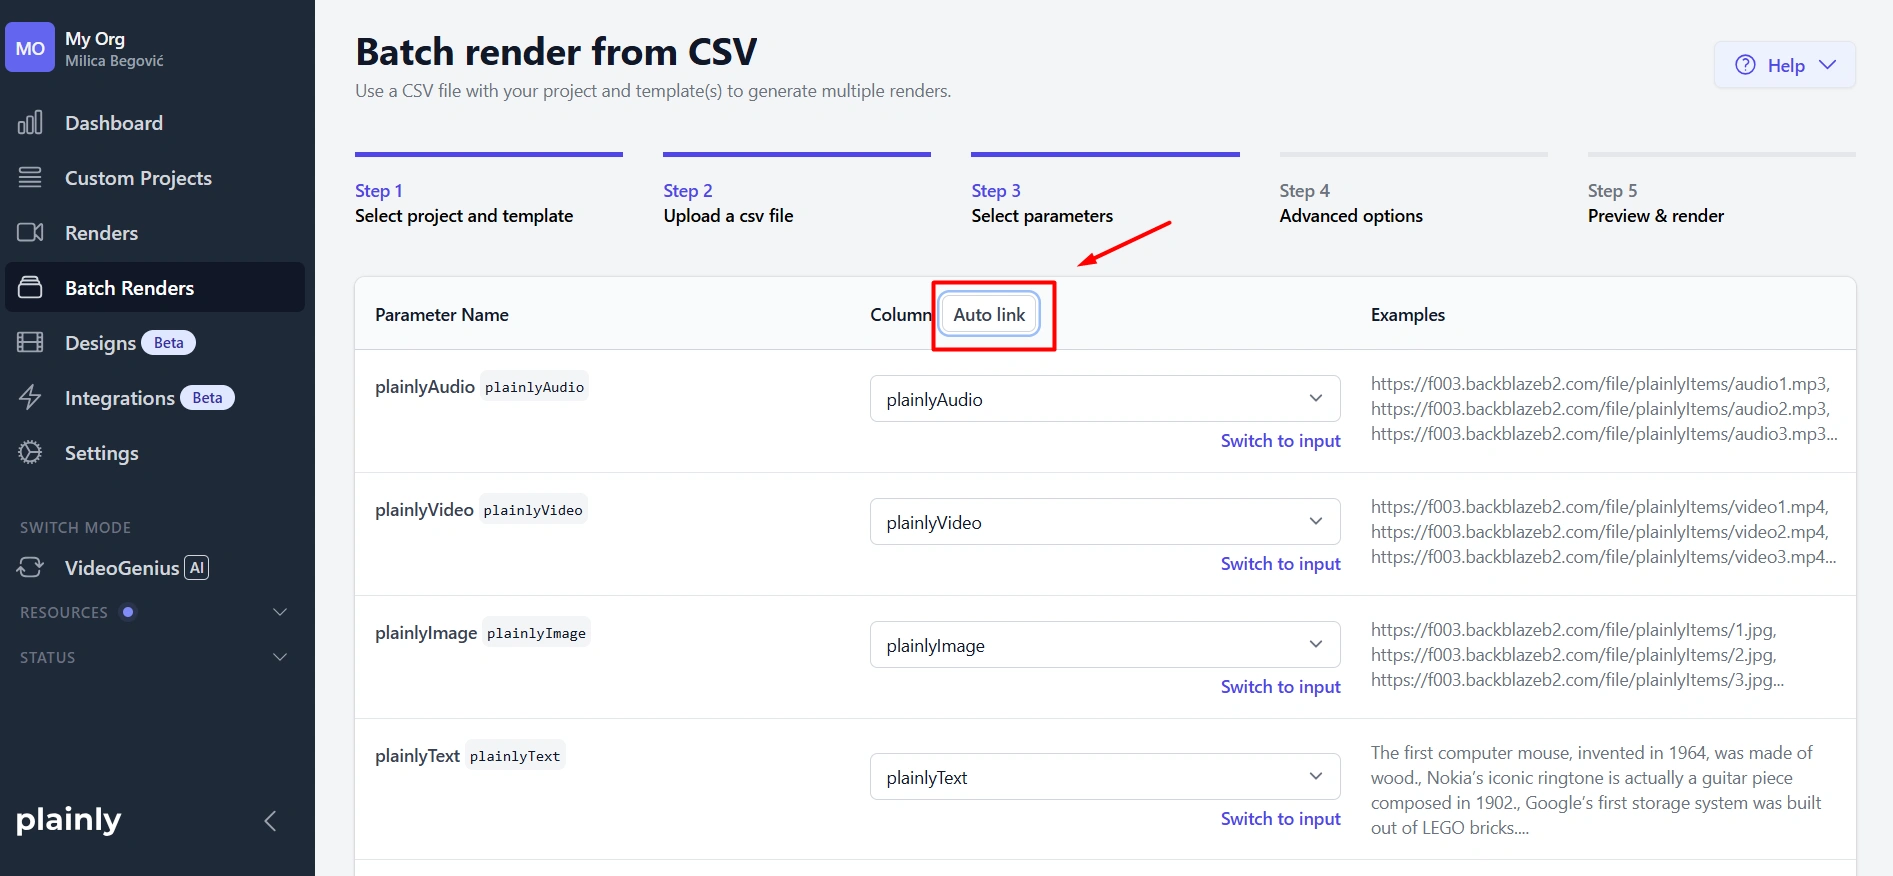
- Your next move should be to select parameters. By hitting the Auto link button, Plainly will automatically map your data to the right dynamic layers, so you don’t have to match variables manually. Neat, right? You can do it by hand, though, but with this powerful button, you don’t have to. And, by the way, to use this button, we named our columns the same as layers.
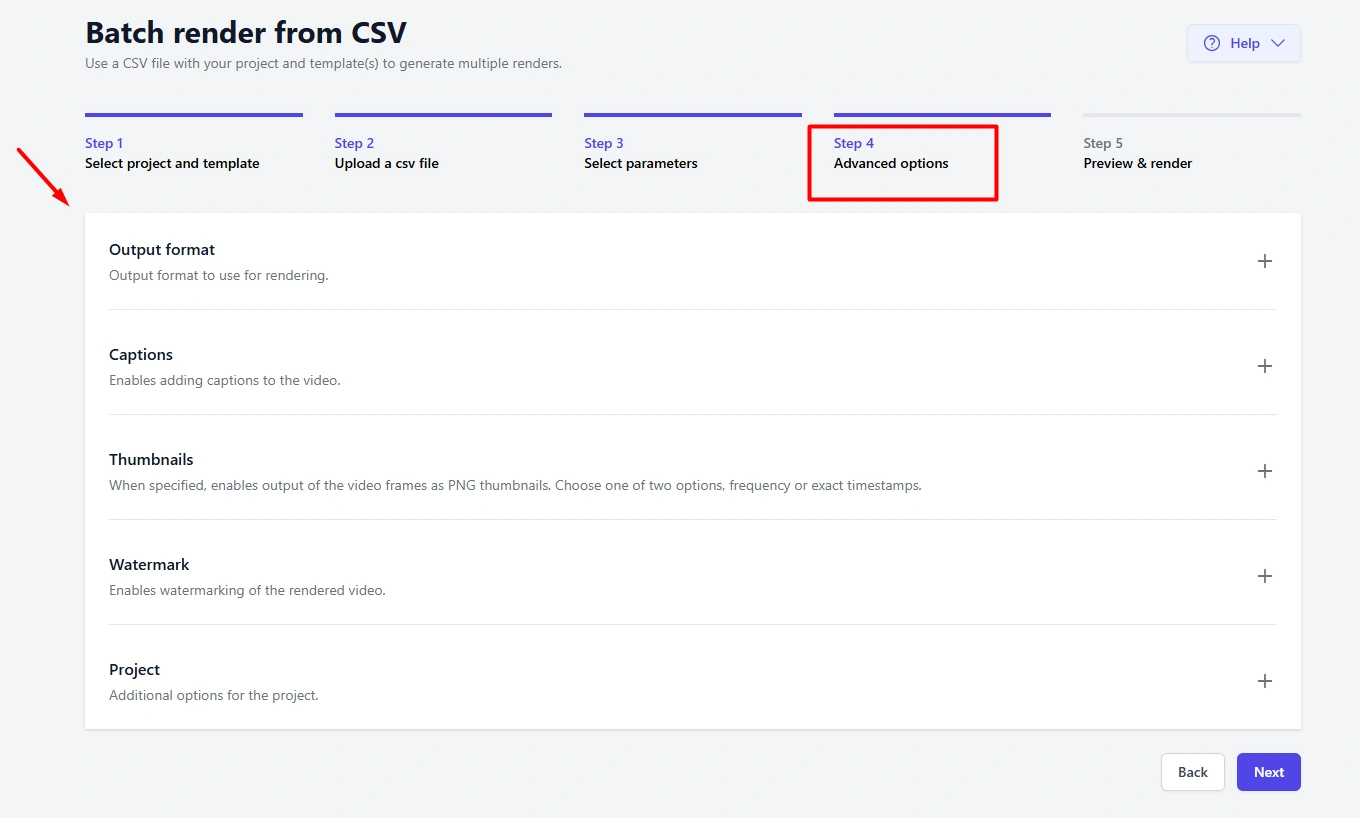
- Finally, you can use any of the available advanced options like captions, thumbnails, output format, and watermarks. Ultimately, it all depends on the idea you have for your Spotify Wrapped-style campaign.
Download or distribute your videos
Once Plainly finishes rendering, you decide how those Spotify Wrapped-style videos reach your users. For simple campaigns, you can download the MP4 files directly and upload them to your email platform, social channels, or landing pages.
If you want a smoother workflow, connect storage and review tools like Google Drive, Dropbox, or Frame.io so finished videos export and land in the right folders automatically for your team. And if you’re building something more complex or fully integrated into your product, again, you can use the Plainly API to deliver videos straight into your app, campaigns, or notification system, with no manual file handling needed.
Ready to build your Spotify Wrapped-style workflow?
Want access to this powerful setup? It's easy to make your own Spotify wrapped-style experience part of your product, not just a once-a-year tradition. You’ve seen the full flow: design a Spotify Wrapped-style template in After Effects, upload it to Plainly, connect your data with a CSV or other integrations, and let Plainly automatically generate thousands of customized videos your users will want to watch and share. From there, you can deliver those videos through Google Drive, Dropbox, Frame.io, your email tools, or even directly inside your app via the API.
Our users claim that shipping these year-in-review campaigns leads to better retention, stronger brand affinity, and a lot more organic social media buzz. You know the drill - users love seeing their story told back to them, so they can reflect on milestone moments. If you’re ready to turn your data into a Spotify Wrapped-style workflow, rather than just another boring send-to-all campaign, now is the ideal time to set up your first template and test the pipeline end to end!
Begin building today by starting a free trial with Plainly to set up your first Wrapped-style template and workflow. Or you can even book a demo with our team, and we’ll walk you through how to plug Plainly into your stack and launch a campaign that’s ready for this year’s “Wrapped” moment! Or explore your options and preferences for your project. So, what are you waiting for?
Ready, set… Go!


.webp)