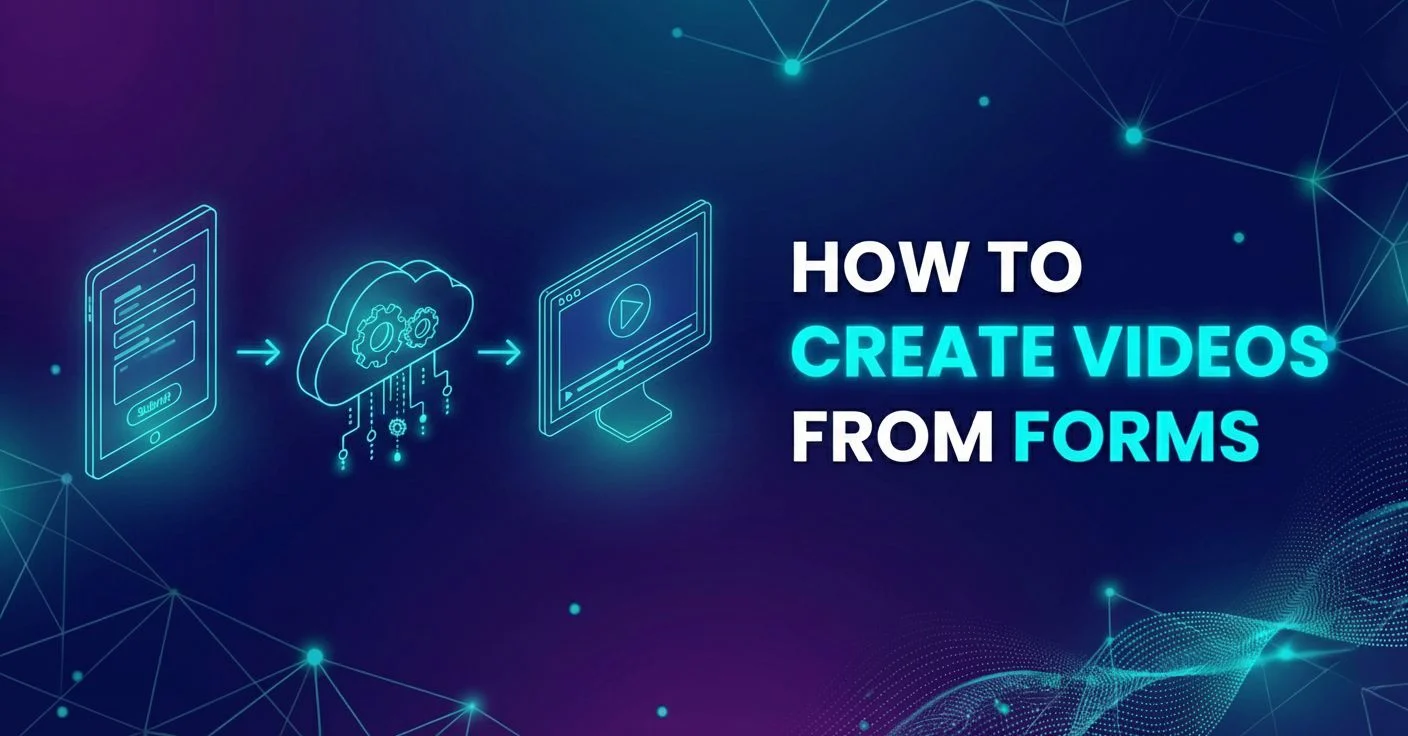
Form to video: quick guide to automating video creation


Summarize with


Creating a form-to-video workflow lets you automatically generate personalized videos based on form submissions, with no manual editing whatsoever. Sounds far-fetched or too complicated? Well, in this guide, we’ll explain exactly how it works, which tools make it possible, and why this approach is becoming the holy grail of modern personalization. By the end, you’ll know exactly how to create videos from forms, automate your process, and scale video creation for every lead, user, or campaign flawlessly - with the same efficiency you’d expect from a dedicated bulk video editor.
Let’s jump right in and learn all about it!
What does creating videos with forms mean?
Creating videos with forms means turning each form submission into a unique, personalized video - automatically. Instead of editing every clip manually, you connect a form (like Jotform, Typeform, or Google Forms) to a video automation tool (like Plainly Videos). When someone fills out their details (name, message, company logo, or product preference), the system takes that data and renders a custom video for them in mere minutes. Awesome, right?
So, when do you use this magical system? You’d use this process whenever you want to personalize at scale. Think of it as replacing repetitive editing with smart automation. In the world of marketing, marketers use form-based video generation to greet new leads, onboard customers, or send personalized thank-you videos after sign-ups, all to build trust and their brand. Recruiters use it to create engaging candidate updates. Even educators use it to send dynamic certificates or video summaries tailored to each student.
Step-by-step guide on how to create videos with forms
To start creating videos from forms, you’ll need three simple components:
- a form builder
- a video automation platform
- a design template to bring your visuals to life
In this case, we’ll use Jotform to collect user data and Plainly to automatically render each video based on that data. Keep in mind that you can also connect other form tools through native integrations, Zapier, or API, depending on how customized your workflow needs to be - especially if your current automation already looks similar to automate video creation with Zapier.
As for the video design itself, you’ll be using After Effects, the industry standard for creating professional, fully customizable templates. If you want complete control over how your final videos look, from animation style to text placement, AE is the way to go. And after the creative part, you just let Plainly handle the rest of the automation. That’s it! But, can automation include human touch, you might ask? With this setup - absolutely!
It might sound complex, but hey, this is why we’ll go over it in extreme detail, so you don’t miss a thing! Let's get started.
Create your video template
Remember: your video template is the foundation of the entire workflow. This is where After Effects comes into play. Every element you want to personalize later (text, images, colors, logos) needs its own placeholder inside your AE project so Plainly can swap those fields with data from your form.
This is where you add your preferred prefix to each layer you’d want to change in each video version later on. Of course, for the purpose of this guide, we will use the Edit prefix, but you can use any other. After you add the prefix, your layout should look like this.
.webp)
After you export and zip your project, it’s time to switch to Plainly.
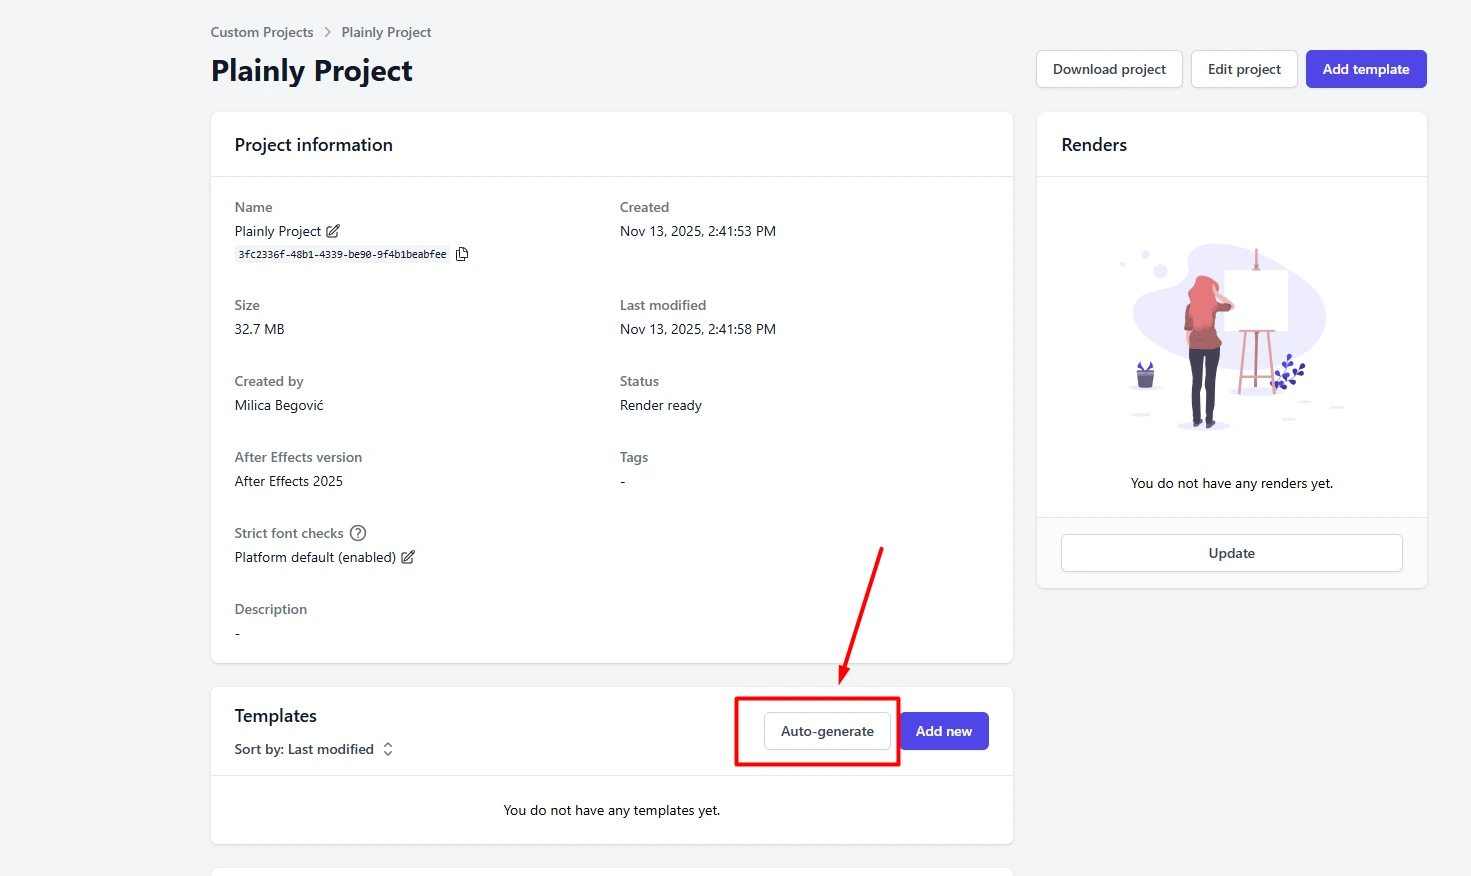
Upload your template to Plainly
The second step is simple. Go to Plainly and upload your creative masterpiece.
- On the main dashboard, click Upload. Then write the name of your project, add details if you need to, as well as the project and hit Upload.

- After your project loads, hit Auto-generate.
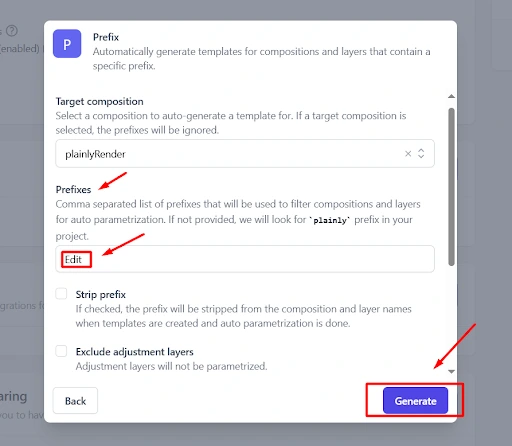
Then, choose the Prefix option, and type in the prefix you used earlier in After Effects, to give Plainly the info which layers should be dynamic (which is Edit in our case). This automatically generates your template and maps all editable layers that will change in your versions.
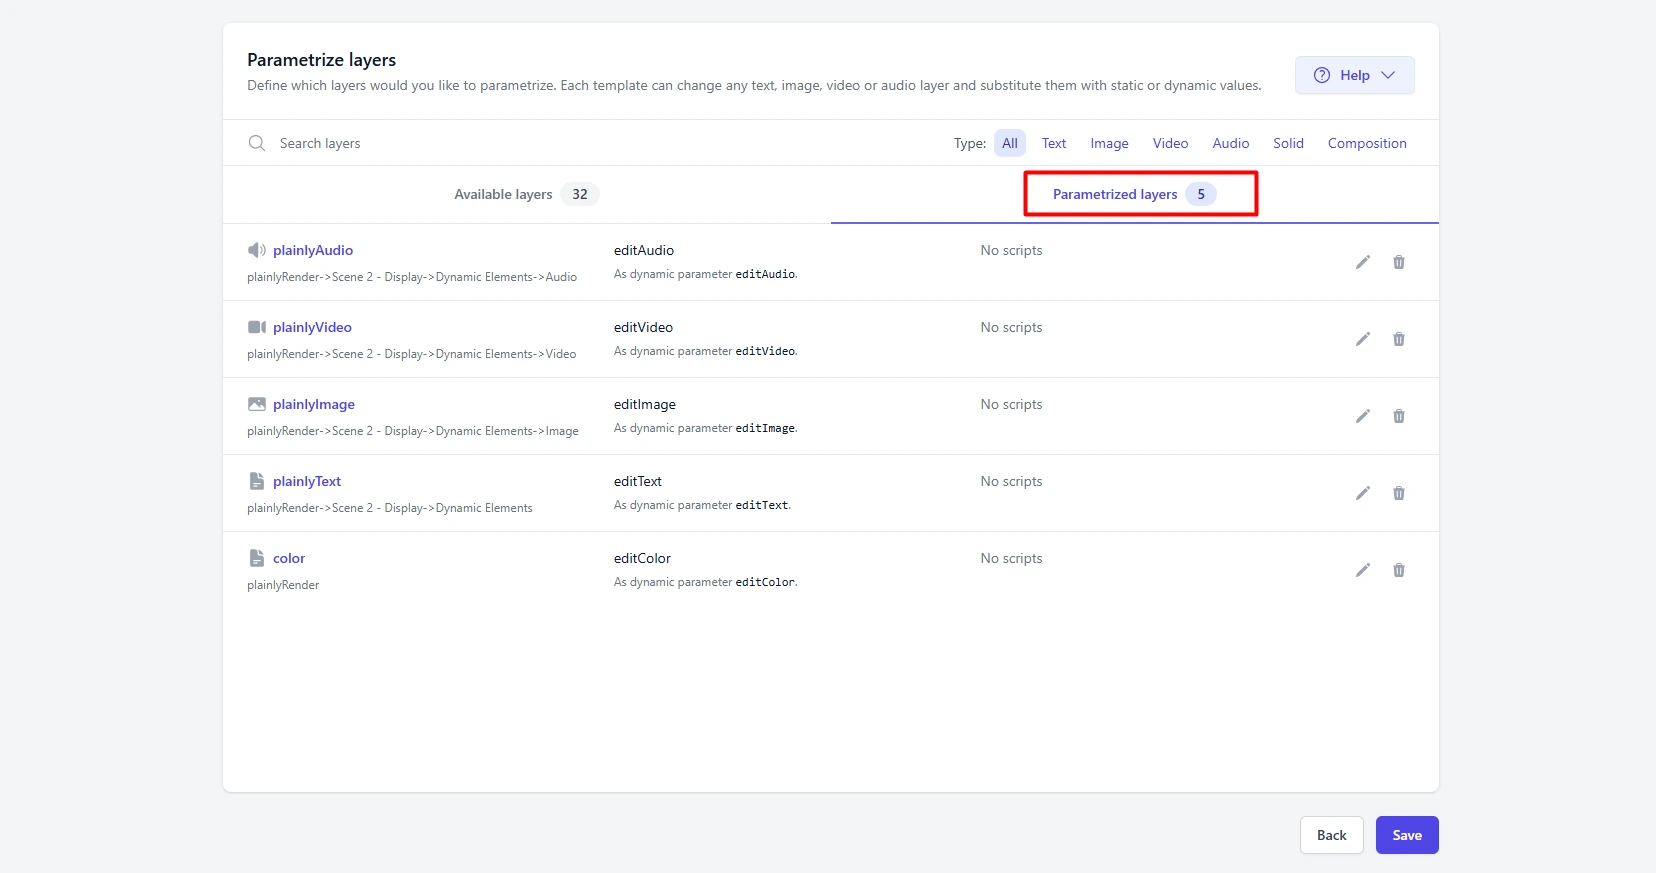
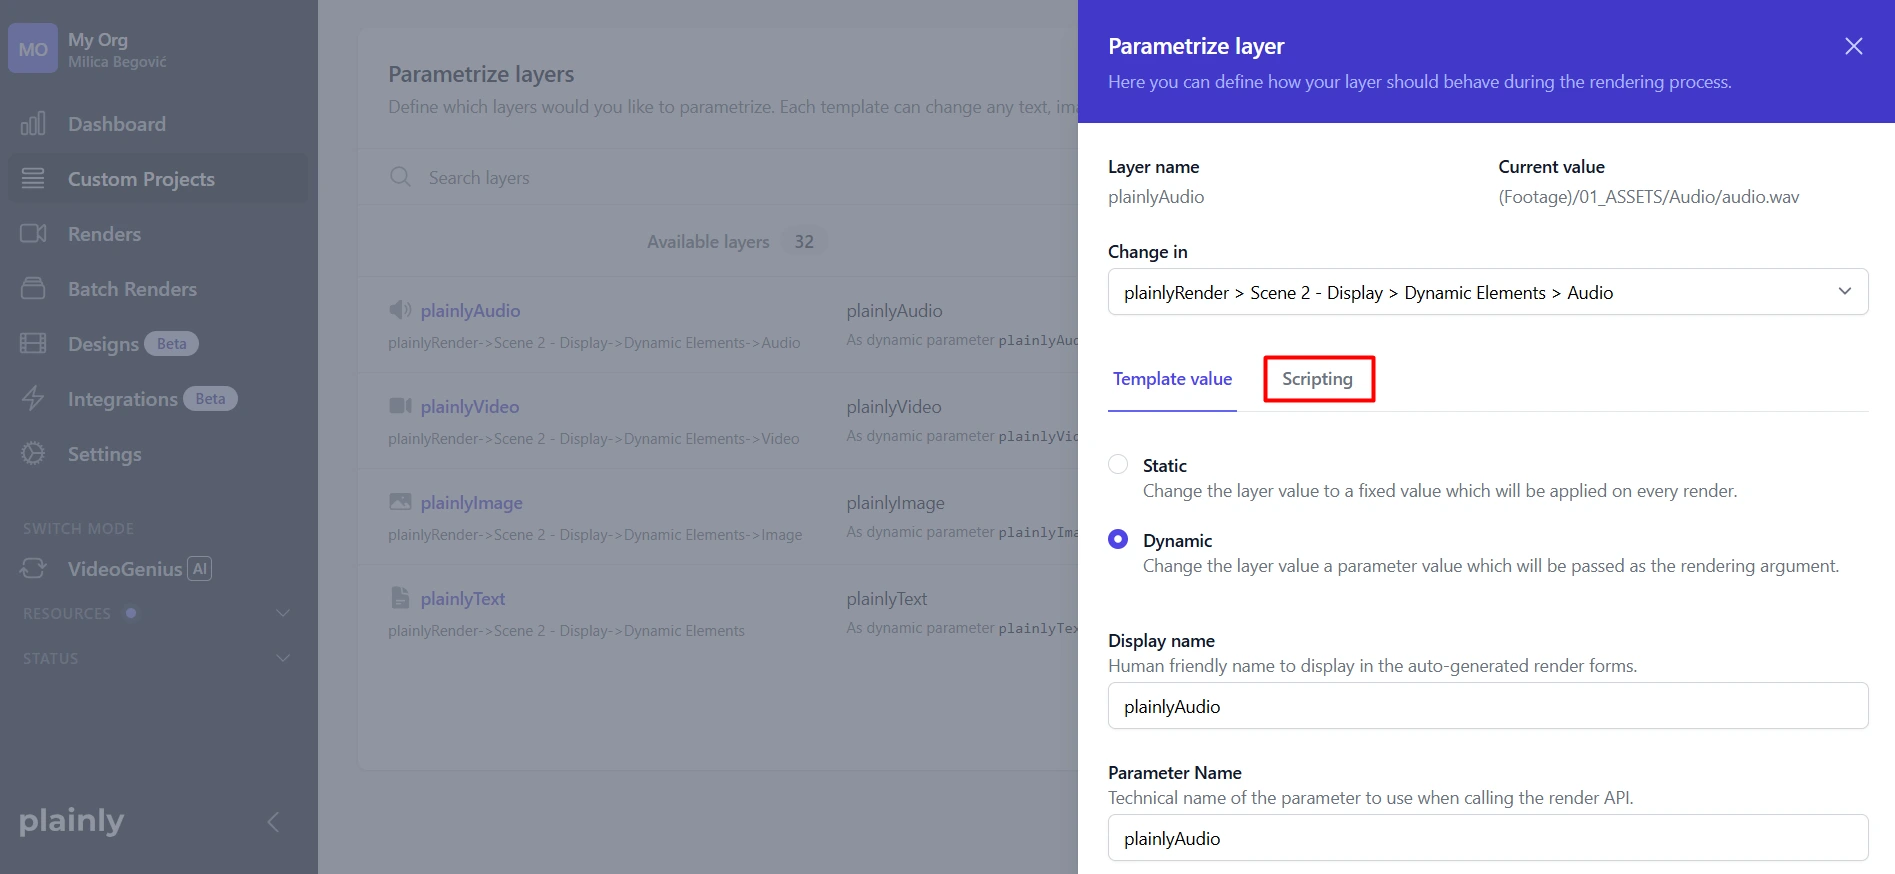
- After the template is generated, you can move on to the next step or open Parametrize Layers to see every element pulled in from your project. From here, you can filter by layer type: text, images, video, audio, colors, or control effects, and also choose exactly which ones should update dynamically during rendering.
- Finally, for even more options, you can add advanced rules. Of course, this is optional, but if you ever need to apply automation rules like crop, extend, or shift, you can use Layer scripting. This way, you can customize how each layer responds to your data when generating personalized videos.
Build your form
For the third step of our setup, we move to our final tool - JotForm. This is actually similar to the spreadsheet to video or the create videos with Airtable concept. The core is the same: you use these tools to feed the data directly to Plainly, so each video gets a different look when rendered.
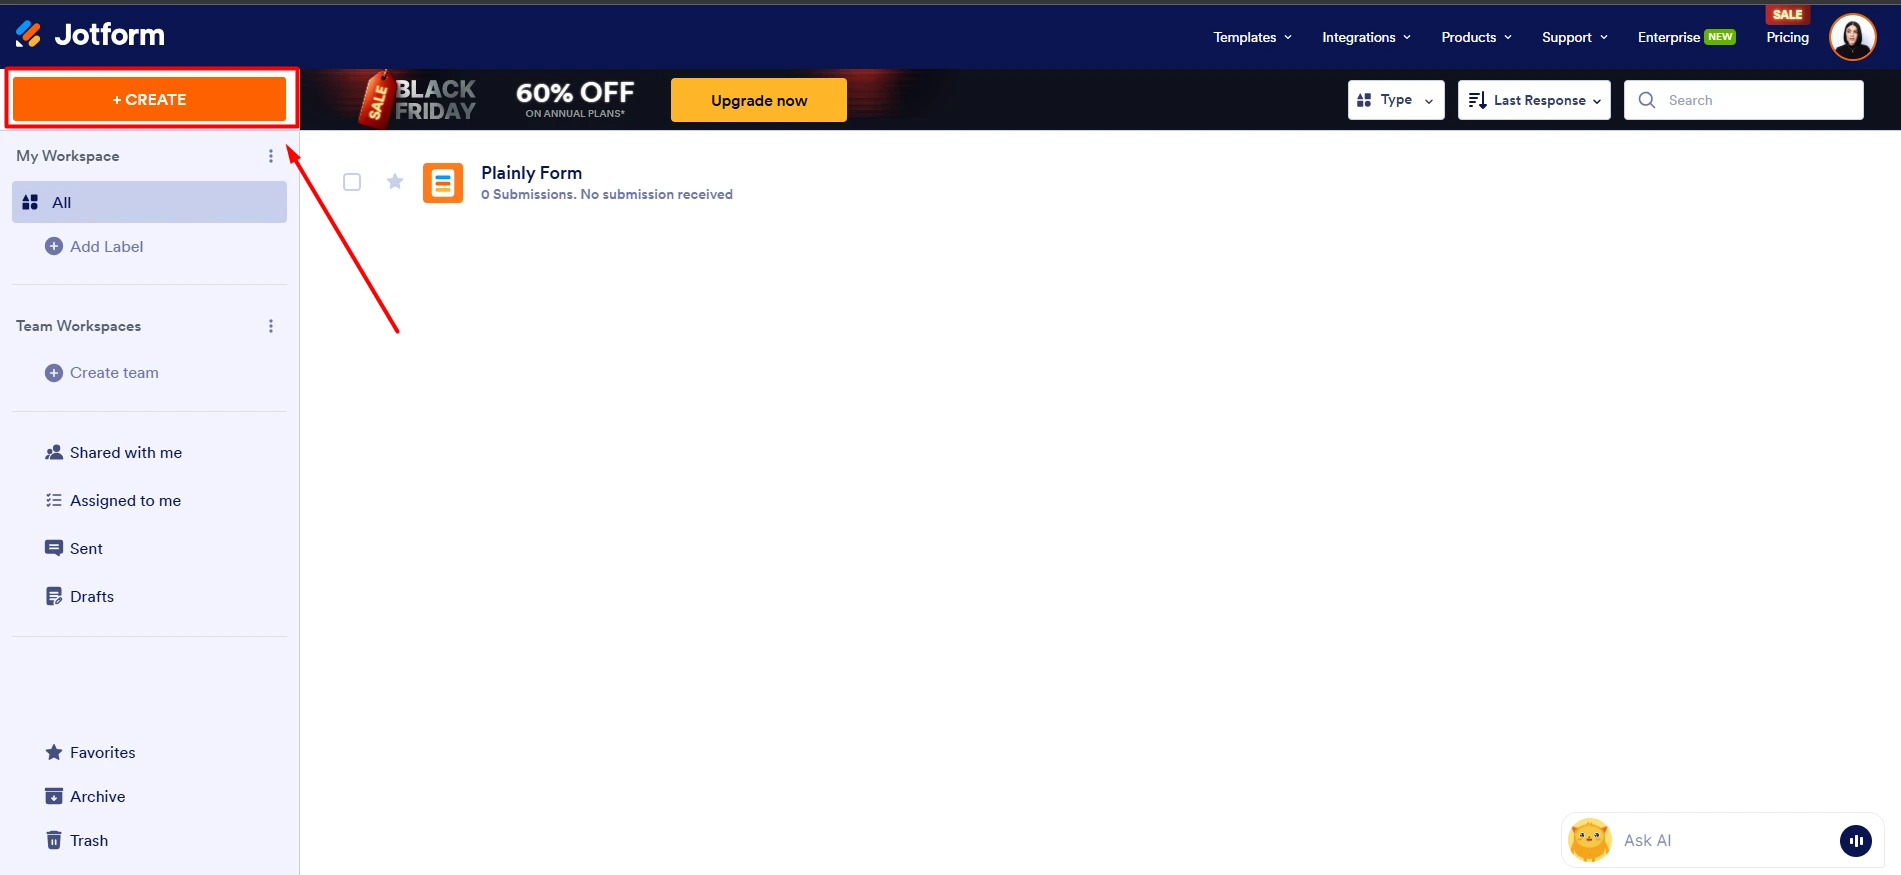
- So, go to your JotForm account and hit Create, like in the screen below.
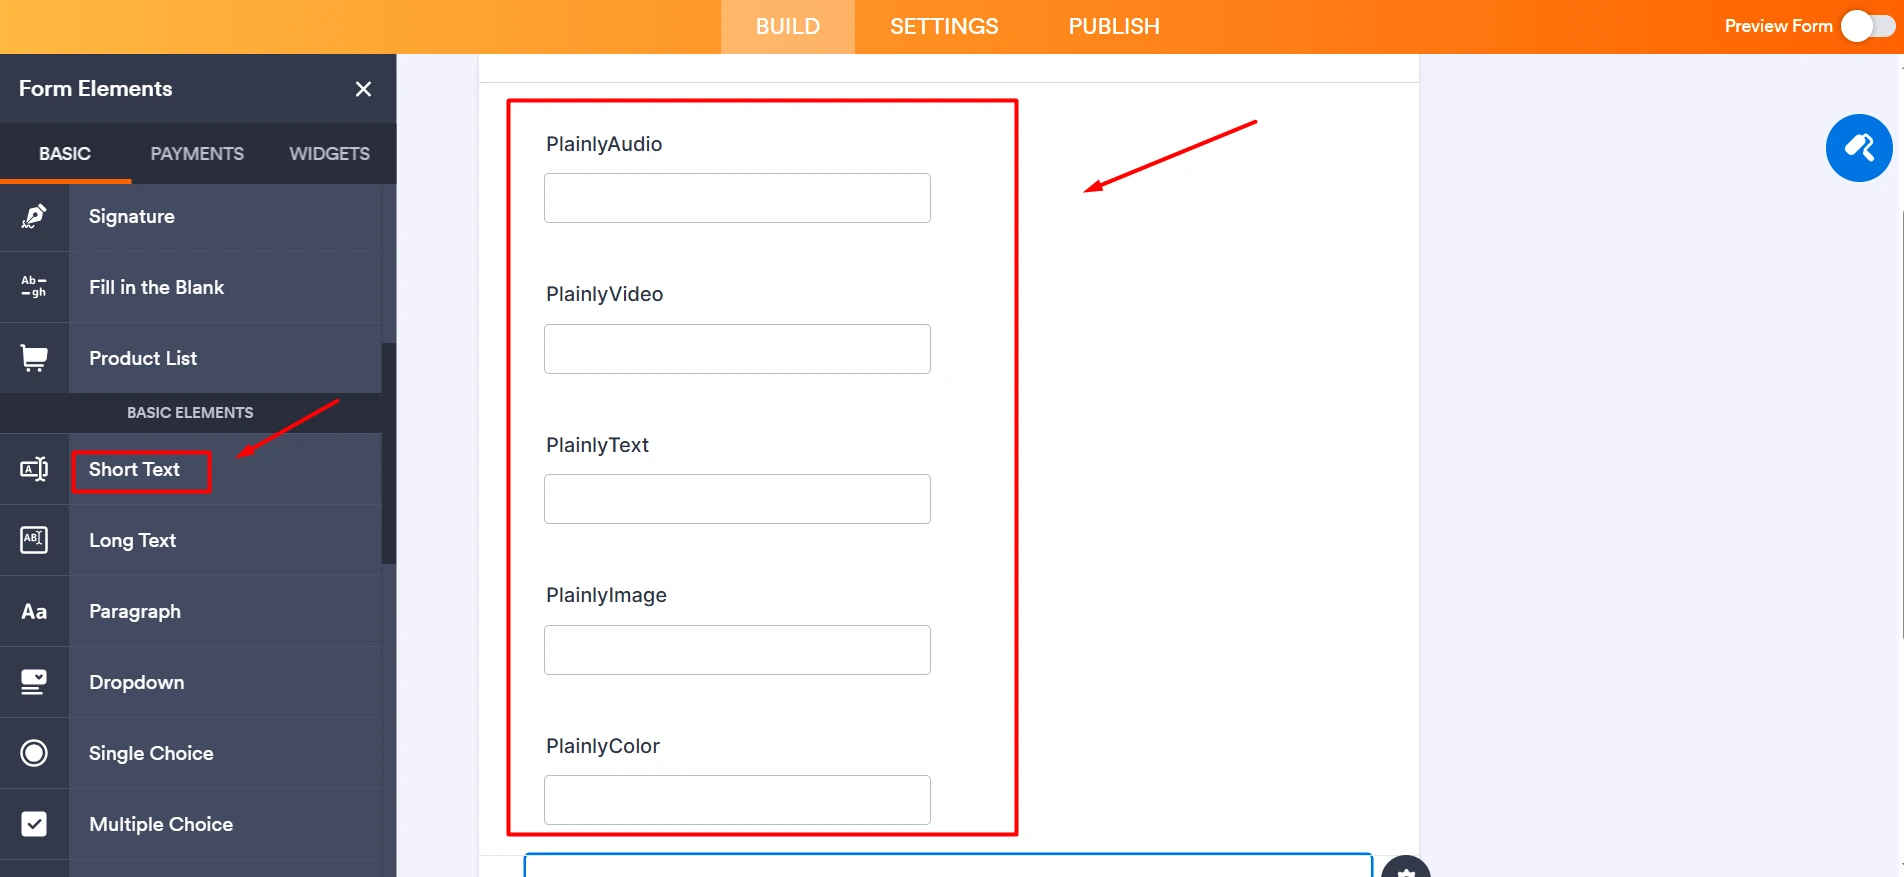
- Then, add as many fields as dynamic layers you have. You should use Short Text basic elements for each, and in the end, it should look something like this.
That’s it for now, but we will be back here for later steps, so don’t close this tab.
Connect the form to your video template
Now, let’s go to Plainly one last time. It’s time to connect Plainly with JotForm via a direct integration.
- Go to your template and hit Add integration.

- Now, in the list of available native integrations, find and click on JotForm (Render on Jotform submission).

- Now a pop-up will appear and here, you should click on the Connect account button.

- Now, get your API key, add it to the field. Then, fill in the regionPrefix from the latest pop-up. The regionPrefix should match your location. We use eu-api for when we want data to be stored on serves of the European Union and under EU data protection laws (EU Safe zone). If not, you can just use api. After that, hit Connect.

- Now that your account has shown up, you should select the form we’ve created before. It will appear in the drop-down menu.
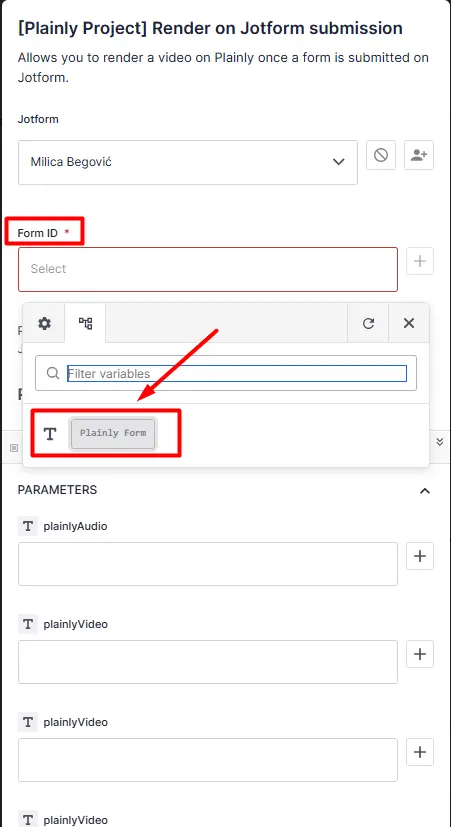
- Now it’s time to set the parameters, so you can allow Plainly to match the fields from the ones in JotForm. You click on the + icon next to each field and select Content Answers near the end of the drop-down.
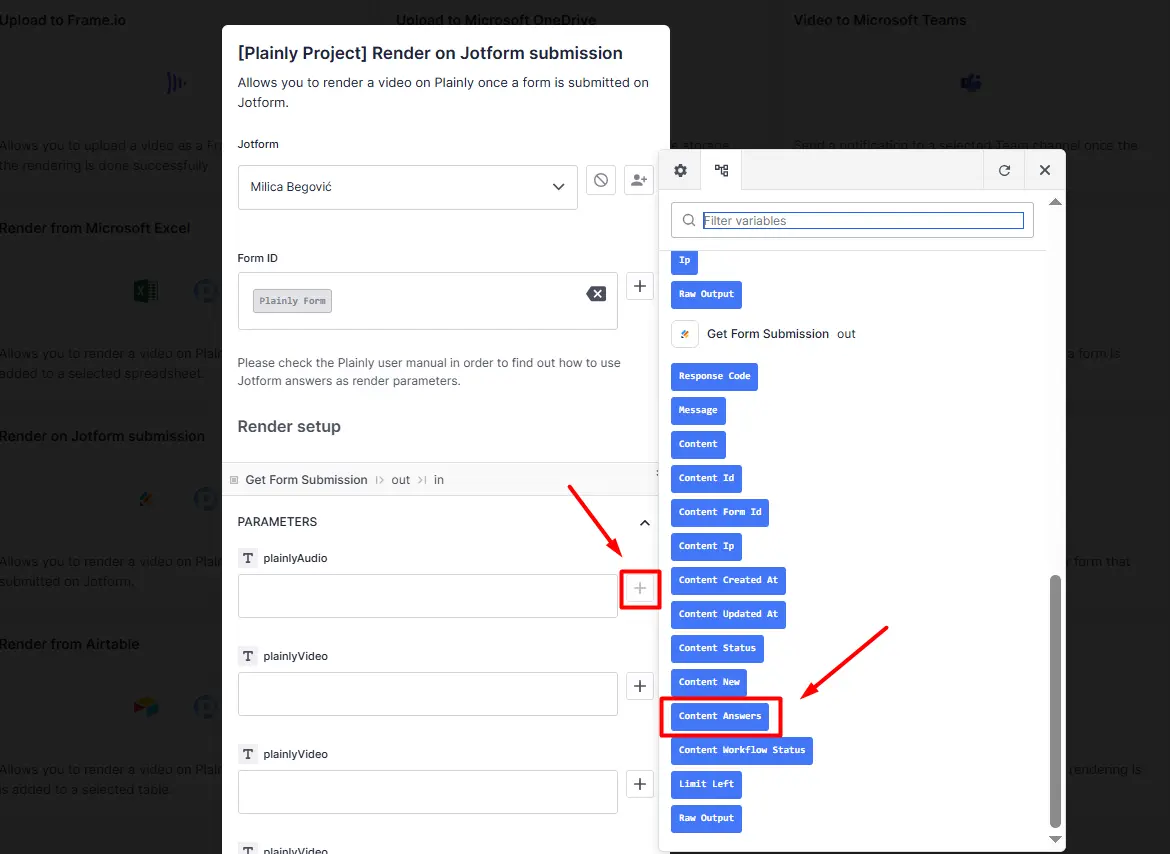
Then click on the tiny pencil next to the field.

Now this is where you pay close attention. Select JSON-path and fill in the path field with id.answer, like in the depiction below.

Here’s the catch: The id part of the id.answer should be replaced with a number from the matching field in JotForm. So, we go to Jotform one more time to get this number. You can find it by clicking on the Properties icon and then Advanced.

Now, scroll down to find Field Details and only copy the number from the Field IDs code that was revealed. In this case, it’s number 9.
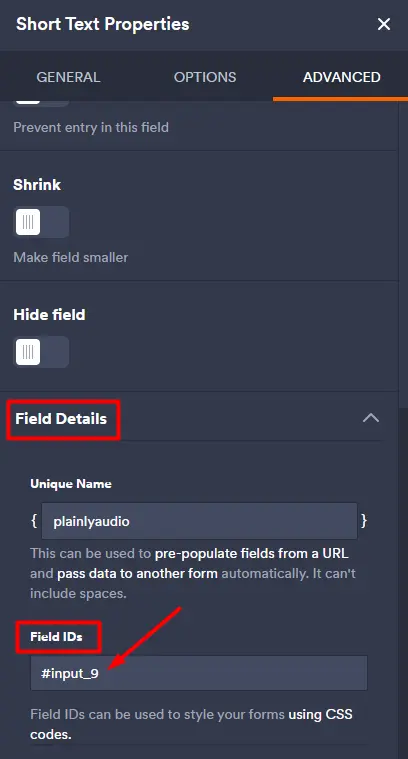
So, finally, we go back to Plainly, replace the id with the number 9, and hit Update to modify this variable.

After you’re done, repeat the same process for each field form your form, and you’re done. You can go even further and continue to add other fields to implement changes like Webhook URL, post-encoding type, Instant download, and more, but that’s only if you want to add more value and play around with your integration.
After you set everything up, hit Start integration. Now, let’s see the integration we’ve created in action!
Add data to your form and render new videos
Was the integration a success? Only one way to find out! If you’ve followed each step carefully, this part will be a walk in the park.
- Go to the JotForm we’ve created earlier. Now hit Publish and Copy link.

- Paste the URL into a new tab and fill it with data that will change your video versions after rendering. When you’re done, it should look something like this.

Once you hit Submit, that should trigger rendering in Plainly immediately.
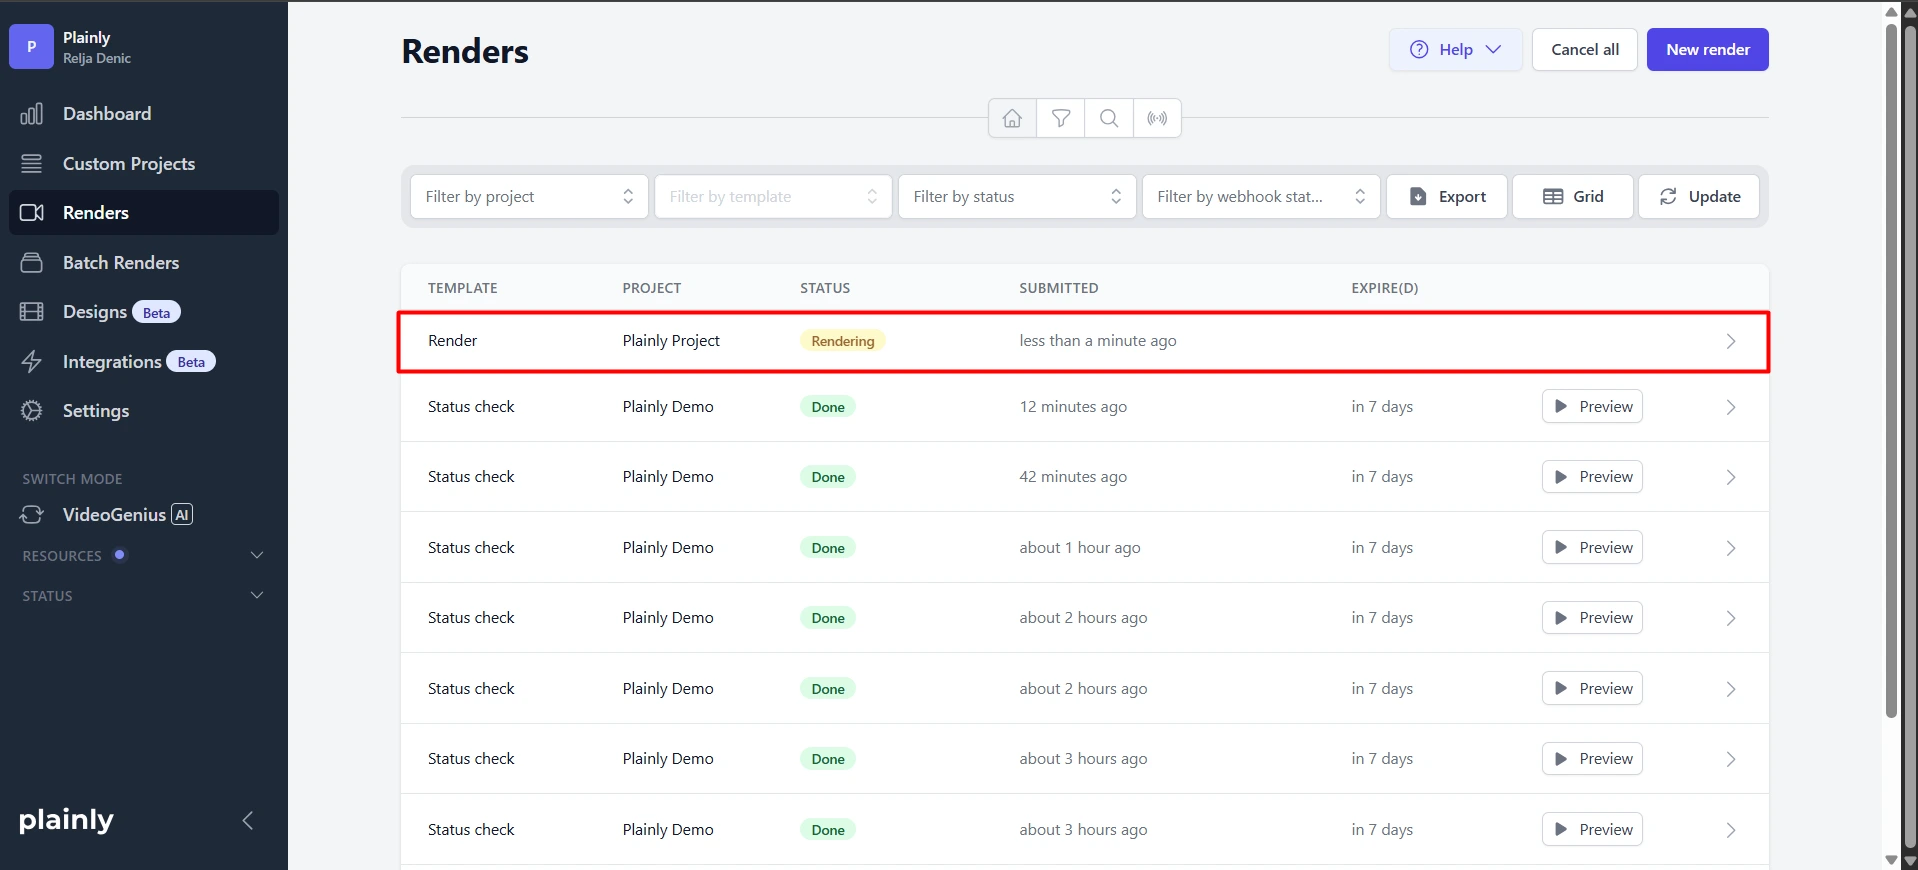
- Now, to find the video versions, go straight over to the Renders page in Plainly. We’re looking to see if there are any renders in progress for this form, in order to figure out if the integration was a success. If they show up here, that means it worked.
- After the render is done, you can go to that render and click on any video. This will let you preview it and see if all parameters have been replaced with the ones you’ve submitted through your form. Watch out for any errors and fix them before moving to the final step.
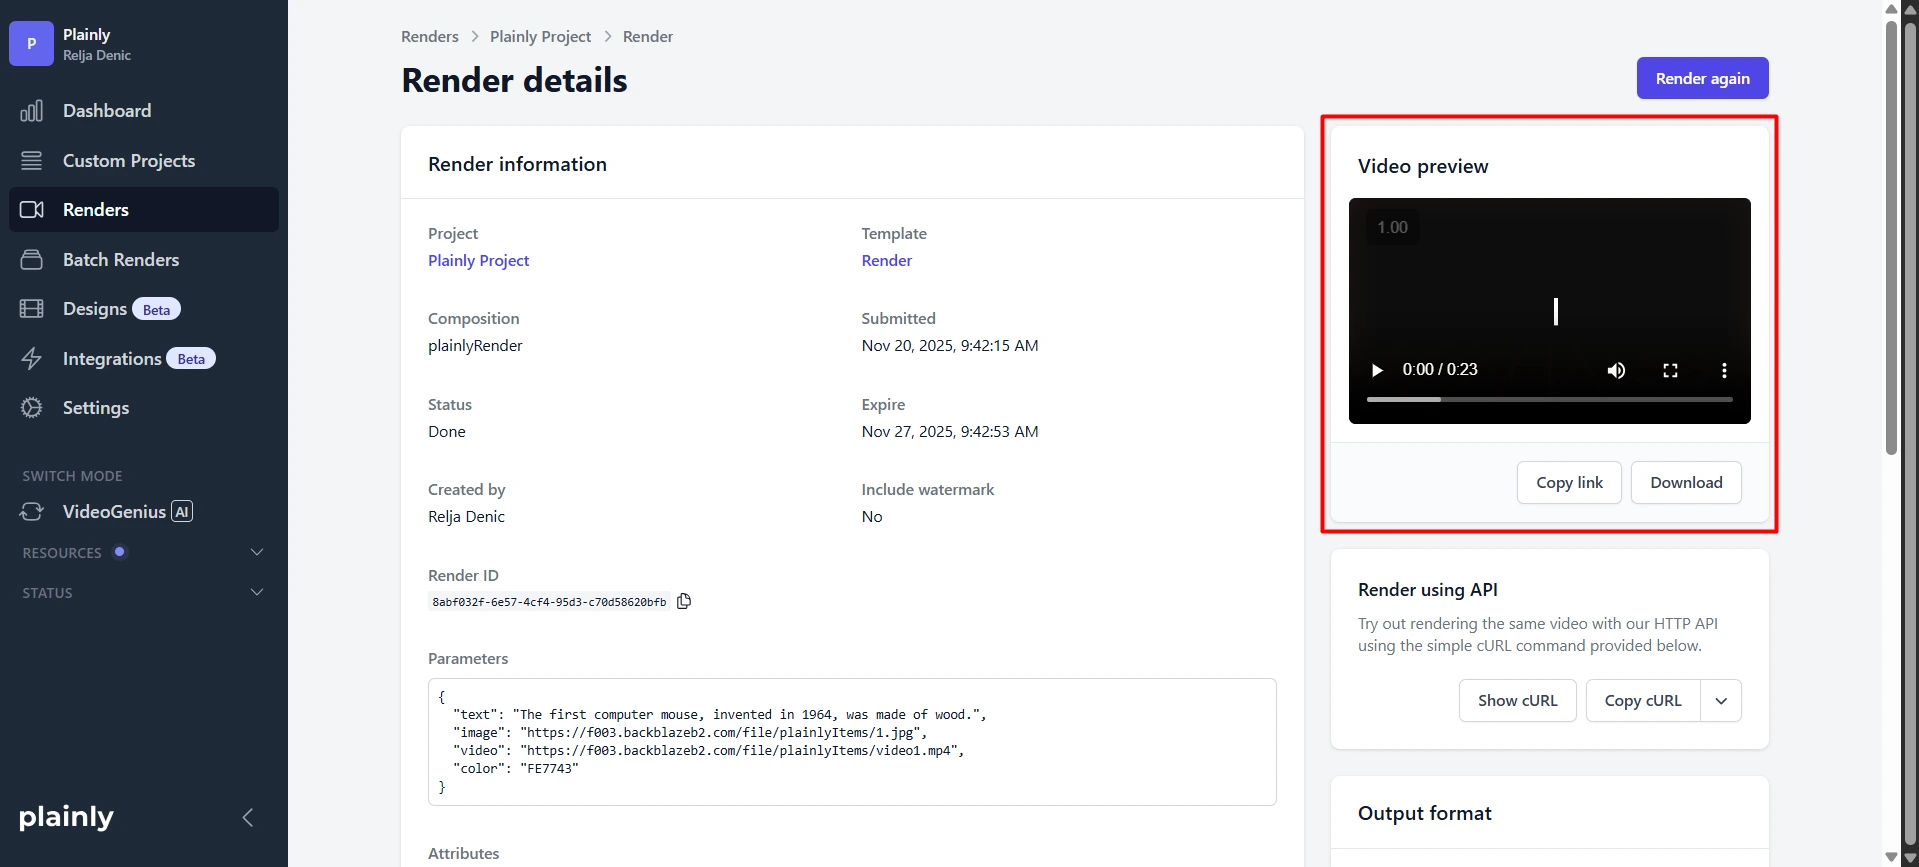
If everything is in place and all layers have been replaced, you’re good to go. The integration was a success! If, by any chance, your videos didn’t render in the way they should have, then just go back to the beginning. Repeat the same steps, from first to last, and this time around, everything should be working just fine.
Distribute your videos automatically
After your videos are rendered, you can take the final step and automate their delivery. Want to send it somewhere else? Sure, no problem. Plainly has many native integrations, which make it easy to pass each finished video into the tools you already use in your workflows.
You could use tools like Google Sheets, Slack, Airtable, and many more. And, if we don’t have a native integration for your preferred tool, you can always use Zapier or even API to connect them with Plainly.
This turns your workflow into a continuous loop: form data comes in, videos get generated, and every finished file moves to the right destination of your choosing, without any manual handling. It’s the simplest way to keep personalization running at scale while your team focuses on more meaningful, higher-value work. Great, huh? We think so, too!
Ready to start creating videos from forms in just a few steps?
So, now that you’ve seen how a simple form can trigger a fully personalized video for each and every viewer of your audience, how Plainly handles the rendering behind the scenes, and how the entire workflow scales without adding manual work, we can finally ask: Are you ready to set it up yourself?
With the right template, the right inputs, and an automation layer that runs reliably every time, you’re basically operating your own automatic video editor - one that never gets tired and never breaks.
If you’re ready to make your work easier and build your own form-to-video system, you can jump in today. Start a free trial and experiment with your first automated workflow, or book a demo with Plainly, and we’ll walk you through the exact setup that fits your use case. Maybe even give you some extra ideas.
Plainly is all about making the idea-to-automation process effortless. So, are you ready to experience it?