Automate video creation with Zapier [2025]


Summarize with


Want to generate thousands of videos in bulk without writing a single line of code? You’re in luck, as this guide will show you exactly how to automate video creation with Zapier and Plainly Videos.
Zapier is a popular no-code automation platform that allows you to connect apps and move data between them based on certain conditions. It works by watching for predefined Zapier triggers and then running actions in another app. Combine it with Plainly, and you can build a setup that creates videos for you, start to finish.
In the next few steps, we’ll walk you through the exact process we use to tap into Zapier video automation. You’ll learn how to prep your video template inside of Adobe After Effects and a bulk video editor (a.k.a. Plainly), build your Zap in Zapier, and connect the dots so everything runs smoothly.
Worry not! It’s not as hard as it sounds. :)
A step-by-step guide for creating videos with Zapier and Plainly
To make this kind of no-code video automation work, we’ll use Zapier to collect input data, like text, images, footage, colors, and more, and Plainly to turn those inputs into ready-to-share videos.
In this tutorial, we’ll create everything inside Zapier - the input table, the form where users can submit their parameters, and the automation that connects it all to Plainly to automatically generate videos. Of course, you can easily expand or customize this setup later, as Zapier integrates with 8,000+ tools, including Google Sheets, Airtable, and Typeform.
Nonetheless, to get started, you'll need:
- An After Effects template (this will be your video base)
- A Plainly account
- A Zapier account
- And optionally, accounts for any other tools you want to include in your workflow.
However, for the purpose of this tutorial, we’ll keep it all inside Zapier so it’s easy to follow along.
Step 1: Create and edit your video template
Before setting up any automations, you’ll need a video template ready to receive dynamic data. This is what Plainly will use to replace text, images, footage, audio, etc., automatically once Zapier sends over new inputs.
Start by opening your After Effects project. Every element you plan to update - like text, color, or footage - should have the prefix added to its layer name.
For example:
- editHeadline for a title text layer
- editImage for an image placeholder
- editColor for background or accent colors
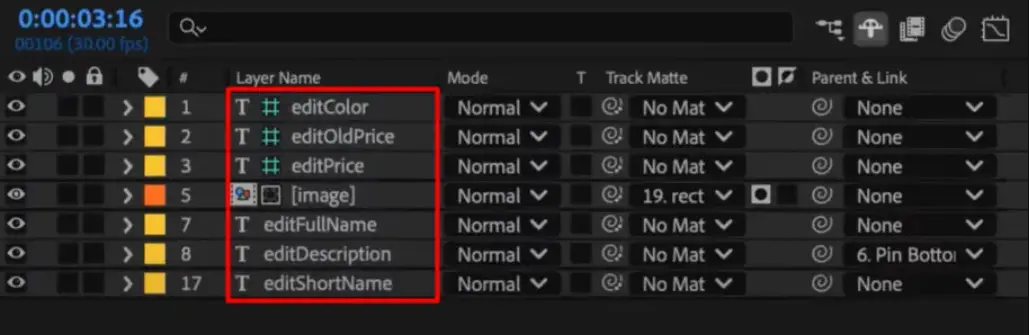
This prefix tells Plainly which layers are dynamic, meaning they’ll change based on the data you send from Zapier.
We will continue using the ‘’plainly’’ prefix throughout the blog, but you can choose any other prefix. Just make sure to add it to all layers with the changing elements.
Once your template looks good and everything you want to change is labeled properly, zip the entire AE project, including all your assets, as you’ll need it in the next step.
Step 2: Upload your template to Plainly
There’s no direct Zapier After Effects integration. But that’s what you’ve got Plainly for - to act as the bridge between your AE project and the automation workflow.
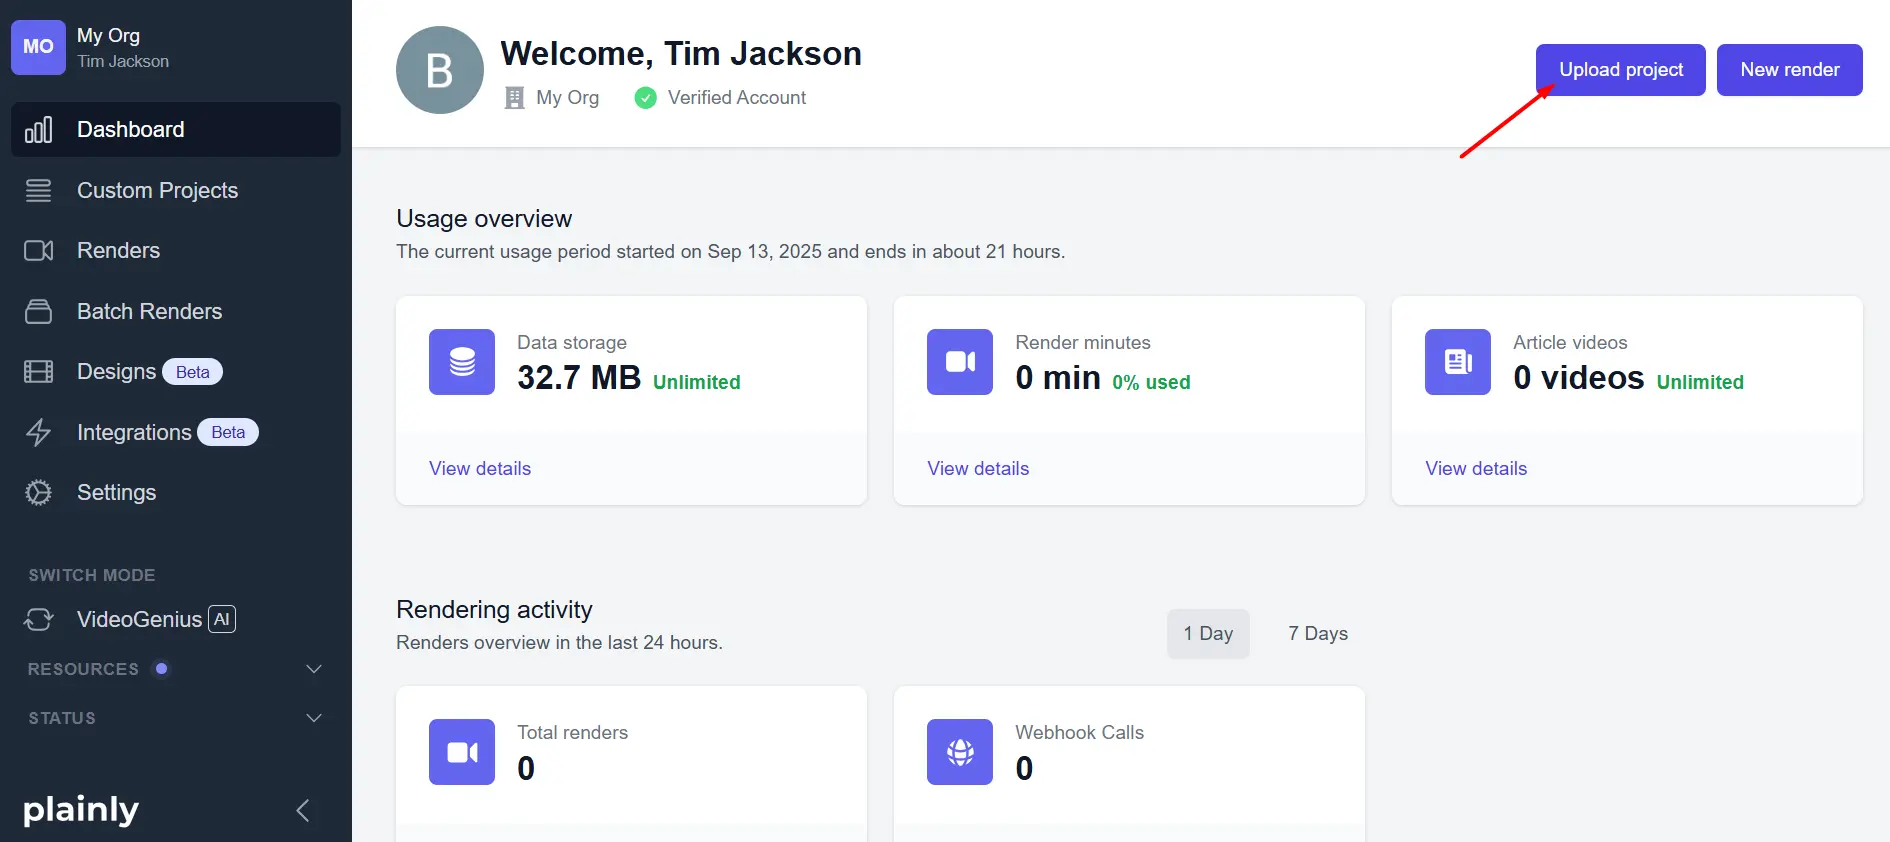
That said, with your template zipped up, it’s time to upload it to Plainly.
To do so, first, log in to your Plainly account, and then click Upload project.
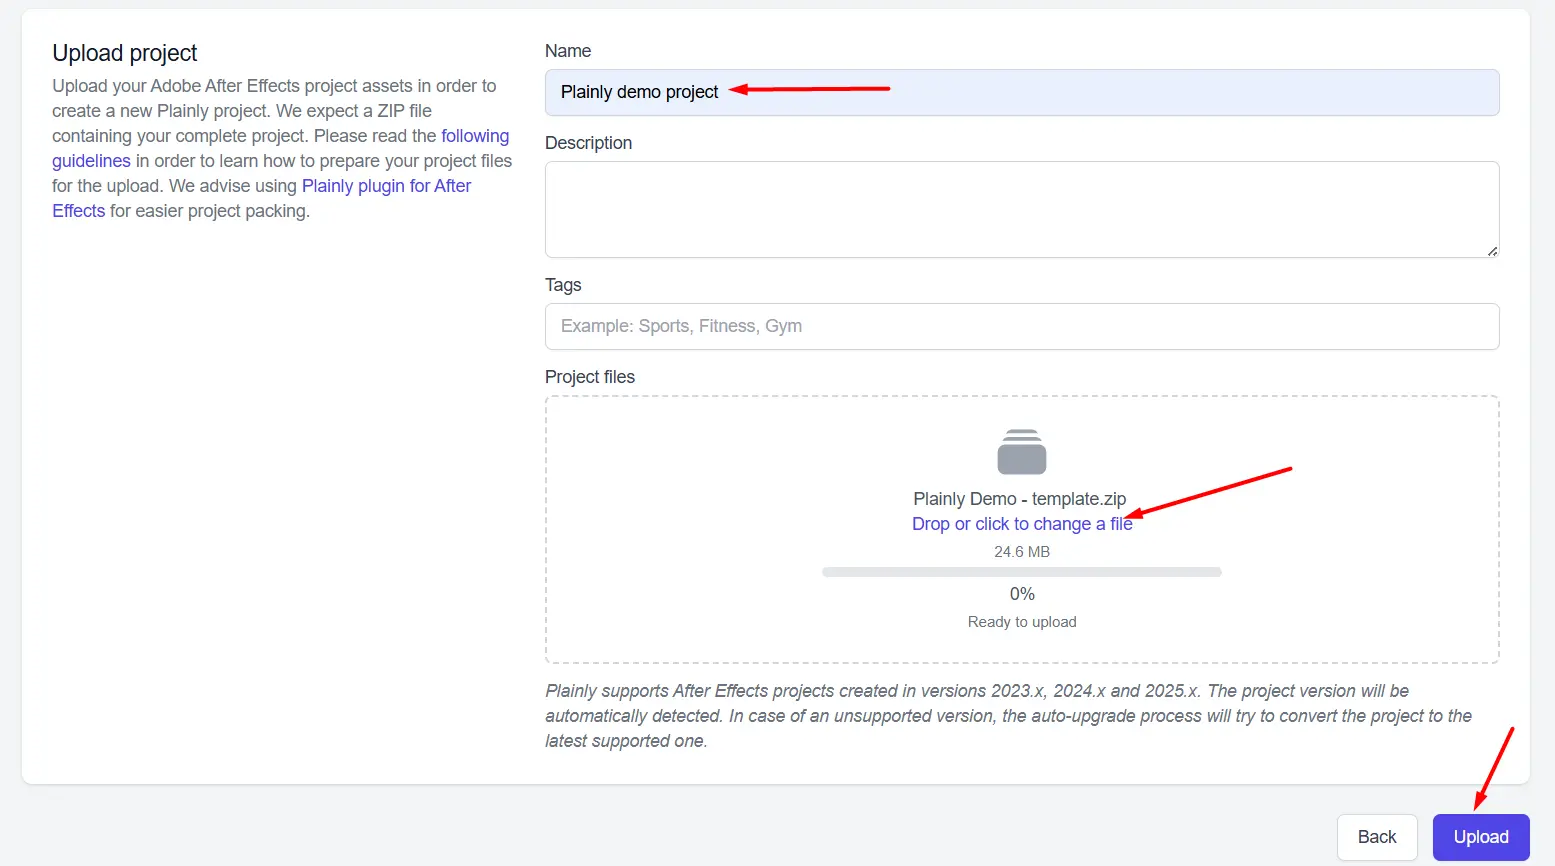
Give it a name (optionally a description and tags, as well) and upload your zipped After Effects project.
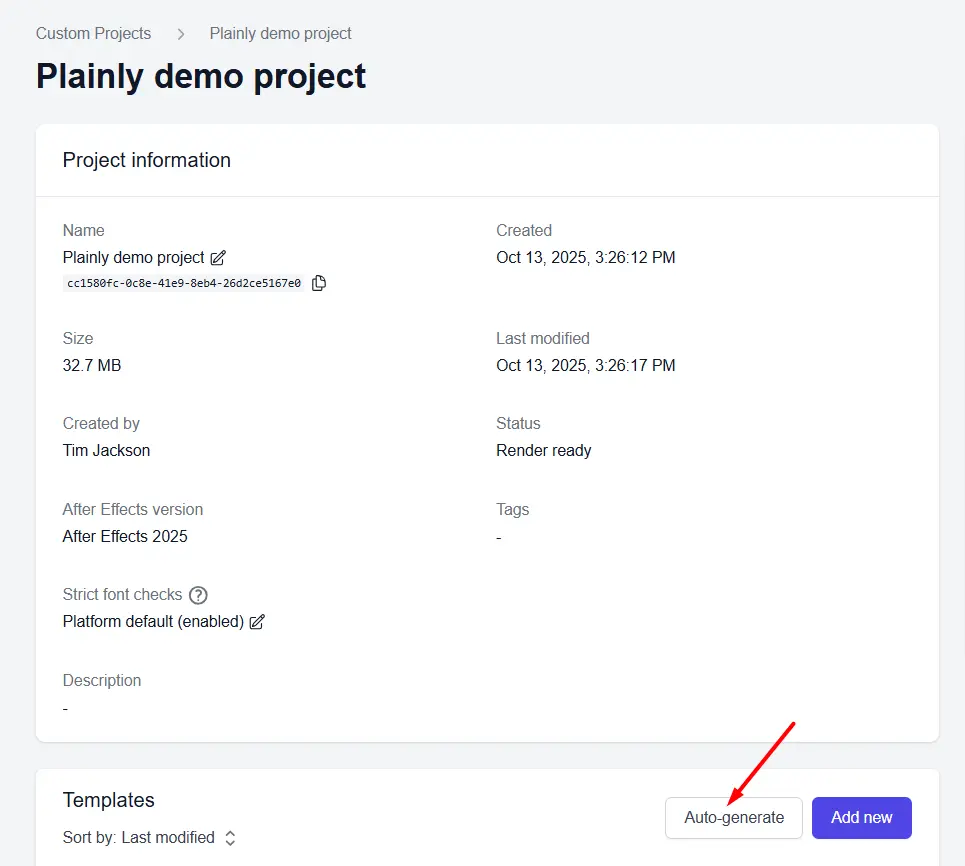
Once uploaded, scroll down to Templates and click Auto-generate.
Select the ‘’prefix’’ option from the pop-up that appears...
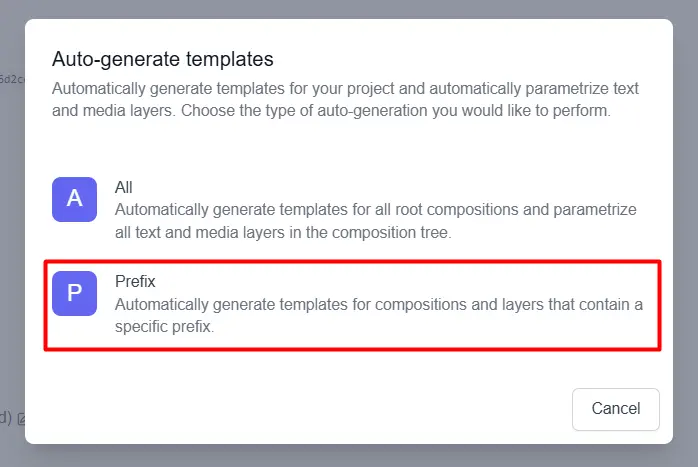
…and then type in the prefix you used earlier (in our case, “plainly”), and hit Generate.
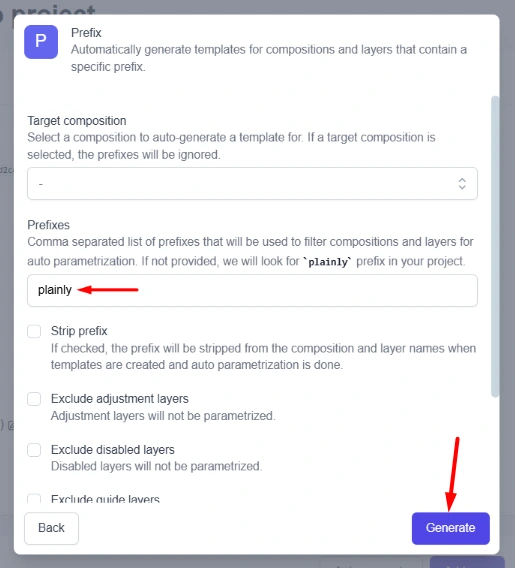
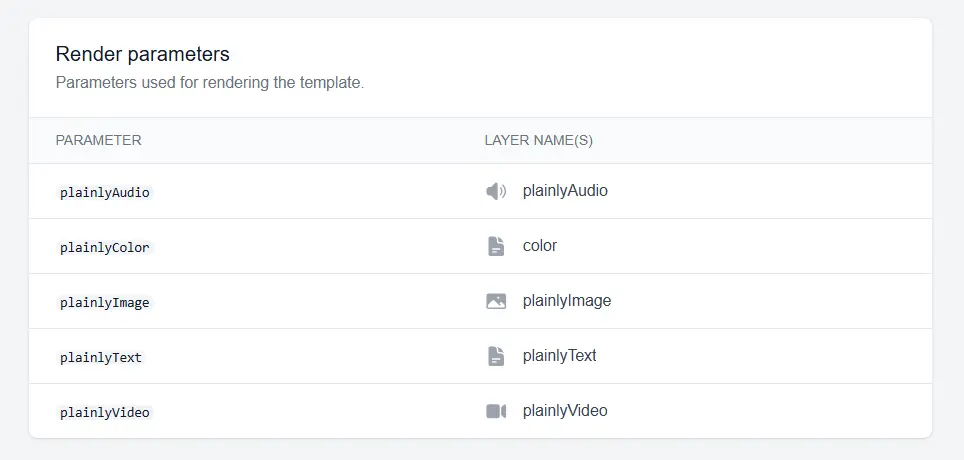
Plainly will then automatically scan your AE project and identify all layers that match the prefix.
These are now your dynamic fields (a.k.a. render parameters) - the ones that will later receive data from Zapier. You’ll see them listed in your template overview (e.g., plainlyText, plainlyImage, plainlyVideo).
If something’s missing, double-check that the prefix is spelled correctly in After Effects before moving forward.
Step 3: Create a Zapier table
Template all set up?
Let’s take it to Zapier, where you’ll build a table that will store data for your videos.
Think of tables as Zapier’s version of spreadsheets. And just as you can transfer data from a spreadsheet to video, you can also push it from a Zapier table to Plainly to create data-driven videos at scale.
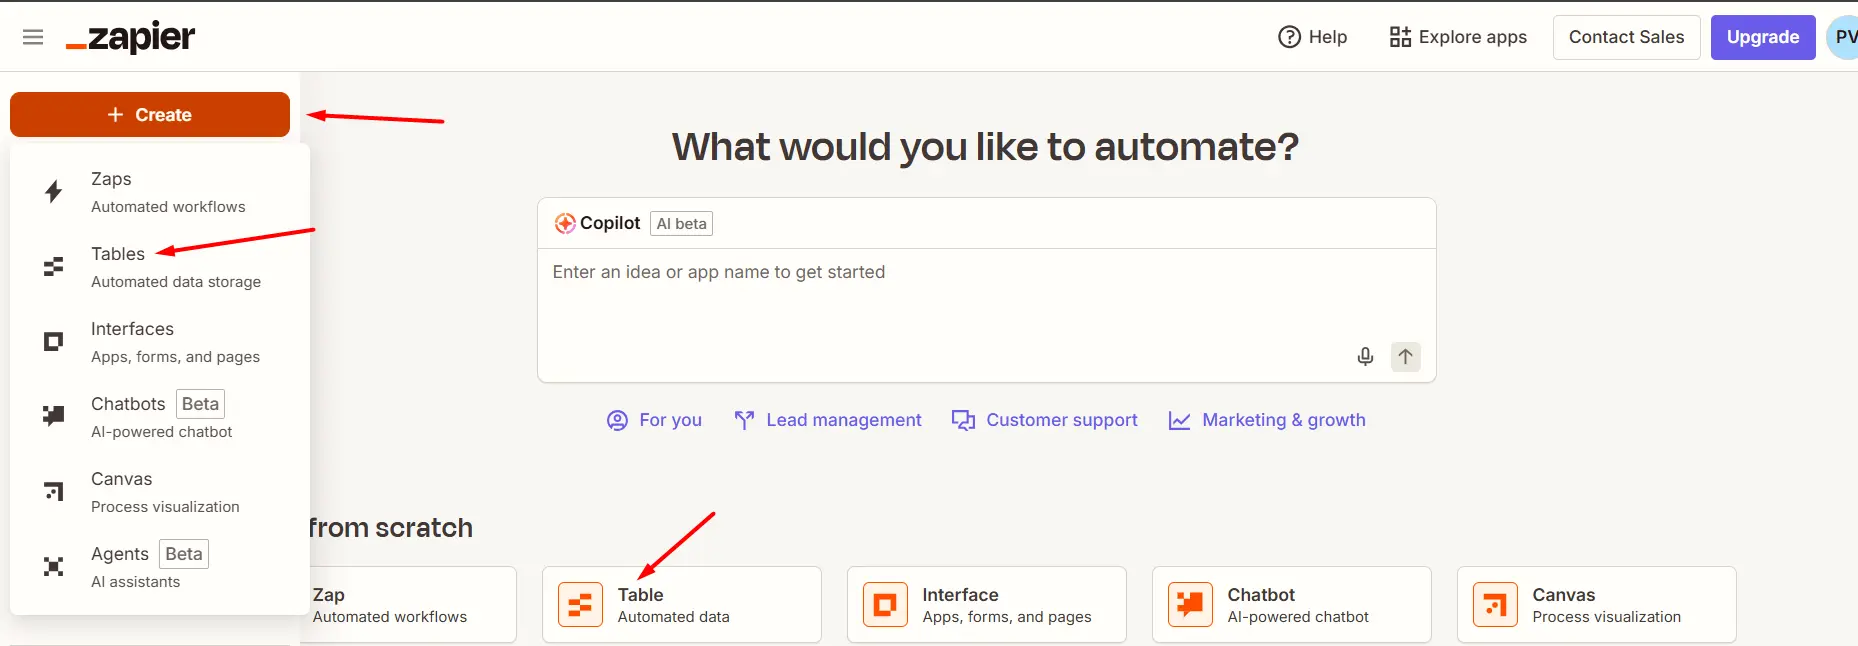
Now, to create one from scratch, first, log in to your Zapier account and pick the Table option from your dashboard (or the side menu).
Then, choose Blank table.

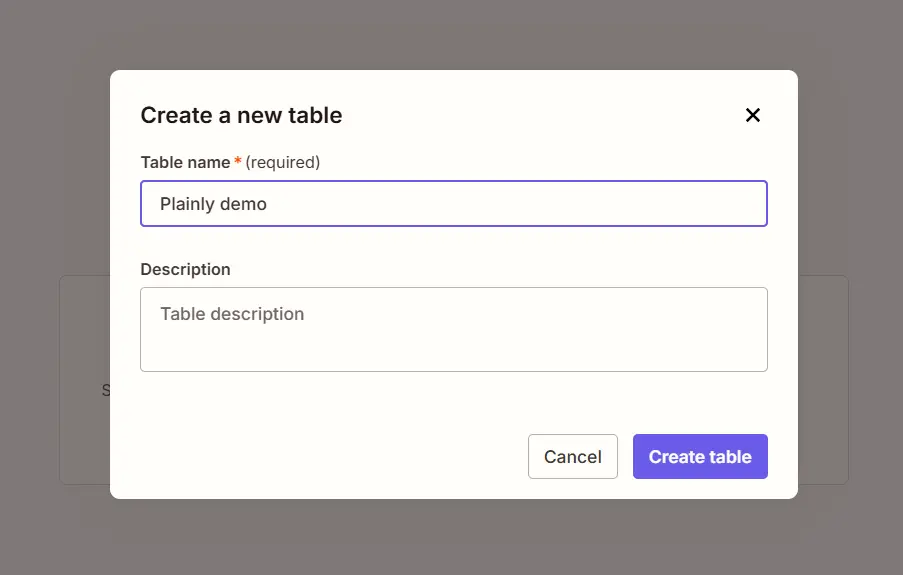
You’ll see a pop-up appear prompting you to name it. Do so and click Create.
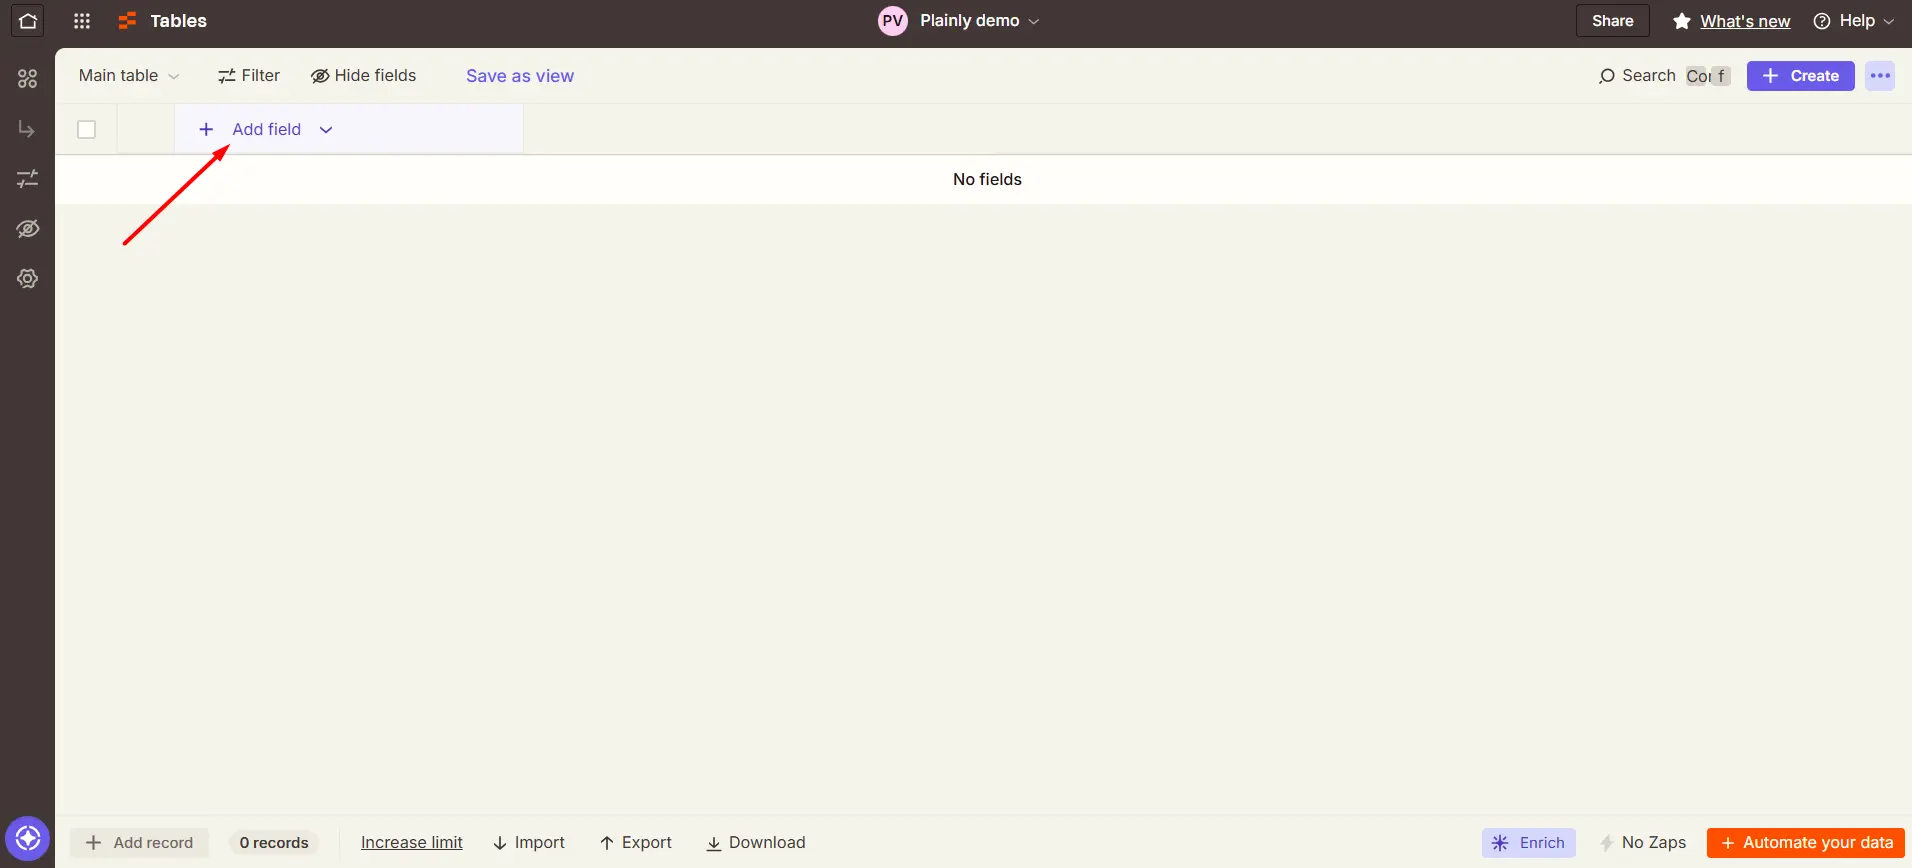
The next step is to add fields, so click the corresponding button in the upper-left corner.
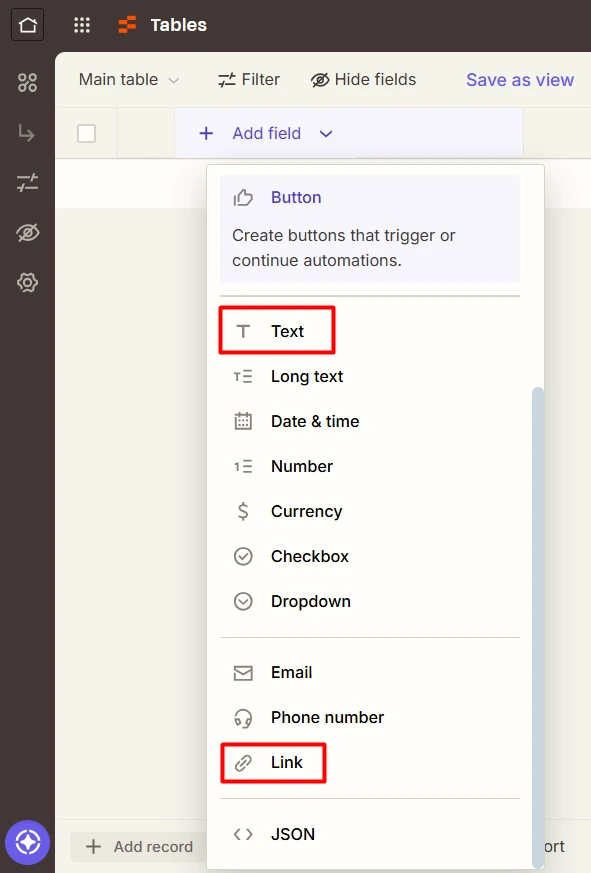
Then, you’ll want to pick the field type. There are multiple types available, but generally speaking, you’ll be choosing between Text and Link:
- If the dynamic element is text, select the Text field.
- If it’s something that requires a URL (e.g., image, video and audio files), select the Link.
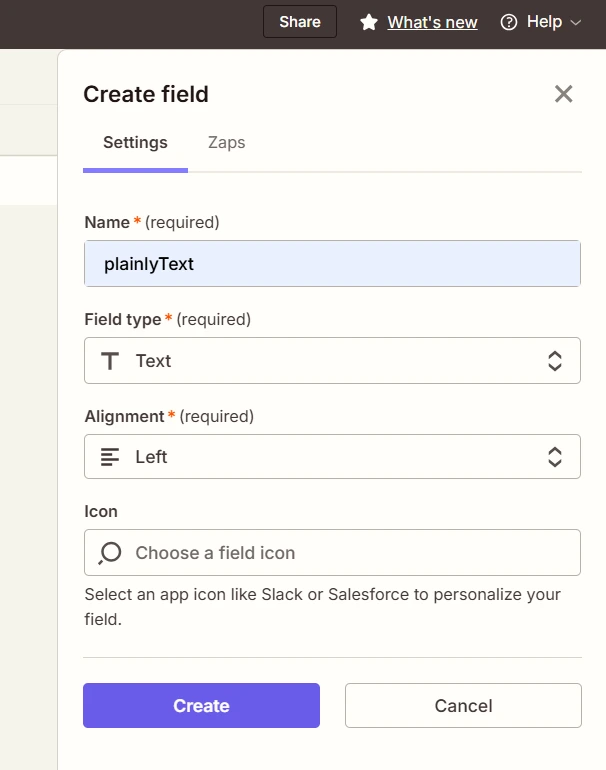
Once you’ve selected the field type, give your field the same name as your parametrized layer name (layer with the ‘’prefix’’ - plainlyHeadline, plainlyImage, plainlyColor, plainlyVideo, etc.) and hit Create.
Bear in mind that you’ll need a separate field for each parametrized layer. So, repeat the process for as many as you have defined in your video template.
Once done, your table structure should mirror your AE setup exactly.

Step 4: Create a Zapier interface with a form
Now that your table is ready, let’s make it easier to feed data into it - by building a form using Zapier Interfaces.
This form will act as a user-friendly input for you or your team. Anyone can fill it out to trigger a video creation workflow; no need to open the table manually.
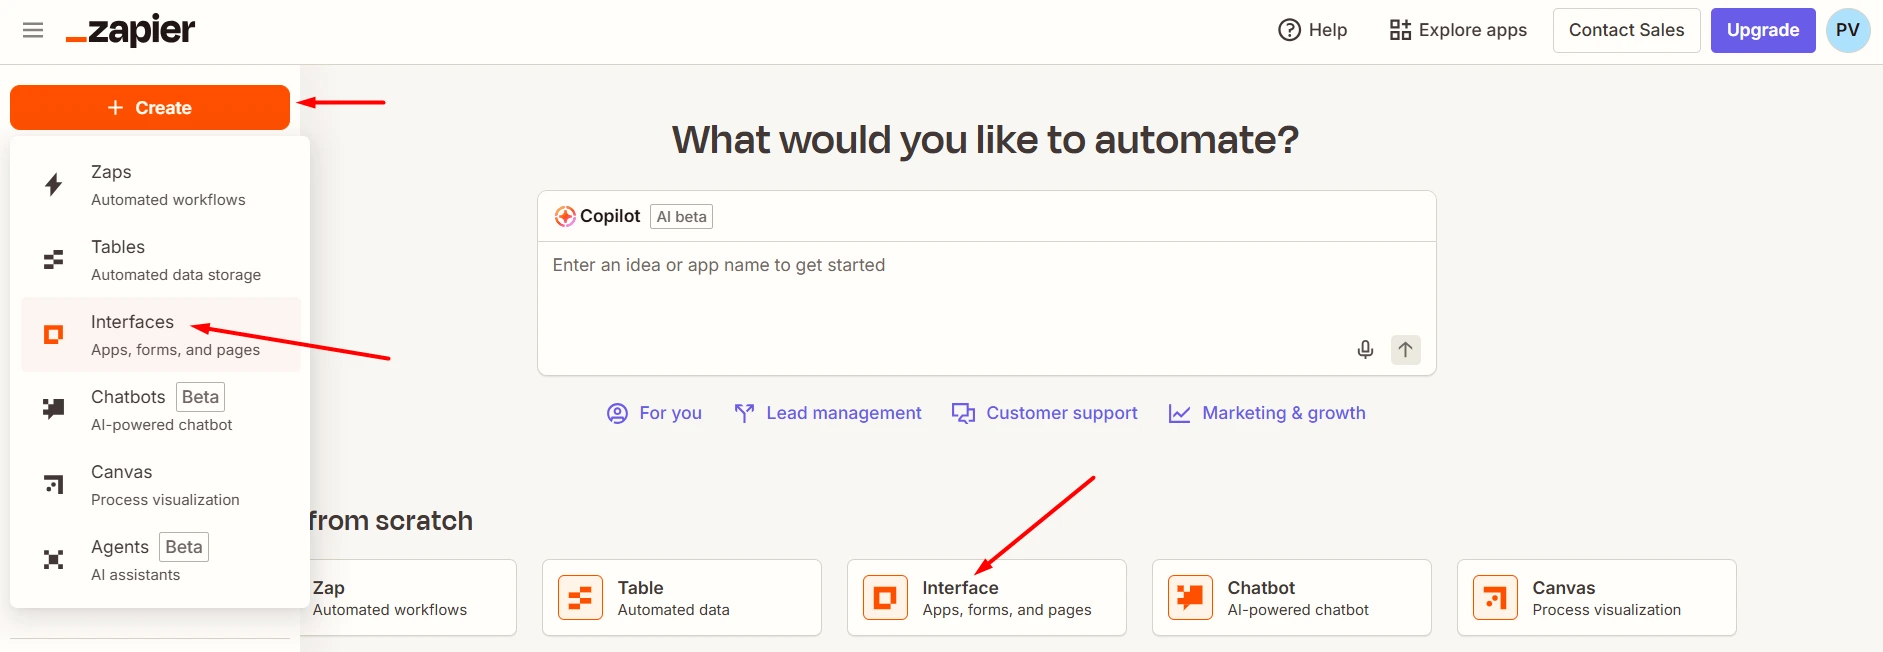
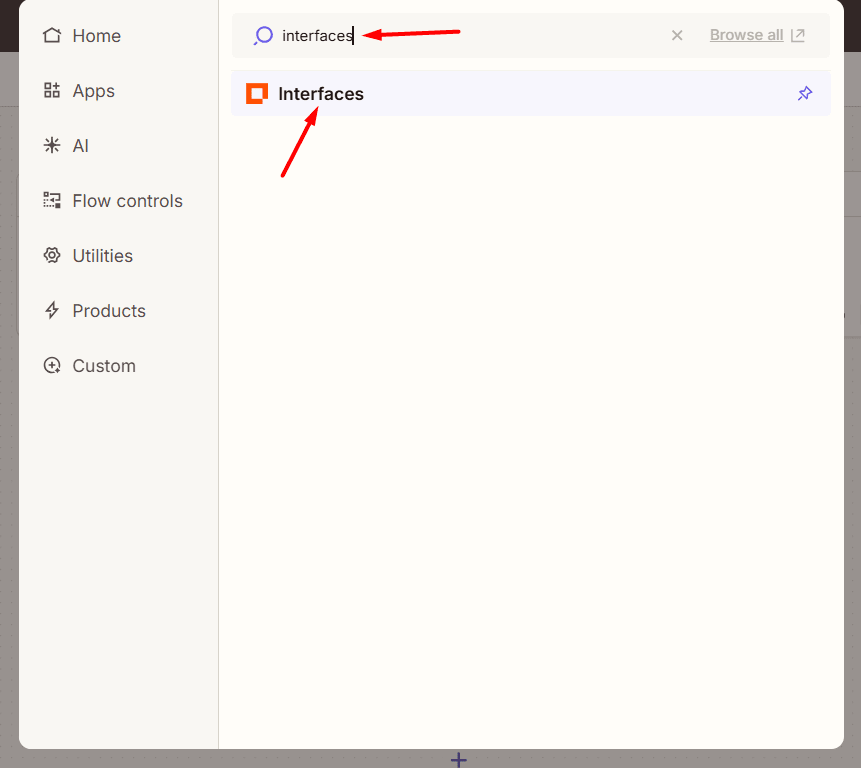
To build one yourself, first up, go back to the Home screen. From there, click the Create button in the sidebar and select Interfaces. Alternatively, you can pick the Interface option directly from the dashboard.
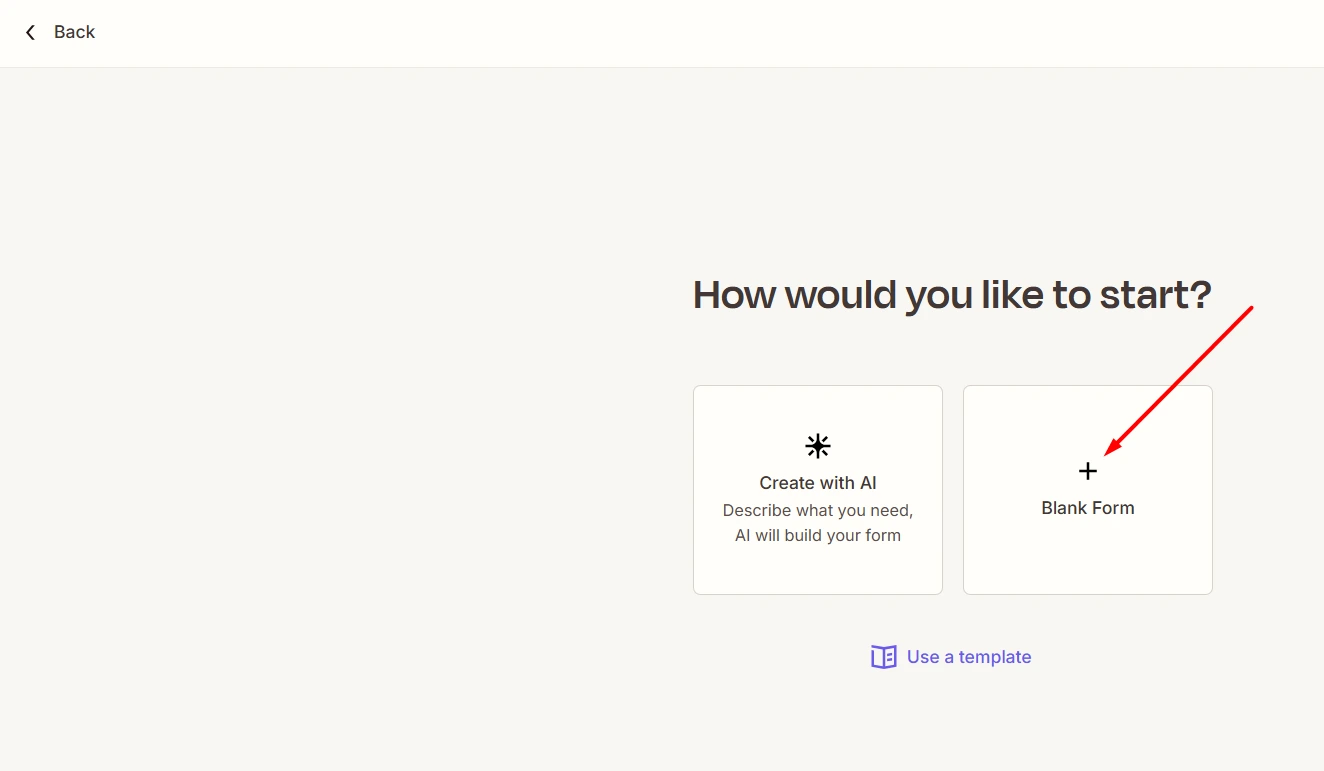
When asked how you’d like to start, choose Blank Form.
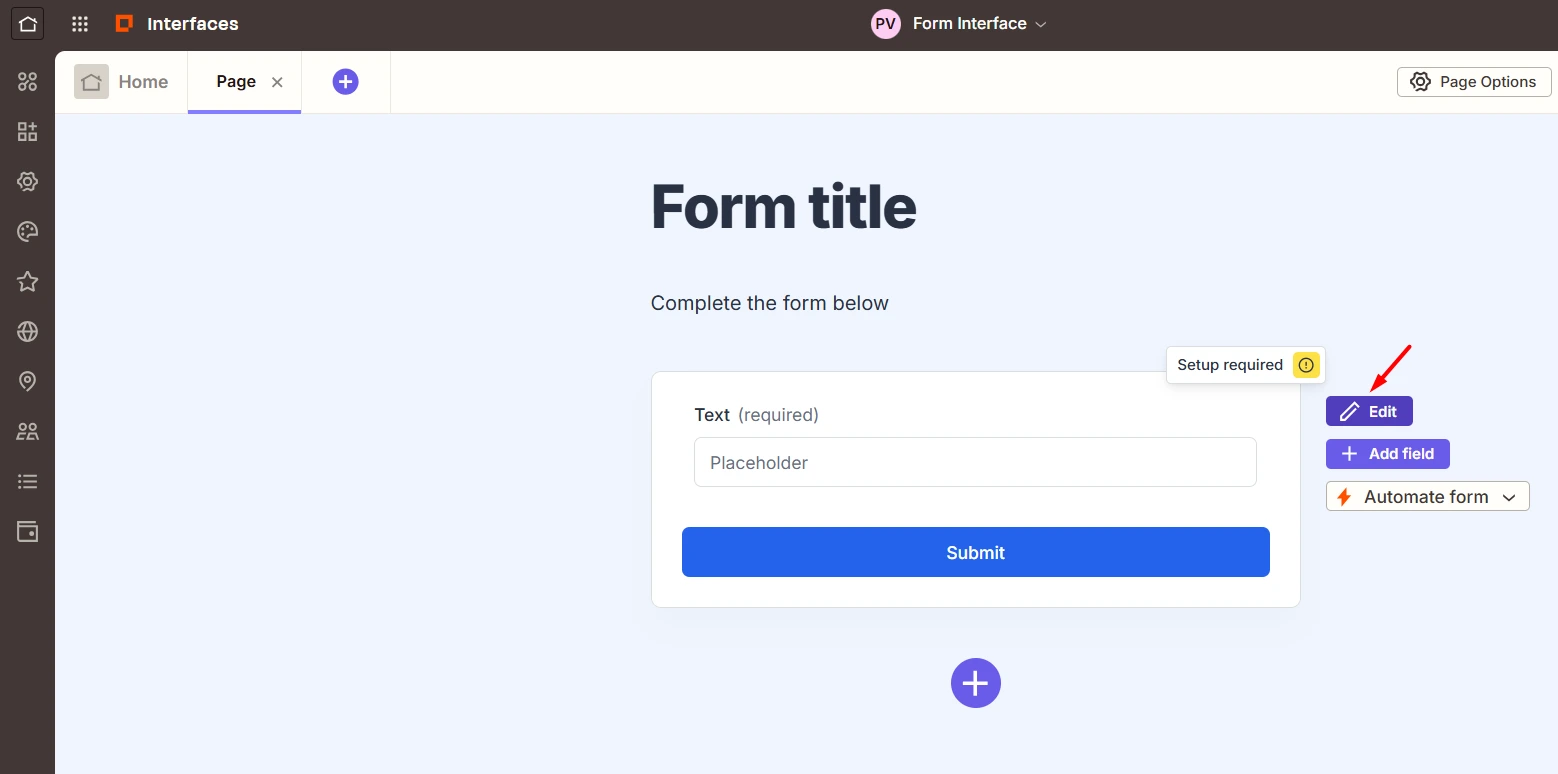
After a few moments, you'll be taken to a form builder. Don’t fill anything manually. Instead, click Edit on the right side of the form.
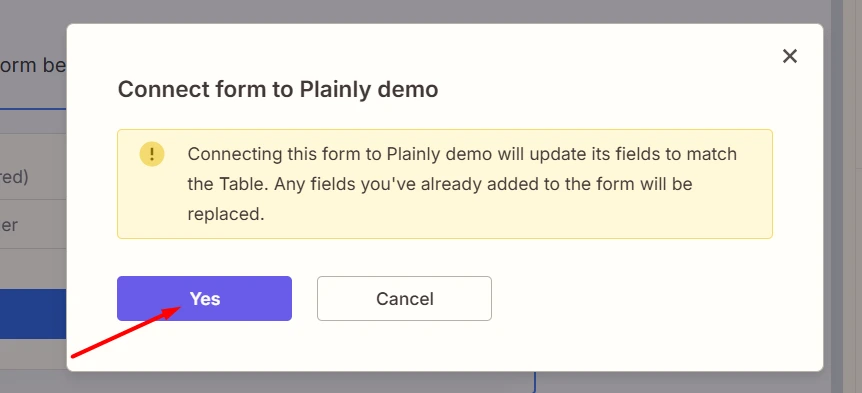
Next, we want to connect the form to the table created in the previous step. To do so, go to the Data tab and then select your table.
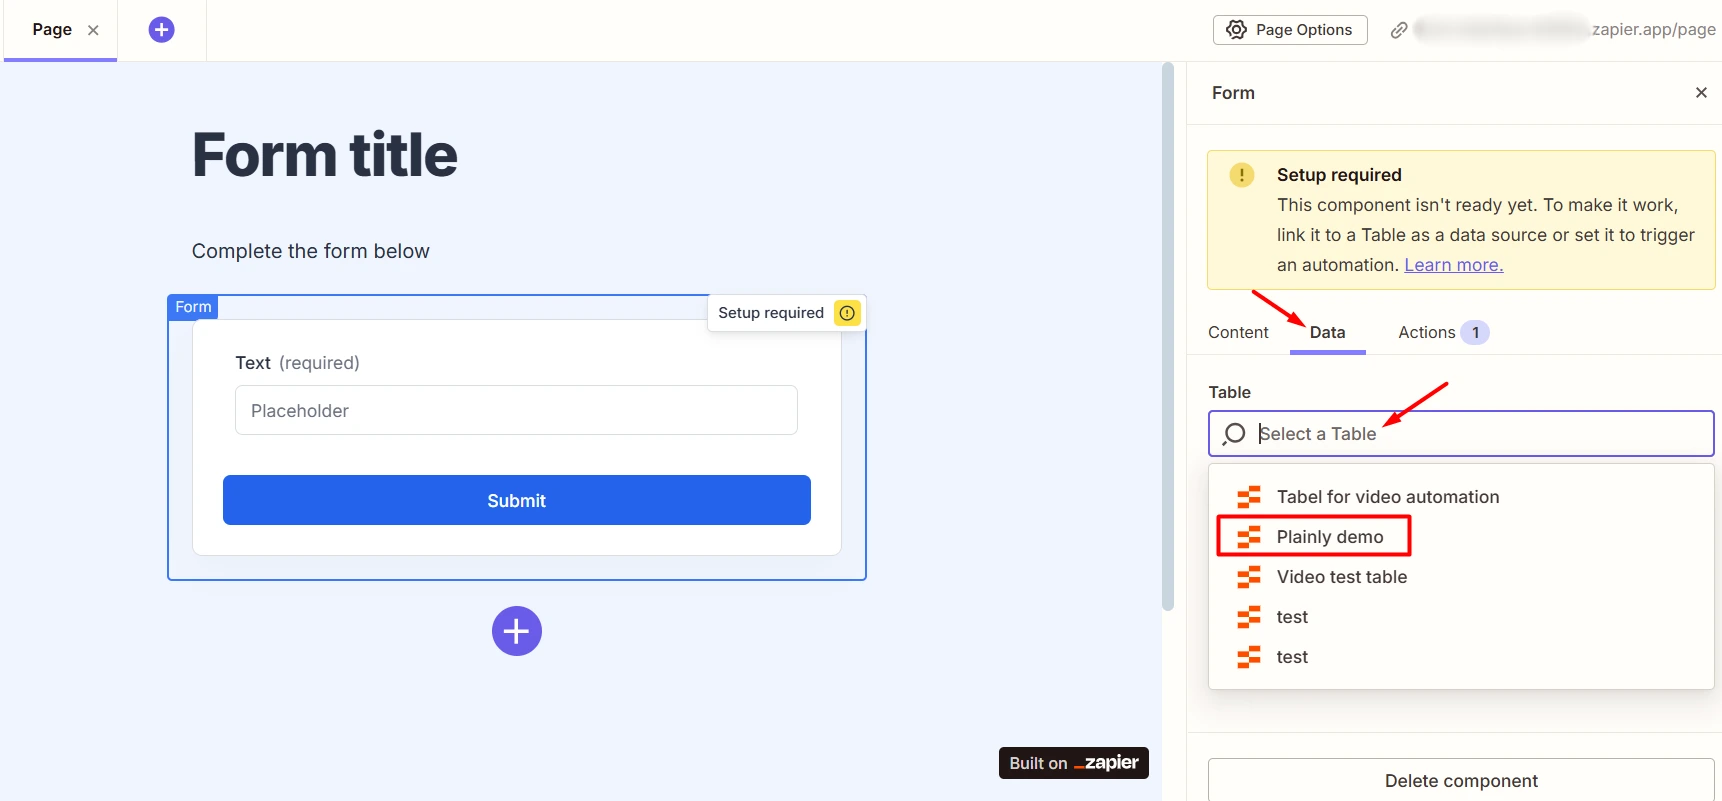
Zapier will then show a pop-up saying that all form fields will be updated to match the table columns. That’s exactly what we want, so go ahead and click Yes.
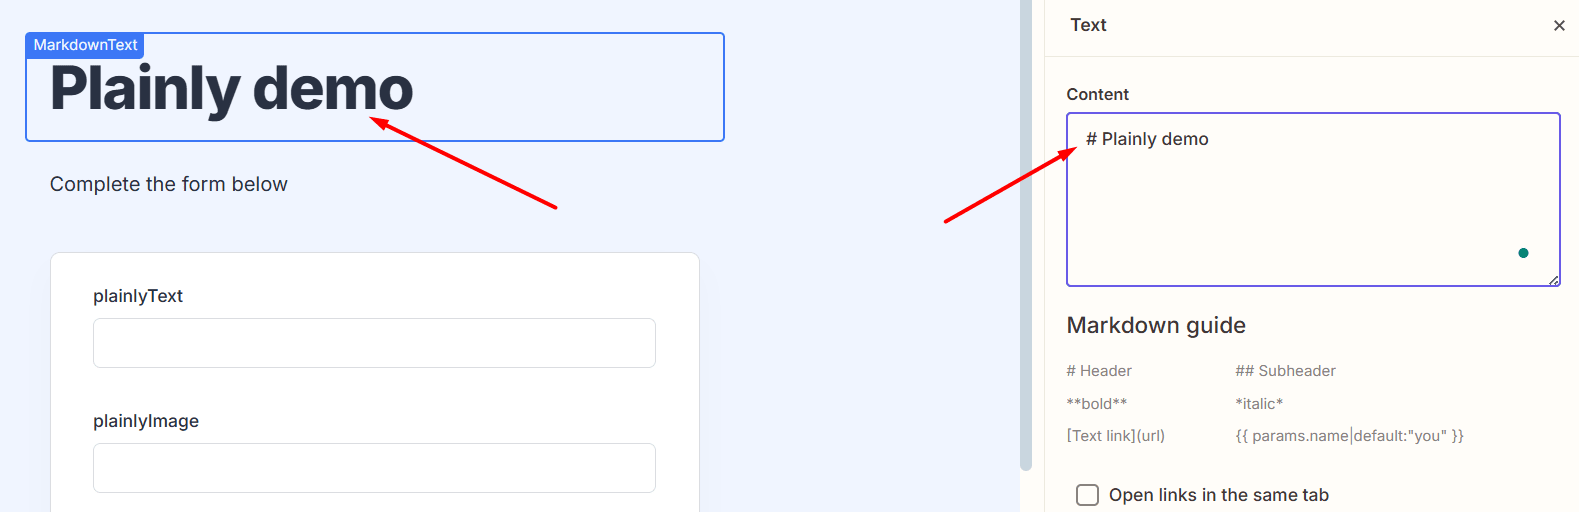
The only thing left is to rename the form title and the form itself.
To change the form title, hover over the title section until the edit button appears.

Click it, then update the Content field with the title you'd like end users to see.
Now, to rename the form (called "Form interface" by default), first, find it in the navigation bar. Click on it, select Rename, then type in your preferred name and press Enter to save.

And that’s it! Easy peasy lemon squeezy! :)
Zapier will now automatically create a form based on your table structure, meaning each dynamic field from your video template will have its own input.
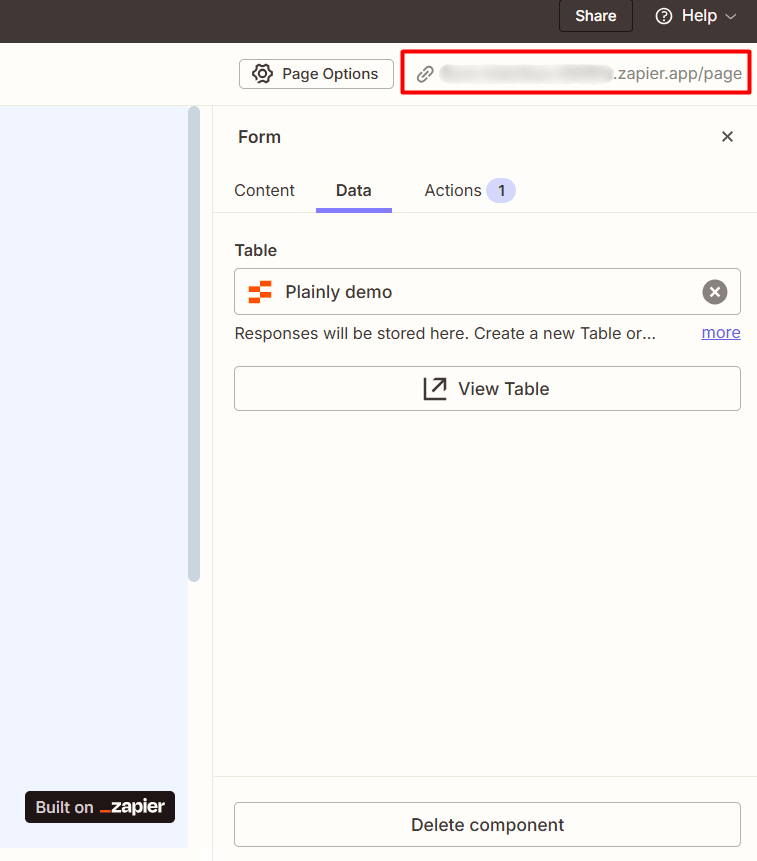
To get the shareable link, look in the top-right corner. It should look something like this:
https://formname-xxxxxx.zapier.app/page
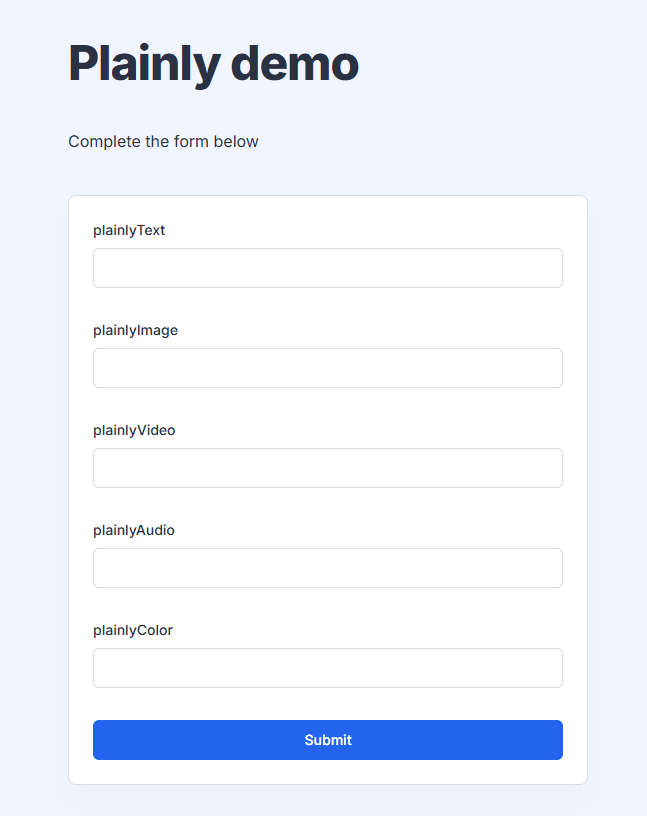
Meanwhile, this is what the form looks like when you open the URL.
Now, whenever someone submits the form, Zapier will automatically store the data in your table, ready for Plainly to pick it up and create dynamic videos.
You can keep this form private for internal use. Or, share it with teammates, clients, or even users if you’re collecting video requests externally.
Step 5: Set up the Zap trigger
It’s finally time to automate video generation with Zapier, and it all starts with creating a Zap - a.k.a. an automated workflow that connects two or more apps, in this case, Zapier and Plainly.
The process starts with you creating a trigger.
But first, go back to the Home screen again. Click the + Create button in the sidebar and select Zaps. Or click Zap directly from the dashboard.
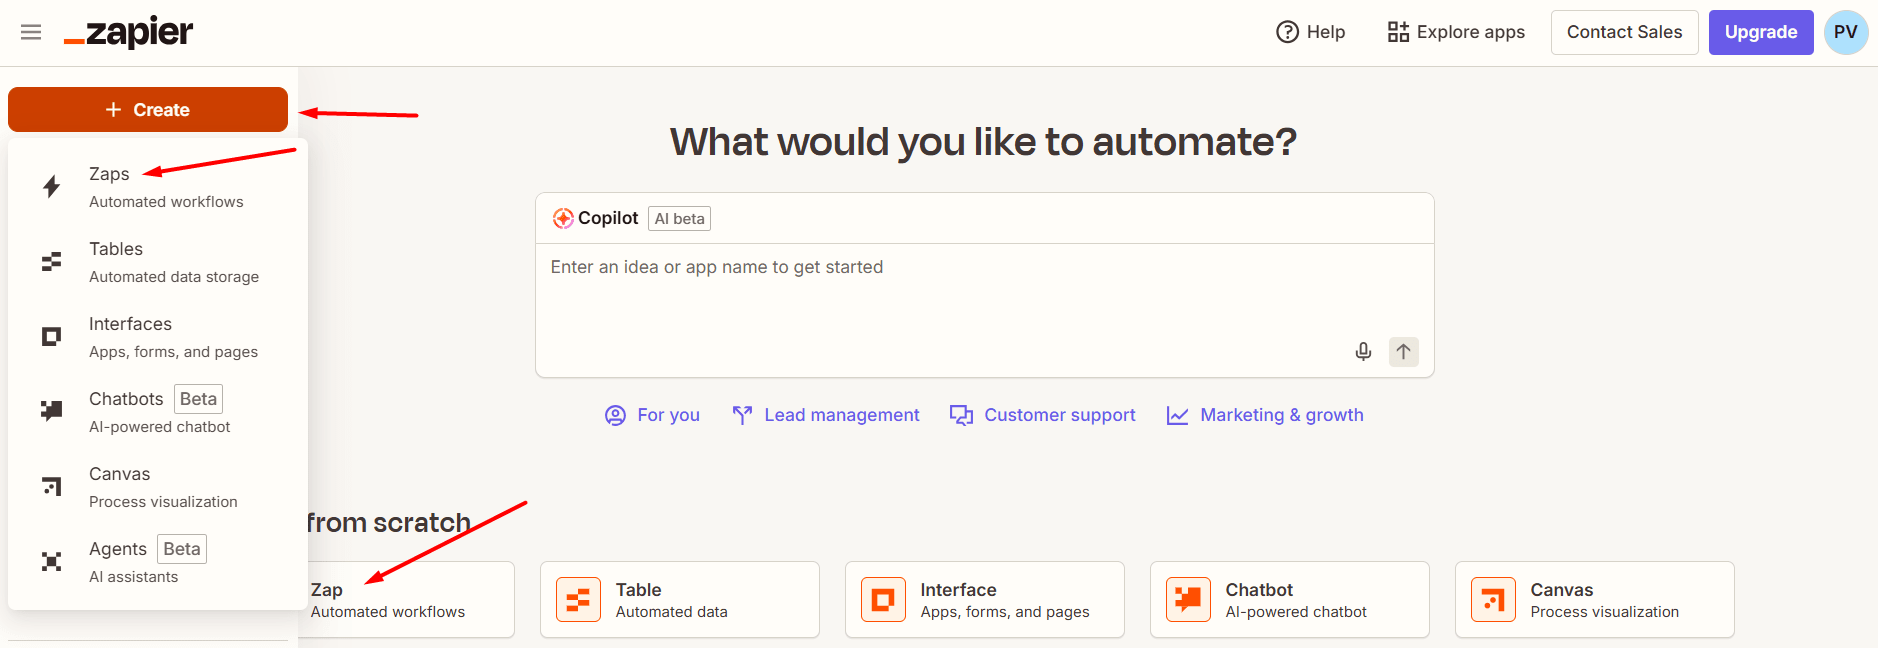
In the workflow editor, click on Trigger to start setting it up.

Then, type Interfaces in the search bar and select it.
Choose Form Submission Created as your trigger event. This will make the Zap run every time someone submits the form.

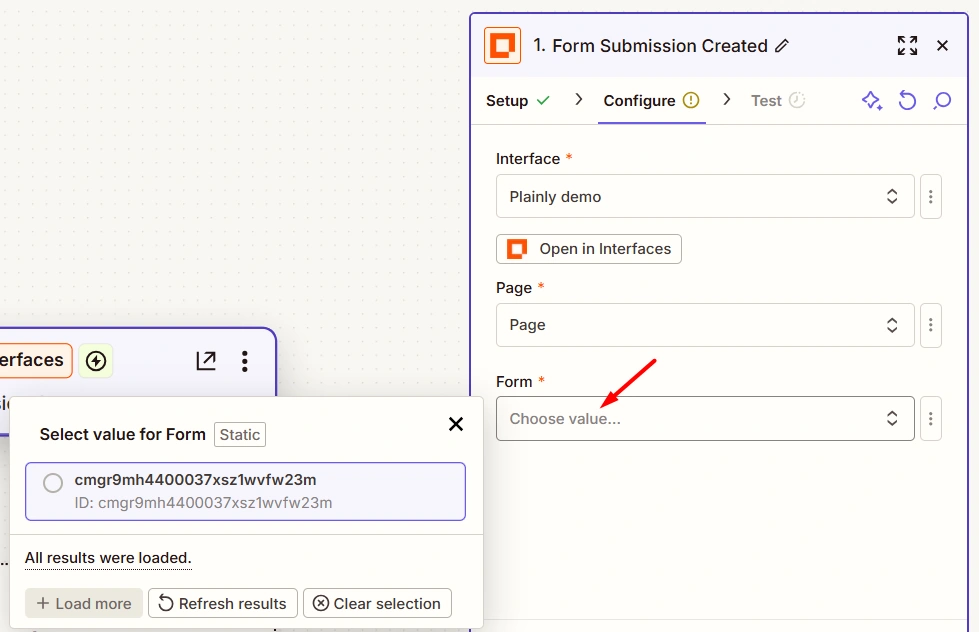
After you click Continue, Zapier will ask you to choose which Interface, Page, and Form you want to connect.
First, select the Interface you built earlier. You can identify it by its name or ID (you can double-check these on your Interfaces page).
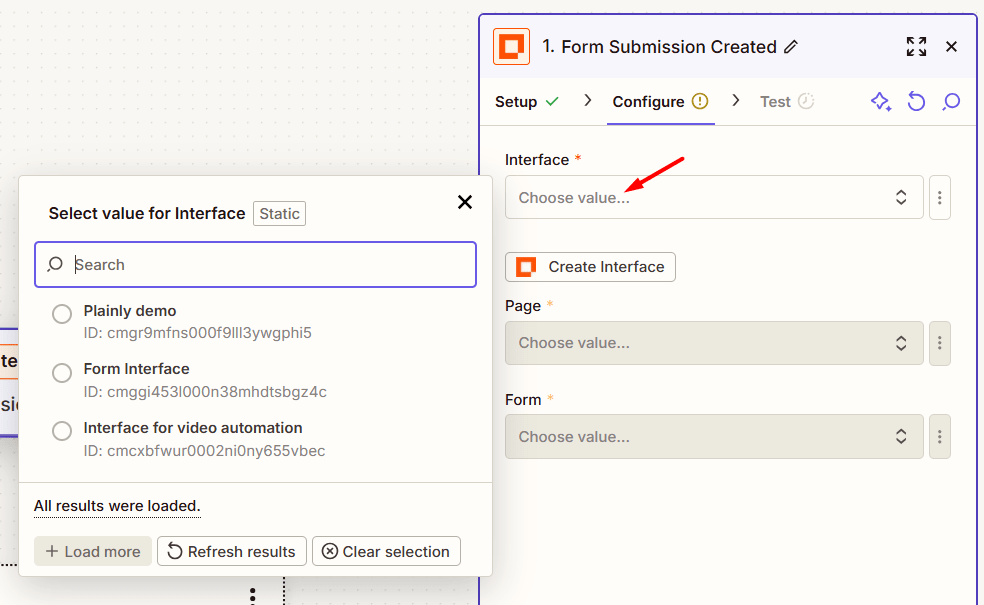
Then, select the Page. If this is your first interface form, you’ll likely see just one option.
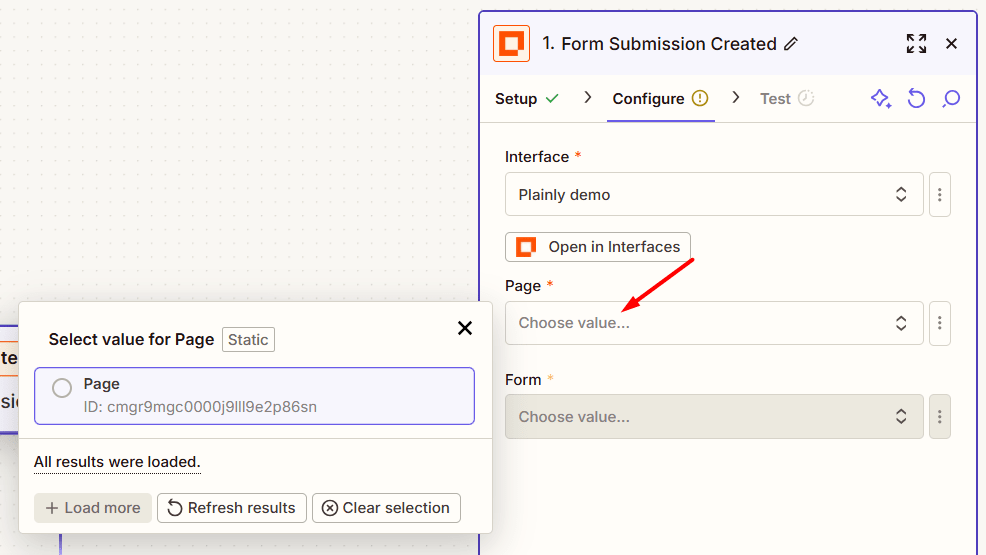
Finally, select the Form (again, there’s usually only one option).
Once everything’s selected, click Continue, then hit Test trigger.

If everything’s set up correctly, Zapier will detect your most recent form record submission.
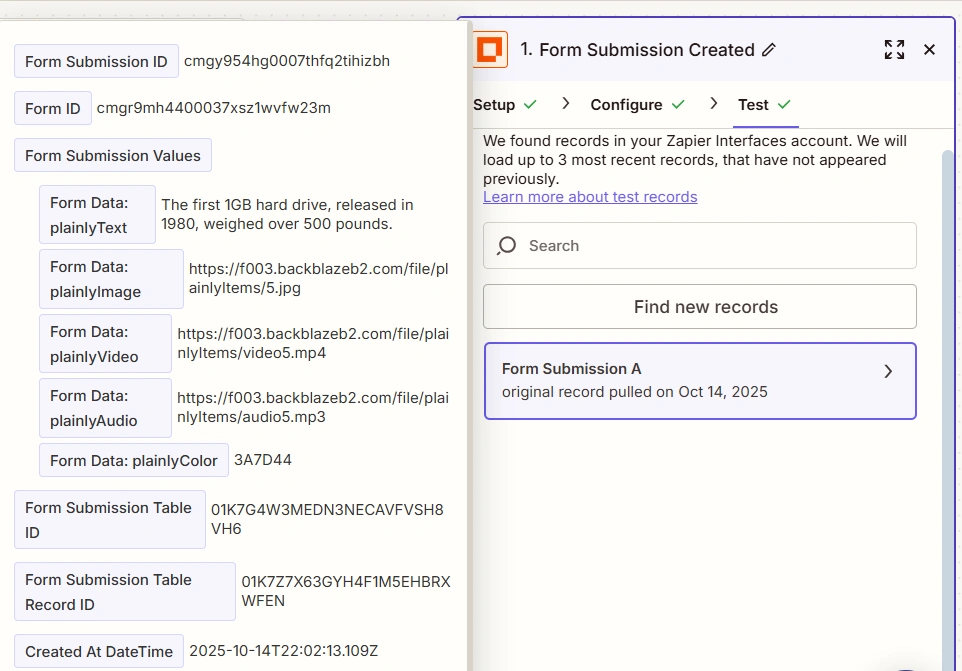
If you haven’t submitted it yet, you’ll see some placeholder (dummy) data instead.
Either way, the test will run. But if you want to see real data appear in it (and make troubleshooting easier), it’s best to submit the form yourself first.
Step 6: Create a video generation action
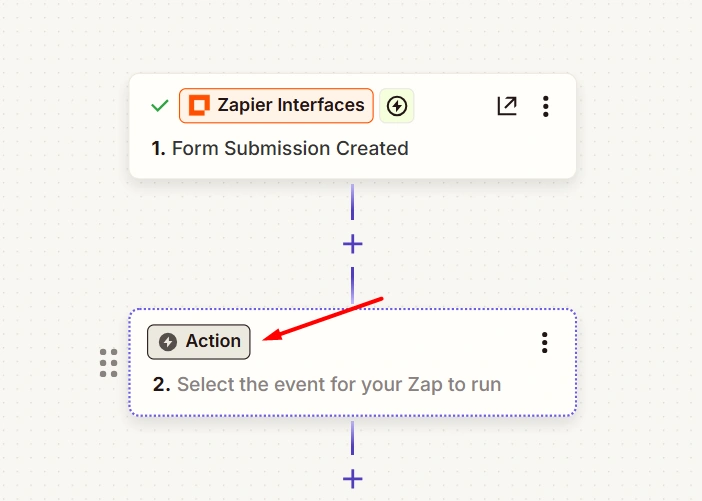
With your trigger set, it’s time to define what happens next - the action. In this case, it’s rendering a video using your Plainly project.
Start by clicking the Action button in your workflow editor.
Then, search for Plainly in the search bar and select it.
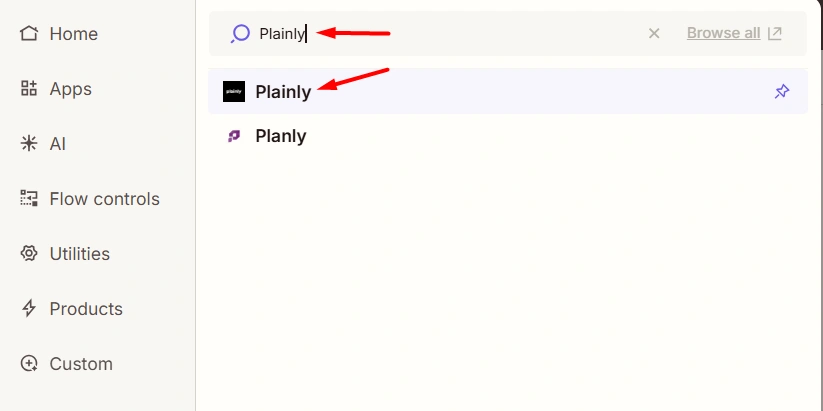
Choose Submit Render as your action event, so that Zapier can tell Plainly to create a new video render every time the trigger is fired.

Now you need to connect your Plainly account. So, click Select an account -> Connect a new account.
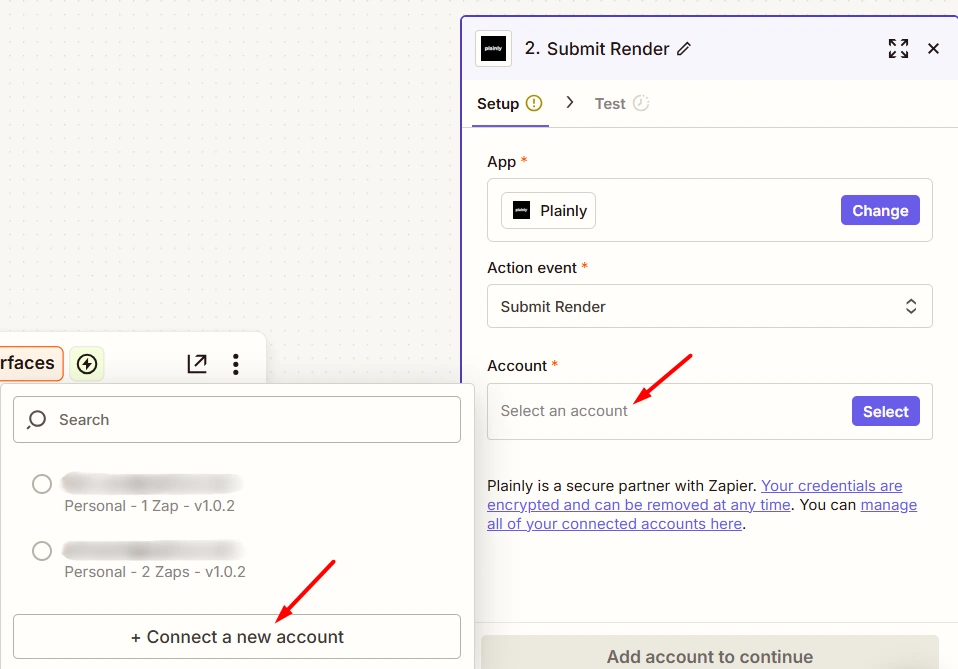
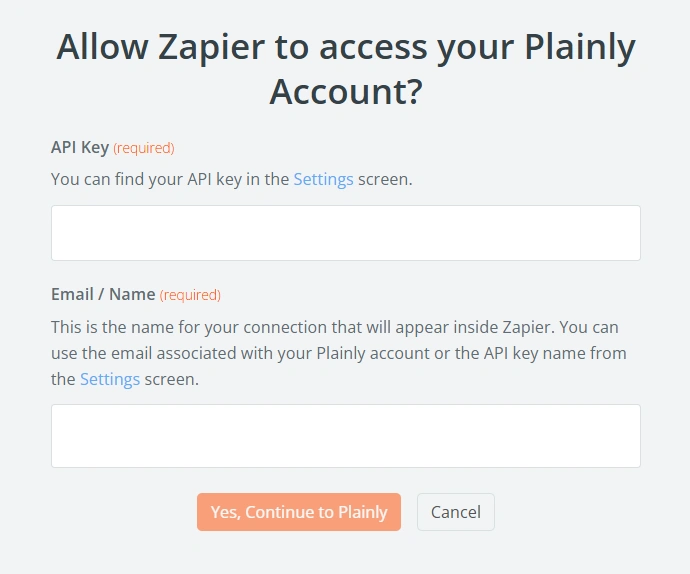
A new window will open asking you to enter your API key and email associated with your Plainly account (or API key name instead of the email).
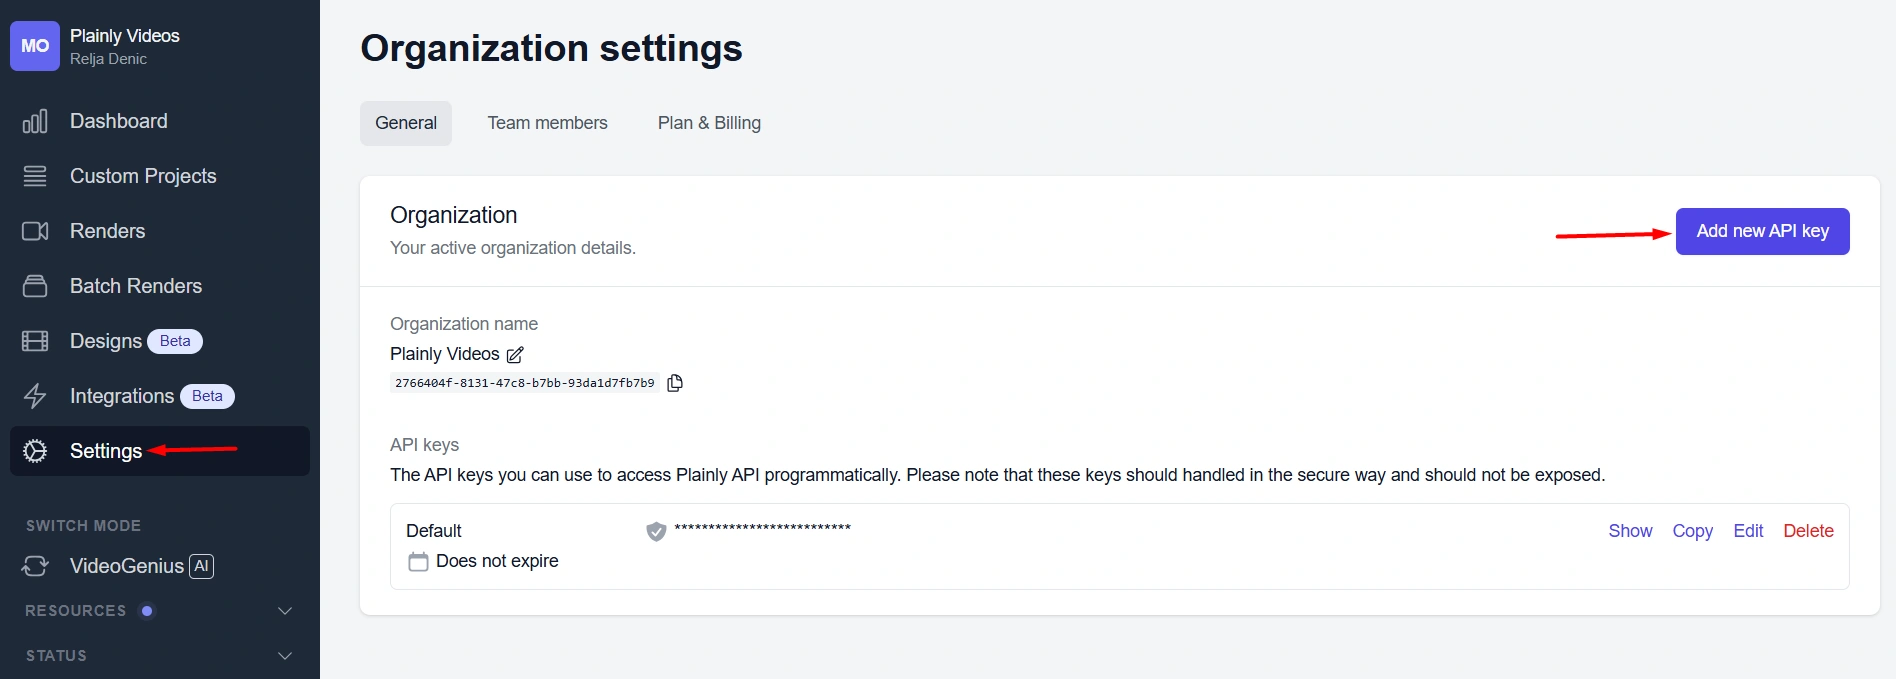
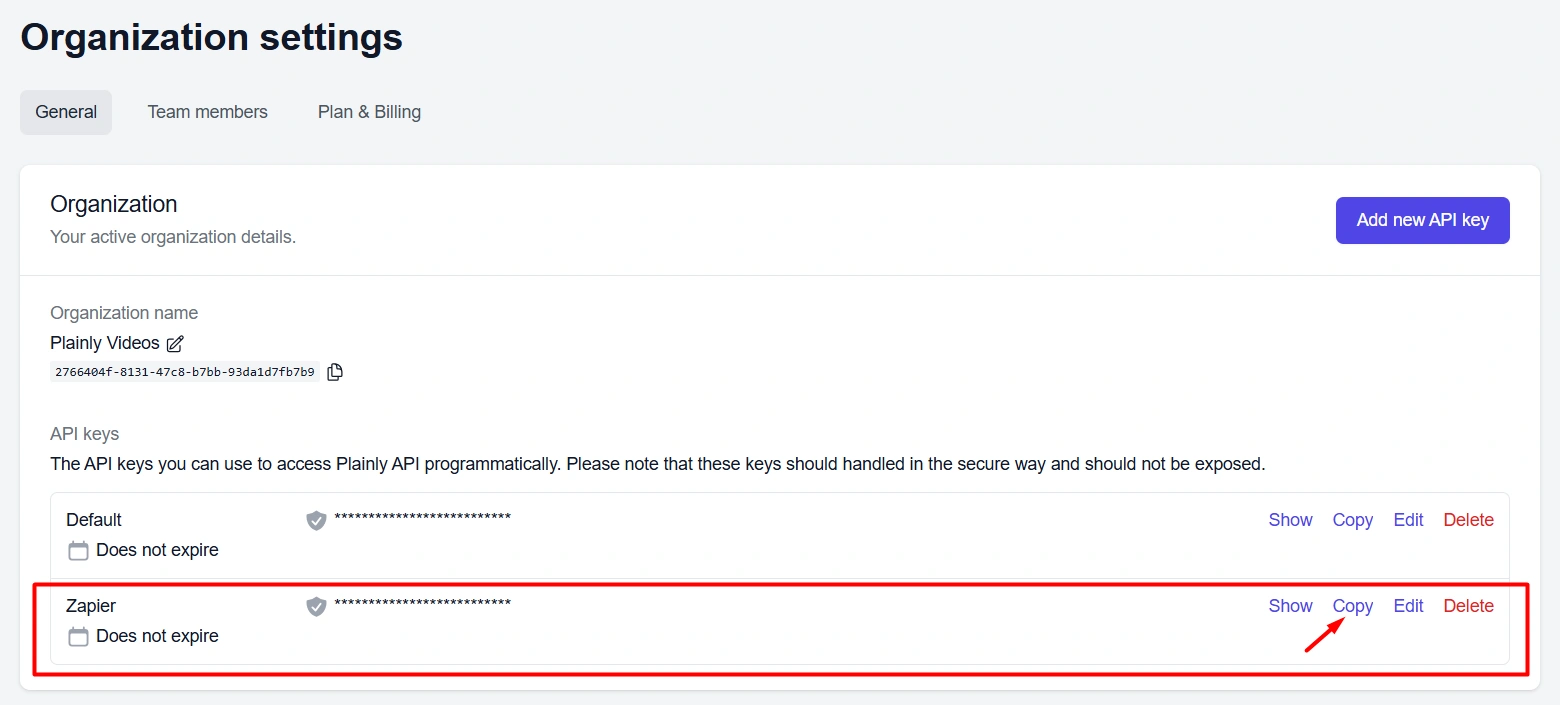
That said, to get your API key, go to your Plainly settings. You can use your default one with no issues. But if you'd like more control, for example, to set expiration dates, usage limits, or just to have a dedicated key for Zapier, you can also generate a new one.
So, click Add new API key.
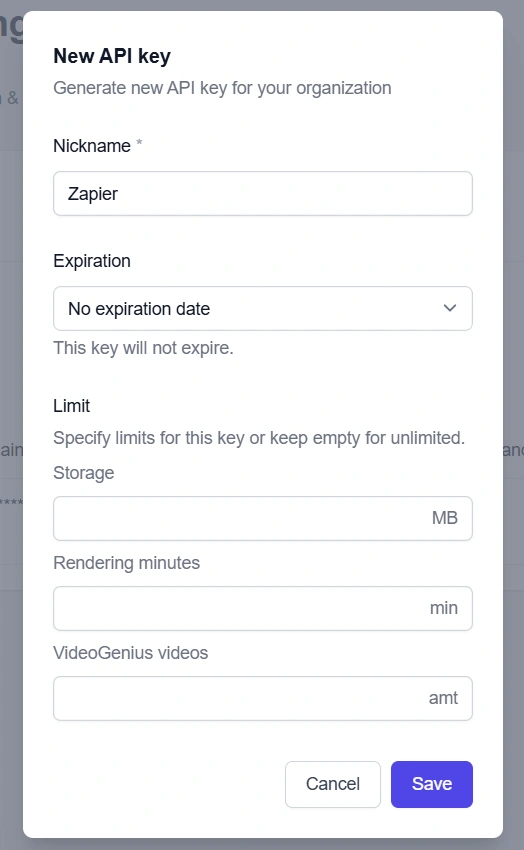
A new dialog will appear prompting you to enter the key name, expiration date (30,60,90 days, or no expiration), and limits (if applicable).
Save everything when happy with the setup, and the new API key will appear on your Settings page, right under the default one. From there, click Copy to have it automatically copied to the clipboard.
Lastly, paste the key straight into the Zapier window, along with the email address/key name, and confirm you want to proceed to Plainly.

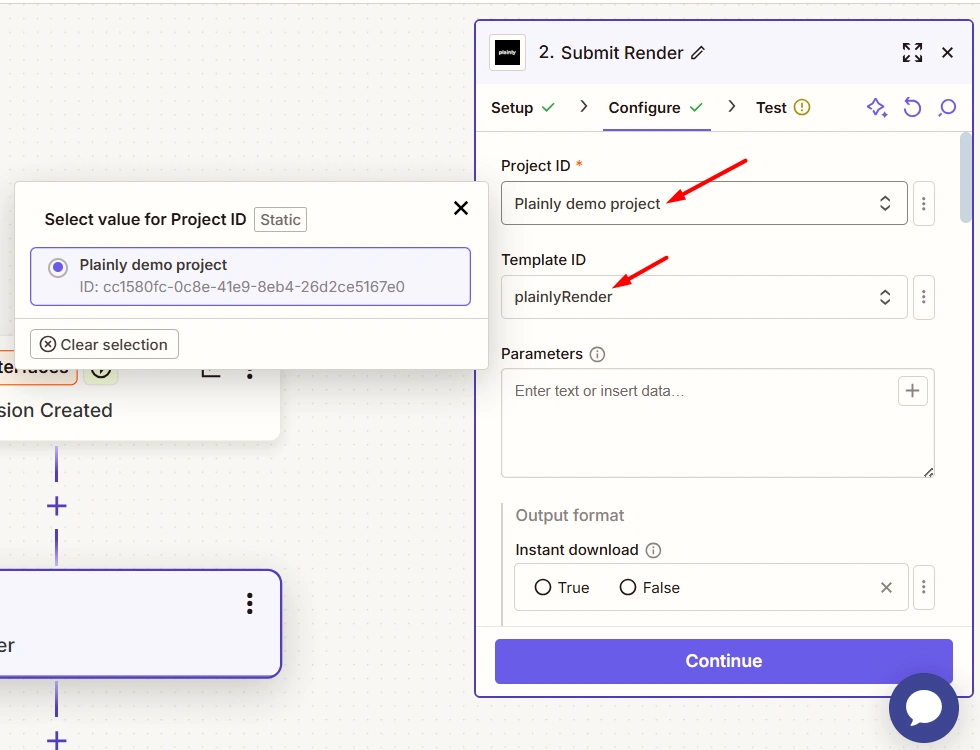
Once your Plainly account is connected to Zapier, you’ll move on to configuring the action, including:
- Project ID of the Plainly project you want to use, which is actually the name of the project you created earlier.
- Template ID of the template that Plainly auto-generated from the parameters you chose to make dynamic in your project.
Now, for the parameters, this is where the magic happens.
Zapier uses a JSON format to send data into your video template. So, when you're filling out the Parameters field, start by typing out your parameter block using this structure:
{
"plainlyAudio": "",
"plainlyText": "",
"plainlyVideo": ""
}
Each key (like "plainlyAudio") should be in the new row and exactly match the name of the dynamic layer you set up in your template. So, if the layer is named plainlyAudio in your template, it should also be plainlyAudio here.
Now, instead of manually entering the values (on the right side of the colon), click the + icon inside each empty string. This opens a dropdown where you can select the corresponding form field from your trigger step, for example, "plainlyAudio" from the Interface form.
Zapier will then automatically insert a dynamic variable inside the quotes. Repeat that for each field you want to populate.

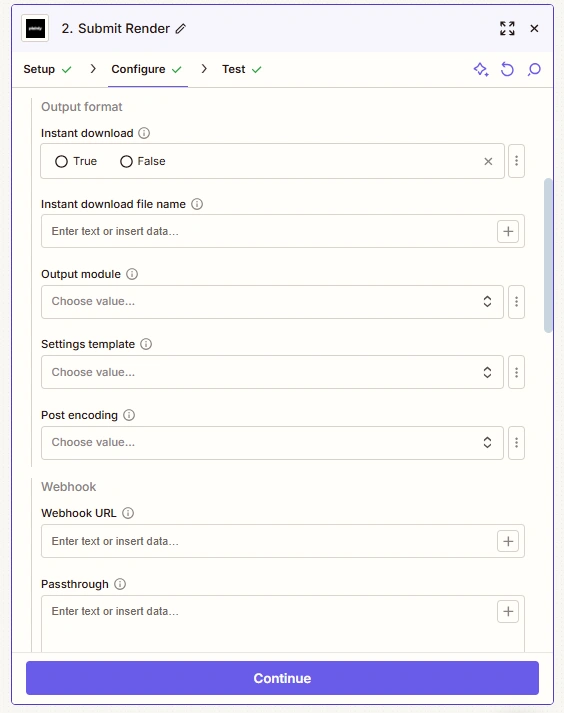
You’ll notice plenty of additional options in this step (output format, captions, encoding, webhooks, watermarks, thumbnails)
These are completely optional, so feel free to adjust the settings based on your project needs. You can also leave them as is, if that's what you prefer.
When done with the Configuration settings, click Continue, then move to the next tab and hit Test step.
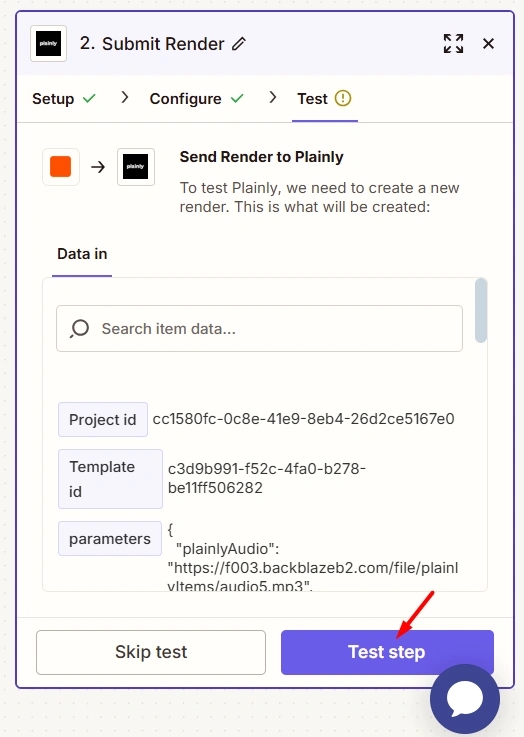
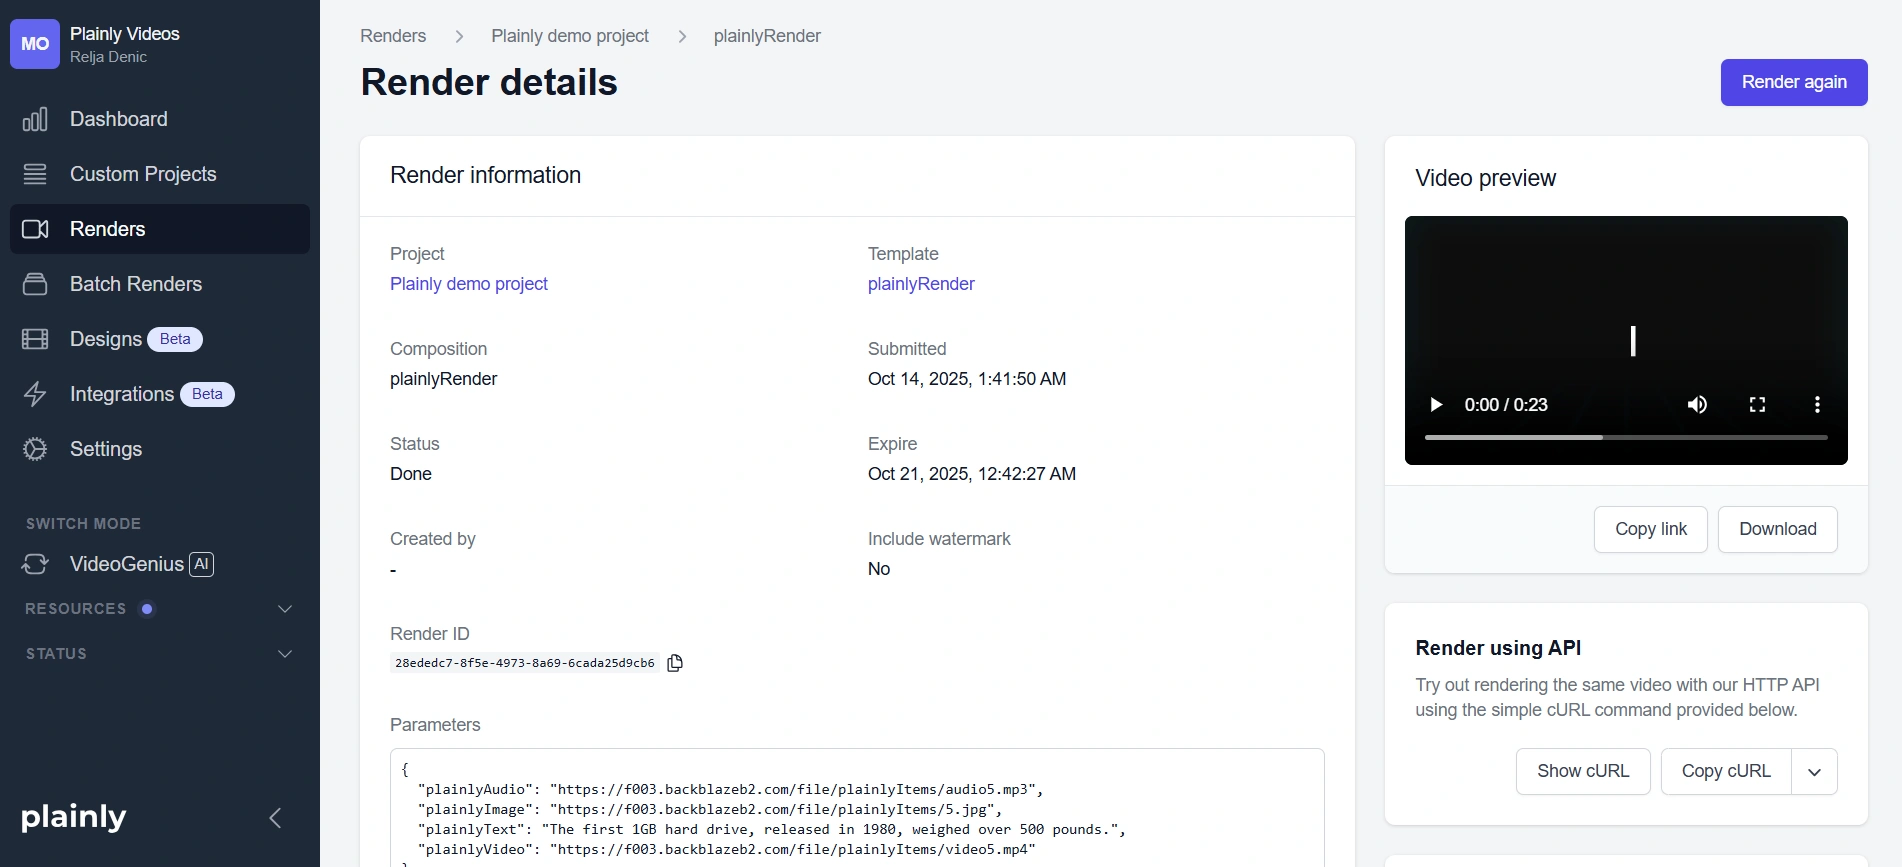
If successful, you’ll be able to see the test render in your Plainly account.
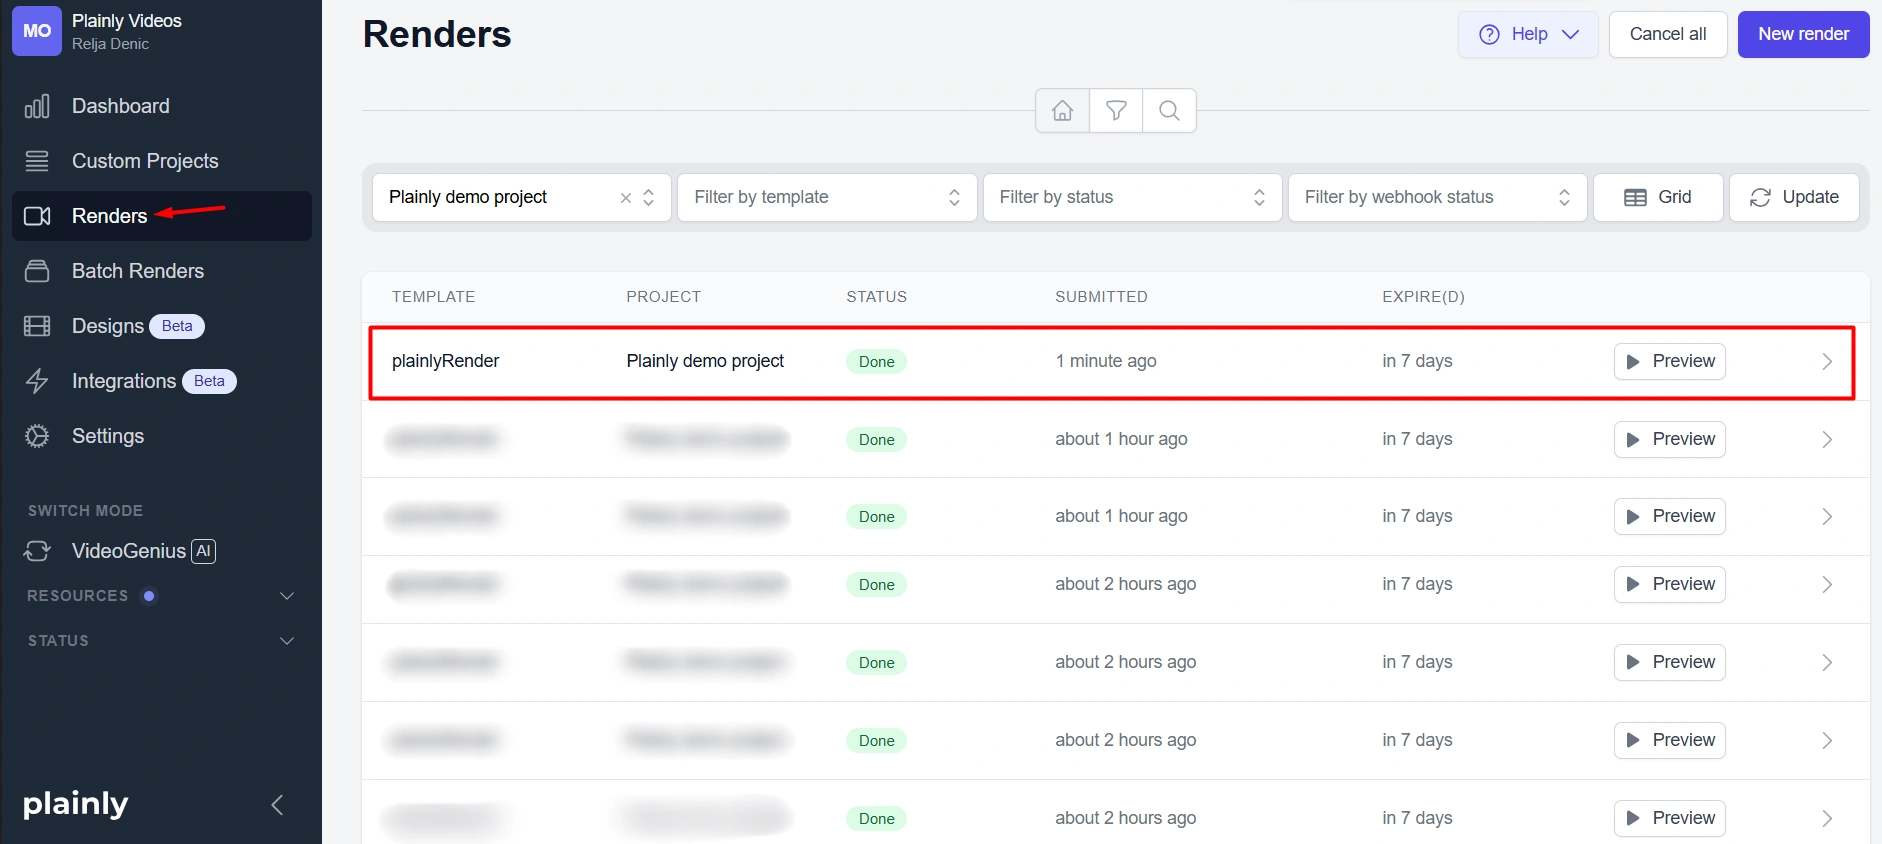
Feel free to click on it to examine the details and preview the sample video.
Step 7: Activate your Zap to automate video creation with Zapier
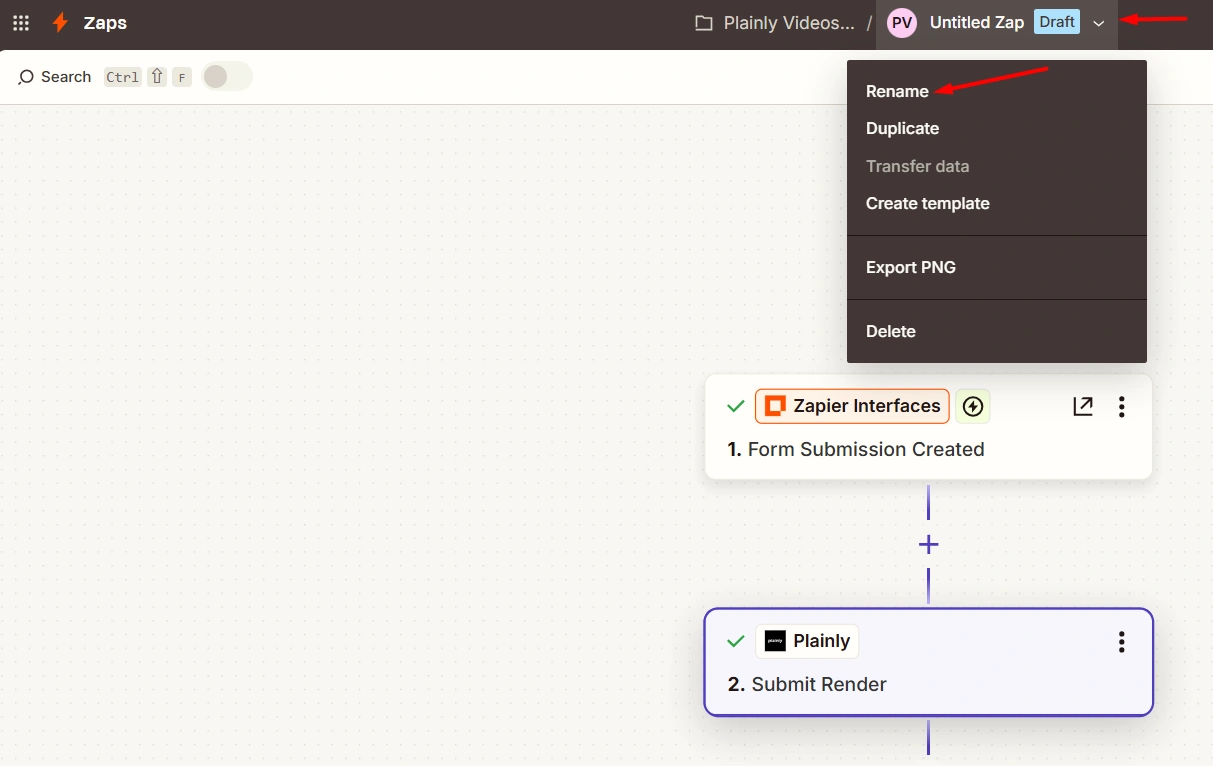
If the test is successful and the render shows up in Plainly, go ahead and name your Zap so it’s easier to manage in the future.
You can do this the same way you renamed the interface form - just click on the Zap’s name in the navigation bar, hit rename, and type in a new one.
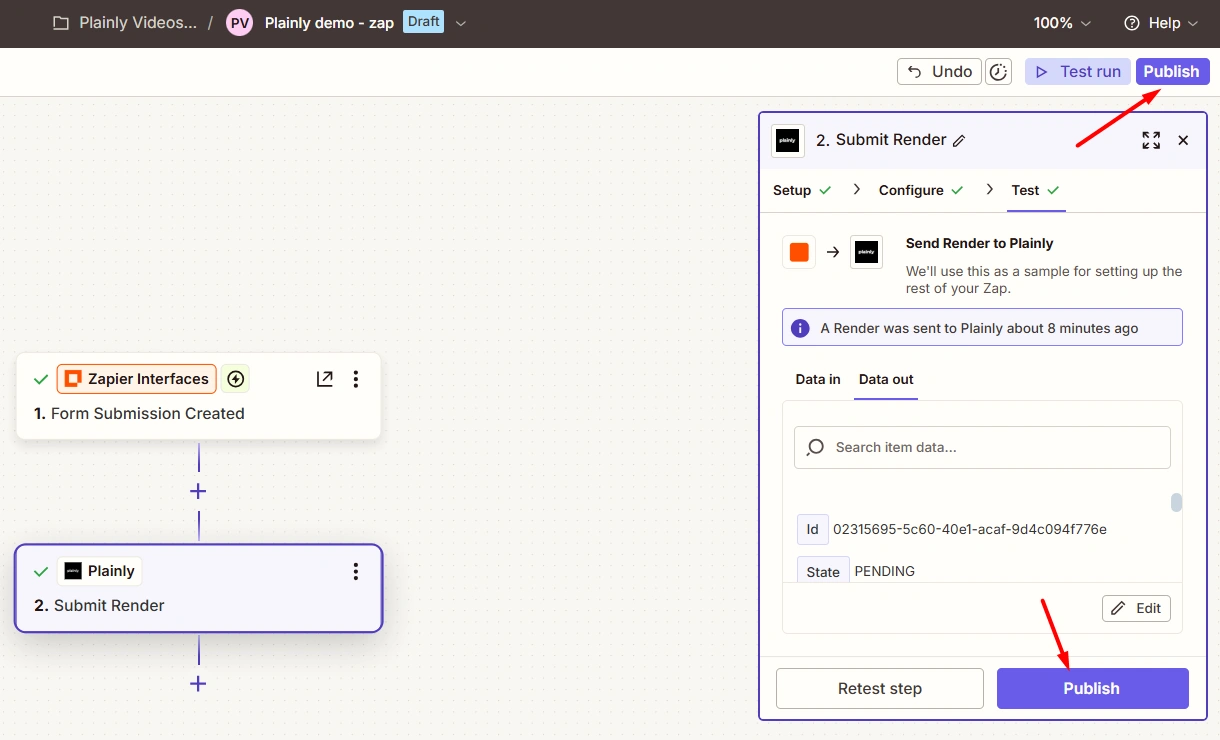
Now, all that’s left is to publish your Zap. You can do this by clicking the Publish button in the top-right corner or in the Submit Render step.
And that’s it! Your no-code video generation workflow is officially up and running!
From this point forward, every new record submitted through your form will automatically trigger a new video render in Plainly.
No-code video automation workflow made simple
It’s not so hard to automate video creation with Zapier, is it? :)
However, what we showed you here is just one example of how you can connect Zapier and Plainly. You can take the same setup and expand it however you like, according to your use case - plug in Airtable to manage your inputs, Typeform to collect requests, Slack to notify your team members of new form submissions, Google Drive to store your renders, etc. You decide how far the automation goes.
Of course, if you’d rather skip Zapier altogether, Plainly also comes with native integrations for popular apps like Dropbox, Frame.io, and Google Drive, among others. That means you can still automate the creation of your videos without building an entire workflow from scratch.
And if you’re ready to start scaling your video content creation process, all while cutting the production time, give Plainly a spin. You can start a free trial or book a quick demo, and we’ll help you get your first workflow running in no time.


.webp)