A simple guide to using FFmpeg to convert images to video

Have a bunch of images you’d like to tie together and create a video? Maybe you want to add simple text or audio??
FFmpeg is one of the ways you can convert images into an mp4 file. Developers simply love it. I will show you exactly how to do it, but I will also show you the alternative way using Plainly. Plainly is great if you want to set up video automation quickly and want something that’s more user-friendly with an incomparably smaller learning curve.
This tutorial will show you how to create a video slideshow with on-screen text and audio just from a few simple images. Let’s dive right in.
How to convert images using FFmpeg to create a simple slideshow
FFmpeg aims to be the best technical solution for developers who want to use this command line tool to convert multimedia files between formats. In other words, it’s a very fast video and audio converter that you can use to create a simple slideshow out of your still images.
If you have a sequence of images you want to turn into a slideshow, you need to specify those input images and output files.
If you haven’t downloaded FFmpeg by now, you should do it here. I highly recommend you choose packages and executable files that are already complied with and ready to go depending on your OS (Linux, Windows, or iOS).
After you’ve downloaded the FFmpeg, the next step would be to render the video (i.e. create a slideshow) based on your input. As i mentioned above, this is the command that you need to execute:
ffmpeg -framerate 1/2 -i image%03d.jpg -filter_complex "scale=1920:1080:force_original_aspect_ratio=decrease,pad=1920:1080:(ow-iw)/2:(oh-ih)/2" -pix_fmt yuv420p -r 30 outputvideo.mp4
Once you press “Enter”, it will trigger FFmpeg’s script and the slideshow video will appear.
Let’s just take a moment to clarify a few things from the command above. In this scenario, all of your images are in the same folder, in a sequence with proper naming. Here are other elements that I thought could use some clarification:
-framerate 1/2
the duration of one image, in this case it’s 2 seconds. Make sure to put this bit before your -input.
-i image%03d.jpg
the input that you’ll be using. %03d.jpg this part points to how you numbered your images, and what image file format you’ll be using.
-filter_complex scale=1920:1080:force_original_aspect_ratio=decrease,pad=1920:1080:(ow-iw)/2:(oh-ih)/2
during testing i had issues because the width of my images wasn’t divisible by 2 and i was using yuv 420p pixel format. To ensure that i don’t get this error, i added this command which will scale the images to 1920px by 1080px while keeping the aspect ratio. It will also add black boxes on the sides in the case of vertical images.
-pix_fmt yuv 420p
refers to your selected pixel format (this one is recommended because it increases the compatibility with most of the video players)
-r 30
the frame rate of your output video. In our case, this means 30 frames per second.
Since we’re using %03d.jpg make sure that your images are named properly and that they are in the correct file format. In our case they have to be named image001.jpg / image002.jpg / image003.jpg etc..
They have to be in the jpg format, and numbered with three digits (001, 002). If you change the format in the command to .png they can be .png format, and if you only have a handful of images (and a short slideshow) you can use %02d.png, to signify that your images are numbered image01.png / image02.png / image03.png...etc.
Pro tip: To make creating videos from images using FFmpeg easier, create a separate folder with all the images that you want to include in the video and have a clear naming system. For example, if you’re creating a slideshow video about teddy bears, you should name your images TeddyBear001, TeddyBear002, TeddyBear003, etc.
Issues that might pop up while trying to convert images to video using FFmpeg
Being open source, FFmpeg is under continuous development. This means that you may encounter problems as you try to try to convert images to video using FFmpeg. Luckily, you can always check FFmpeg’s Bug Report to see if there are any issues that are being worked on at the moment.
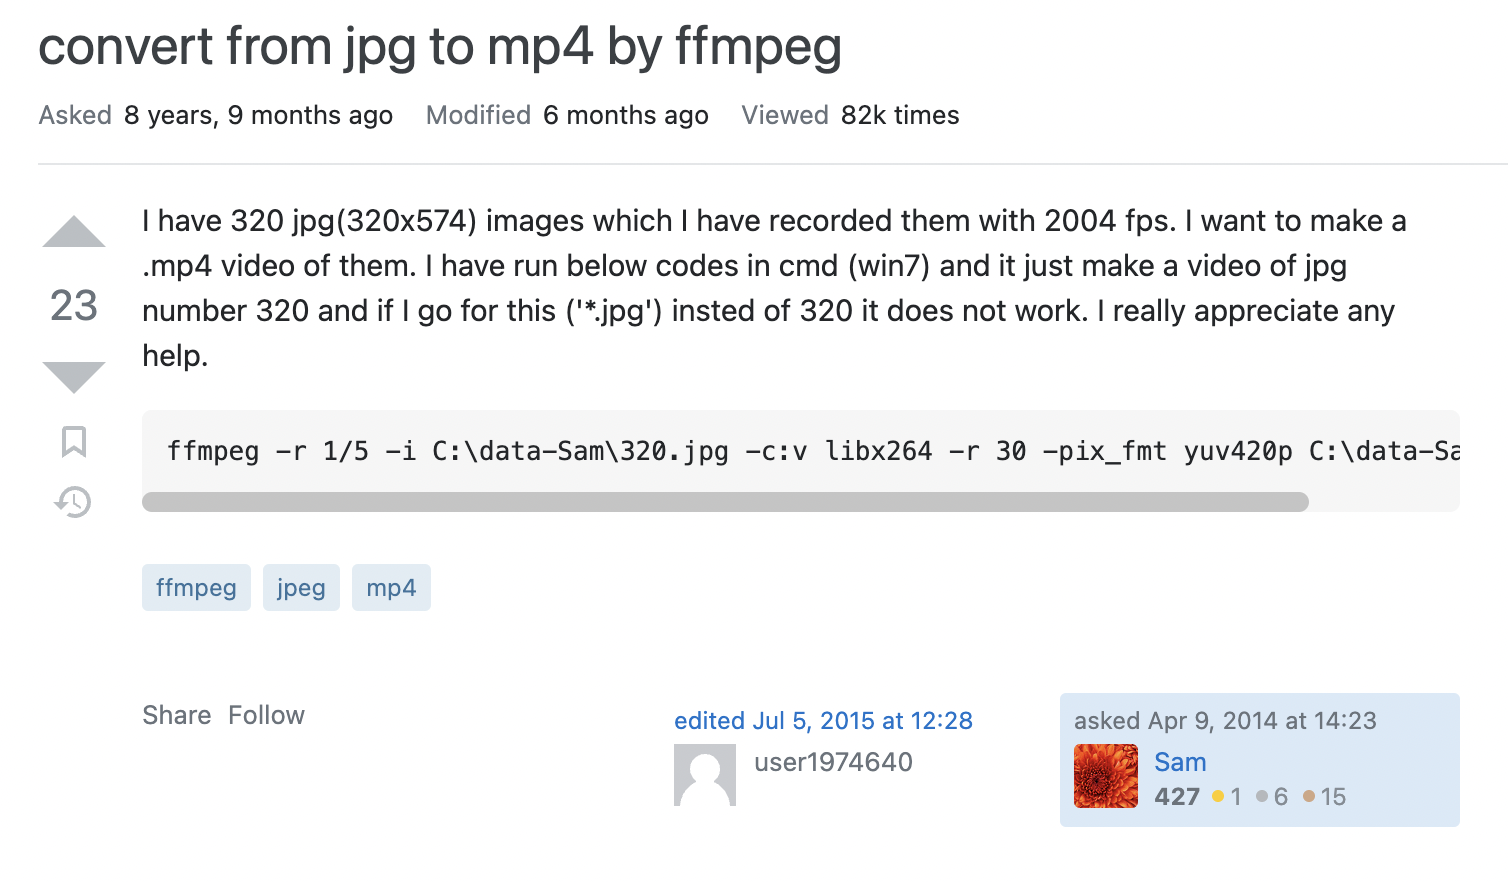
Here’s an example from Superuser of an issue that an FFmpeg user encountered:

As you can see if you read through the entire thread linked above, the issue occurred simply because the user named the file ffmpeg so that he can easily identify where it is, which caused the error. The workaround would be to execute the command from a different folder, but it was obviously easier just to rename the file.

Above you can see another example from Stackoverflow. Needless to say, it’s very important to name your images properly in order for the command to work.
To sum it up, what are the lessons here?
- Make sure to double-check if your path is correctly formatted and your name files follow the right nomenclature
- Check the official FFmpeg’s Bug Reports or submit your own to the bug tracker
- Make sure that you get the order of the commands right
- Put all image files in the same folder
- FFmpeg has comprehensive documentation and a list of commands you can use, but bear in mind that a simple lack of space or the wrong symbol (e.g. em dash instead of a regular dash) you type may cause an error.
Another common issue relates to playback to Quicktime and other codecs. If you scroll back up, you’ll see that I used -pix_fmt yuv 420p as the recommended format and I did so not without a reason. If you choose certain pixel formats such as 4:4:4 Planar and 4:2:2 Planar, it’s likely that your video won't work in some video players.
Adding audio while converting images to video with FFmpeg
Want to add an audio track to your video? Let’s use the first example I provided when talking about how to create a slideshow using FFmpeg. With a bit of modification of the original command, you can also add audio:
ffmpeg -framerate 1/2 -i image%03d.jpg -i audio.mp3 -filter_complex "scale=1920:1080:force_original_aspect_ratio=decrease,pad=1920:1080:(ow-iw)/2:(oh-ih)/2" -pix_fmt yuv420p -r 30 -t 00:00:22 outputvideo.mp4
-i audio.mp3
the name of your audio file
-t 00:00:22
this command will define how long is the output file. When i was testing, by default FFmpeg made my output file’s duration the same as my audio file. Some of the documentation said that you should be using -shortest, but that also gave me poor results (it cut the video in half). By adding -t and then HH:MM:SS you will be hardcoding the duration of the output video, but it’s always going to work. Just multiply the number of images you have by the duration of each image and add that to the command.
Again, just make sure to have all your files in the right places so that the command can be properly executed.
Did you know? I’ve already written about FFmpeg a while ago. Check out this guide on how to trim video using FFmpeg, it includes a video tutorial as well!
Adding text while converting images to video with FFmpeg
If you’ve been following by now you probably have a slideshow made out of a sequence of images, and background audio. But what about text? We can all agree that a slideshow without some text to accompany it is pretty boring.
I wanted to add multiple text lines at multiple points in the video and i realized that the easiest way to do that is to add hard coded captions. This means that it will burn text into video and it will appear the same way as if you used drawtext filter.
Since we’re already using the scale filter in order to make our images fit the video, we’ll need to stitch together a couple of video filters. The command that i ended up using is:
ffmpeg -framerate 1/2 -i image%03d.jpg -i audio.mp3 -filter_complex "scale=1920:1080:force_original_aspect_ratio=decrease,pad=1920:1080:(ow-iw)/2:(oh-ih)/2 , subtitles=text.srt:force_style='Alignment=10,OutlineColour=&H100000000,BorderStyle=3,Outline=1,Shadow=0,Fontsize=18" -pix_fmt yuv420p -r 30 -t 00:00:22 outputvideo.mp4
You’ll see that we bundled up the video filters under the -filter_complex command. Here’s what i added in order to get the on screen text.
subtitles=text.srt:force_style='Alignment=10,OutlineColor=&H100000000,BorderStyle=3,Outline=1, Shadow=0,Fontsize=18'
This is basically a command for adding hard coded captions with a bit of styling. You can style the captions to your liking. You’ll have to create your own SRT file but this is the fastest and easiest way to add text to your slideshow.
In the end, this is what we end up with. Pretty impressive results from just a few images and one line of code. You can also add transitions, but that’s something we’ll cover in another tutorial. Stay tuned for that.
There’s an easier way to automate video – with Plainly
I hope this simple guide to using FFmpeg to convert images to videos was useful to you. Of course, it only scratches the surface of what one tech-savvy person or a developer can do using FFmpeg, but I think it still offers a nice overview and actionable tips on how to use this command tool.
If FFmpeg feels too complex for you, it probably is. In all fairness, once you get in the hang of it, it can even be fun to play with commands and see what the output will look like. It can also get frustrating getting error messages without being able to spot what you did wrong.
Luckily, there is a better and much simpler way to convert images to video without you needing to write a single line of code. I created Plainly specifically because I wanted to automate video creation and make it accessible to anyone - regardless of their technical knowledge or background. Also, I’m a big believer in the no-code movement.
Plainly allows you to create 1000s of unique videos on autopilot, and yes - this includes converting images into videos. Let me show you how it works, it will only take 15 minutes of your time: book a demo with me and start rendering videos on autopilot.


